
In large construction projects, precise procurement planning is essential. Construction procurement planning means organizing material orders so they arrive just in time for each project milestone. If a steel beam is needed on site for a framing milestone, procurement must work backwards from that installation date, accounting for fabrication, shipping, and receiving. Today’s multi-team projects require clear visibility into inventory and schedules: planners, procurement staff, warehouse teams and field crews all need to know what materials exist, where they are stored, and when they will be available.
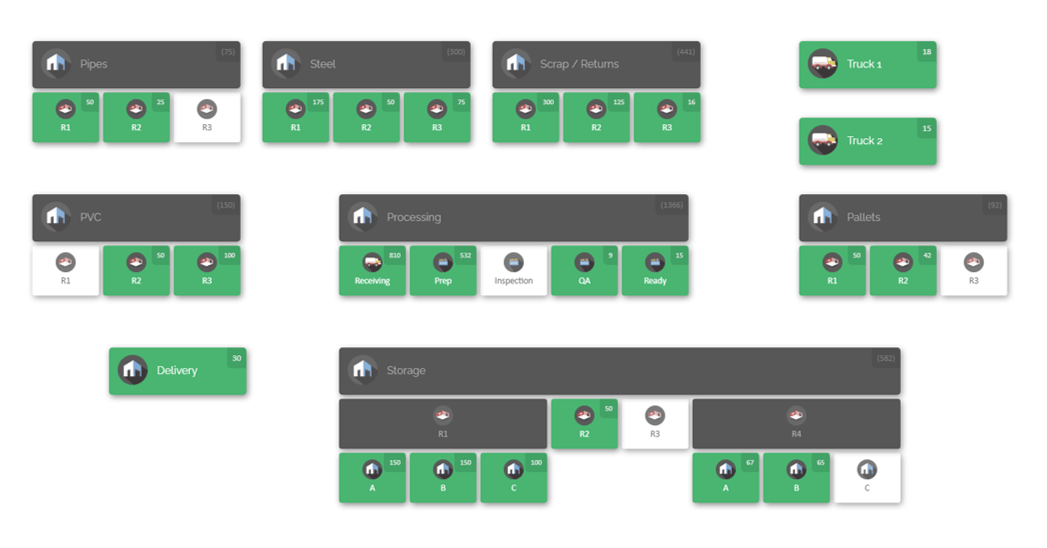
A visual inventory map or dashboard – as shown above – helps everyone share the same data. It links physical warehouse locations (racks, laydown yards, containers, jobsite stores) to inventory records, so that “What do we have?” and “Where is it?” are answered in the context of the project timeline. In this way, procurement becomes part of project controls rather than an isolated purchasing task. By the end of this article, inventory managers and project teams will understand how to synchronize orders with construction milestones, improve cross-department inventory visibility, and use smart mapping tools (like CyberStockroom) to keep everything on track.
Aligning Procurement Planning with the Project Schedule
Effective construction procurement planning treats every material order as an integral part of the project schedule. Instead of issuing a purchase order ad hoc, procurement professionals work backward from the required onsite date. For example, if a foundation crane must be installed by March 15, the team determines the lead times for delivery, fabrication, permits, and transportation, and calculates the latest order date that still meets that milestone. This ensures the material arrives before construction activity needs it – not after.
A useful way to view this process is as a procurement schedule that runs alongside the overall project timeline. In practice, a procurement schedule answers: “Will this shipment be on site before work needs it?” rather than merely “Is the order in progress?”
Key steps to align procurement with milestones include:
- Identify the need date from the WBS: Determine exactly when each material or equipment item must be on site. This comes from the Work Breakdown Structure (WBS) or project schedule. For instance, a WBS task might call for installing electrical panels on April 10; that is the target date for the associated materials to be at the site.
- Quantify requirements from the BoQ: Link that WBS task to its scope of work. The Bill of Quantities (BoQ) or material takeoff tells what and how much is needed (e.g. 20 lengths of conduit, 5 panels, 100 conduit connectors).
- Calculate backward to find the trigger date: Based on supplier lead times, manufacturing and approval processes, shipping transit, and customs if applicable, work backward to the last possible order date. For long-lead or custom items (e.g. structural steel, specialized MEP equipment), this chain can stretch months. Every step – like design approval, RFQ turnaround, vendor evaluation, purchase order issuance, and logistics – consumes time. A simple example: Required onsite date ← shipping ← manufacturing ← engineering approval ← purchase order.
- Check existing stock first: Before ordering, verify if the needed material already exists in inventory. It may be in a central warehouse, another site, or even on a supplier framework. This can save time and money.
- Raise and approve the requisition: Once the actual need is confirmed, create a formal material request or purchase requisition in your procurement system. Ensure it is tied to the specific WBS activity or cost code that triggered it.
- Source and evaluate suppliers: Issue requests for quotation (RFQs) to vendors. Compare technical specs, prices, and confirmed delivery dates. Choose the option that meets quality and schedule requirements.
- Commit and monitor: Issue the purchase order or subcontract, record the commitment, and then track each order’s progress against its intended delivery. Key dates to watch include expected shipment, arrival forecasts, and actual receipt. Update the schedule: if a promised delivery slips beyond the need date, trigger mitigation (e.g. air freight, alternate vendor).
- Receive, inspect and consume: When materials arrive, immediately update inventory records and notify the relevant team. Record a Goods Received Note (GRN) and log where the items are stored. This completes the loop from planning to execution. Proper labeling and location tracking at this stage ensure the next step – installation at the milestone – happens without delay.
By linking the BoQ, WBS, and cost codes, organizations create a complete context for procurement. The BoQ tells “what”, the WBS tells “when”, and cost codes tell “where in the budget.” Keeping these aligned means procurement planning isn’t done in isolation. Instead, every purchase is tied to a defined project activity and timeline. When the procurement and project schedules are connected, teams shift from reacting to delays toward preventing them. For example, if an order falls behind schedule, the project team can see it well before the milestone and adjust plans accordingly. This schedule-driven approach to procurement minimizes last-minute expediting and costly downtime on site.
Improving Inventory Visibility Across Departments

One of the biggest obstacles to seamless procurement is poor inventory visibility when multiple departments are involved. In construction and industrial projects, materials often flow between manufacturing, warehouses, maintenance, and job sites. Each team might use different terminology or systems. Without a unified view, one group might think parts are available while another cannot find them. Inventory may exist in total, but operationally those parts could be scattered: some on pallets in Warehouse A, some in a maintenance crate, some already allocated to a project job site or held for inspection.
To solve this, inventory visibility must go beyond a mere count of part numbers. The goal is a single source of truth that answers not just “how many do we have?” but also: “Where exactly are they, who owns them, and can we use them now?” For example, a central count might show 24 bearings in stock, but are they all accessible? Perhaps 8 are in the main store, 6 beside a production line, 4 in a maintenance cabinet, and 6 already issued on requisitions. Teams need to know each part’s status.
Best practices for multi-department inventory visibility include:
- Establish a common location hierarchy. Define a standard location structure that all teams use. This might include multiple warehouses, receiving areas, aisles, racks, shelves, bins, laydown yard zones, departmental stores, etc. A clear structure (e.g. Warehouse A → Aisle 1 → Rack 2 → Shelf 3 → Bin B5) becomes the address for every item.
- Use consistent item identification. Agree on part numbering or barcoding conventions so every department calls the same item by the same code. Duplicate or overlapping identifiers create confusion; a single unified catalog with descriptions prevents errors.
- Enforce standard workflows. Every material movement should be recorded. When stock is received, transfer-logged, issued, returned or counted, capture it in the system. Standardize how and when teams record inventory events. For instance, require that whenever inventory moves from receiving to storage, or from central store to a jobsite, the transfer is logged – no informal handoffs. This makes the digital record match reality.
- Define ownership and accountability. Make it clear who “owns” a batch of parts. Is it reserved for a specific project? Maintenance’s spares? A general stock? Ownership might be indicated by status flags (e.g. “Allocated to Project X” or “Quarantine”). Knowing who is responsible prevents two groups from pulling the same items unknowingly.
- Perform regular cycle counts and audits. Frequent counts of different segments of inventory (rather than one big annual count) help spot discrepancies early. Cross-functional counts (e.g. warehouse staff counting items in a maintenance locker) also foster shared accountability.
- Share real-time dashboards. Wherever possible, use live reports or dashboards. A central screen or web portal that shows current stock levels by location lets any team check availability without interrupting warehouse staff.
These practices create operational alignment. When all departments trust the same inventory data, cross-team coordination improves. For example, the maintenance team won’t hunt for a spare part that procurement already issued to the production department because the system clearly shows each part’s assigned purpose. Conversely, procurement will see if a part labeled “maintenance spares” can’t be used on a project without approval.
The ultimate goal is that the easiest way to handle a part is the correct way. When receiving stock into a site, the team immediately updates the record and places it at a designated mapped location. When a project team needs a part, they retrieve it and the inventory system is updated. Over time, everyone adapts to following the shared process, knowing that it keeps projects on schedule. Inventory ceases to be hidden in departmental silos or forgotten in obscure spots.
Mapping and Tracking Inventory Locations

A powerful technique to support the above practices is visual inventory mapping. By creating a digital map of all storage areas, teams connect abstract location codes to real-world space. Consider a large construction laydown yard with piles of steel beams, pallets of piping, and scattered tools. Without an organized map, workers might refer to materials as being “somewhere near the north fence” or “in maintenance.” But a well-designed yard map ties every area to a specific name and coordinates: e.g. “North Yard, Zone B, Aisle 3, Bay 2.” Similarly, indoor warehouses can be mapped as aisles and racks.
A site-wide inventory map usually consists of four layers:
- The physical layer is the drawing of the actual site environment. It includes buildings, yards, containers, access roads, and general storage zones. This might be a simple floor plan or a more detailed layout, but it must be recognizable to the people on site.
- The location layer overlays defined storage addresses onto that map. It turns vague space into distinct addresses. For instance, what used to be “Laydown Zone” becomes divided into “North Yard – Rack A, Bay 1,” “North Yard – Rack A, Bay 2,” and so on. Defining these addresses means everyone can consistently reference the same spot.
- The inventory layer ties specific items and quantities to those addresses. This is where the inventory system knows that 50 pre-cast blocks are at “North Yard, Bay 1” while 30 blocks are at “North Yard, Bay 2,” and that 10 crates of fasteners are in the maintenance stockroom.
- The operating layer covers the rules and procedures for moving inventory between locations. It defines how goods are received at an address, how they are picked or transferred, and how counts are done.
By combining these layers, the map becomes more than a drawing – it becomes an operational tool. For example, with a mapped warehouse, a worker needing an item can look at the map and say, “Rack 4, Shelf 2” instead of deciphering a code like “WH1-A04-R03-S02.” A new employee or visiting subcontractor instantly sees where a part is, because they can follow the visual map rather than memorizing cryptic labels.
Best practices in mapping include:
Lay out zones by material flow: Group storage areas by what they contain and how the site operates. For a construction yard, this might mean separate zones for structural steel, MEP equipment, electrical supplies, etc. Within a manufacturing plant, there may be separate maps for raw materials, production stock (kitting areas), finished goods, and maintenance spares. Align the map with how material flows through the project.
Involve the users in mapping: Before finalizing the map, walk through the site with all stakeholders (warehouse, procurement, project engineers, maintenance) and mark the major areas. This “mapping workshop” ensures the map matches reality and uses familiar reference points.
Link parts to storage points on the map: When items are received, the inventory system should allow assigning them to a map location immediately (e.g. “received at Aisle 2, Shelf 5”). For example, when structural steel is delivered, the supervisor indicates it belongs in “North Yard – Steel Zone – Rack 3.” The map then reflects the updated stock and the location label.
Use the map for cycle counting and audits: Counting by map zones can be more efficient. Instead of wandering through the whole site, teams can count all items in one bay, mark it as done on the map, and move to the next. This ensures no area is skipped.
Enable easy transfers between map locations: With a digital map, a user can simply choose the “from” and “to” locations when moving parts. For instance, moving cables from “Main Warehouse – Shelf 4” to “Site Container – Bay X” can be done by selecting those spots on the map interface.
Using a mapped layout significantly reduces search time and misplacement. If a part isn’t found where it should be, the team can quickly see adjacent locations or receiving areas on the map. It also surfaces inefficiencies: for example, if one shelf is overfilled while another is empty, the map highlights that imbalance. In large operations, it is common for someone to hide extra stock at a convenient spot “just in case.” A map and location discipline discourages that: if the map shows ample quantity on one bay, there’s no need for someone to stash hidden reserves elsewhere.
Best Practices for Inventory Accuracy and Control

Accurate inventory records are the foundation of effective procurement. Even the best planning fails if the data is wrong. Construction projects should adopt these best practices to keep inventory records reliable:
- Real-time transaction recording: Update the inventory system immediately when parts are received, used, transferred, or returned. For example, if a foreman takes bolts for assembly, the usage should be logged via handheld scanner or input device right then. Batching updates at week’s end creates “ghost stock” where records lag. Modern systems support quick entry at receiving docks or workstations to keep the database current.
- Perform regular cycle counts: Instead of annual shutdown counts, do frequent small counts in different areas. A 5–10% daily or weekly cycle count catches errors early. This could be as simple as one aisle per day, or a departmental quick count every month. Any discrepancies should be investigated and corrected immediately.
- Set reorder thresholds: Define minimum stock levels for critical items based on usage rates and lead times. The system should flag low-stock items early. For example, if sand for concrete is used at 50 tons per month and lead time is two weeks, set the reorder point accordingly.
- Link project takeoffs to current stock: When planning a new task, compare the material takeoff quantities against actual on-hand inventory. If the BoQ calls for 200 bags of cement and only 150 are available on site, that gap must be addressed before confirming a work start date. Integrating takeoff data with inventory (even via a simple report) prevents crews arriving without needed materials.
- Separate project-specific from general stock: Use location or status codes to distinguish stock reserved for a particular contract from general inventory. For example, label some items as “Project 123 – allocated” and others as “Central stock”. This prevents one project from inadvertently using another project’s materials. If a transfer is needed, treat it as a formal stock movement, not a free giveaway.
- Track returns and leftovers: When a task is canceled or parts are unused, return them to inventory promptly. Record returned items with a new location. For instance, if extra electrical conduit was pulled but not installed, log it back to “Electrical Maintenance Cupboard” instead of leaving it on the floor or discarding it. Reusing leftovers reduces waste and duplicate purchases.
- Identify and eliminate obsolete stock: Periodically review inventory to flag items that have sat unused beyond their demand horizon. Long-storage may indicate over-ordering or a design change. Consider writing off or recycling truly obsolete materials to avoid cluttering the system. Mapping can help here too: cobwebs on a shelf in the far corner might be a clue that something is stale.
- Implement approval workflows tied to projects: Control spending by setting up approval levels. For example, any material request over a certain value must be approved by a project manager. This ensures every requisition ties back to the project budget and scope. It also makes the approval process transparent to all stakeholders.
- Audit for “ghost stock”: Run a quarterly audit for inventory that is recorded in the system but cannot be found physically. Such discrepancies often indicate unlogged transfers, shrinkage, or theft. A brief count comparing system and physical stock in high-value or fast-moving items can reveal issues before they escalate.
By following these practices, inventory accuracy becomes a systematic habit rather than an afterthought. Each check (counts, returns, threshold alerts) closes a loop in the process. The more disciplined the workflow, the more confident teams are in the numbers, and the less they resort to risky workarounds (like ordering duplicate parts “just to be safe”).
Cross-Team Communication and Shared Metrics
Inventory improvements also depend on communication between departments. Some key points for alignment:
- Regular coordination meetings: Incorporate inventory review into weekly project meetings. Discuss upcoming material needs (e.g. from lookahead schedules) alongside current stock levels. If the procurement team knows that a milestone is shifting by two weeks, they can adjust orders. If warehouse staff sees a big drawdown on a part, they can expedite or reallocate stock for that work package.
- Shared dashboards and reports: Provide relevant, tailored views for each team. Executives might want a high-level metric (fill rate, days of stock on hand), while site managers look at immediate inventory status for their zones. A visual inventory map on a common screen (in an office or break room) keeps everyone informed at a glance. When data is siloed, teams work with incomplete pictures; a central interface ensures everyone “speaks the same language.”
- Defined roles and responsibilities: Even if every team participates in inventory, assign clear ownership for each function. Who approves transfers? Who decides reorder levels? For example, a project’s site engineer might own the decision to tap into a stockpile for that project, while the warehouse manager owns the overall inventory count. Establishing these roles prevents confusion over who should act when a shortage emerges.
- Use of Key Performance Indicators (KPIs): Track metrics like inventory accuracy percentage, stockout frequency, order lead times, and turnover rate. Review these KPIs across departments so teams can see the impact of good (or poor) inventory control. For instance, if inventory inaccuracy is high, the project team might decide to allocate more time for counting before major milestones.
When the entire organization treats inventory visibility as a collective responsibility, miscommunication drops sharply. Each team sees how their actions (good or bad) affect others. For example, if procurement routinely orders without checking existing stock, production will soon find redundant supplies. On the other hand, if production knows it has extra components, it can release them for use on another job instead of letting them sit idle. Transparent communication eliminates these duplicate efforts.
CyberStockroom: Bridging Inventory and Project Needs
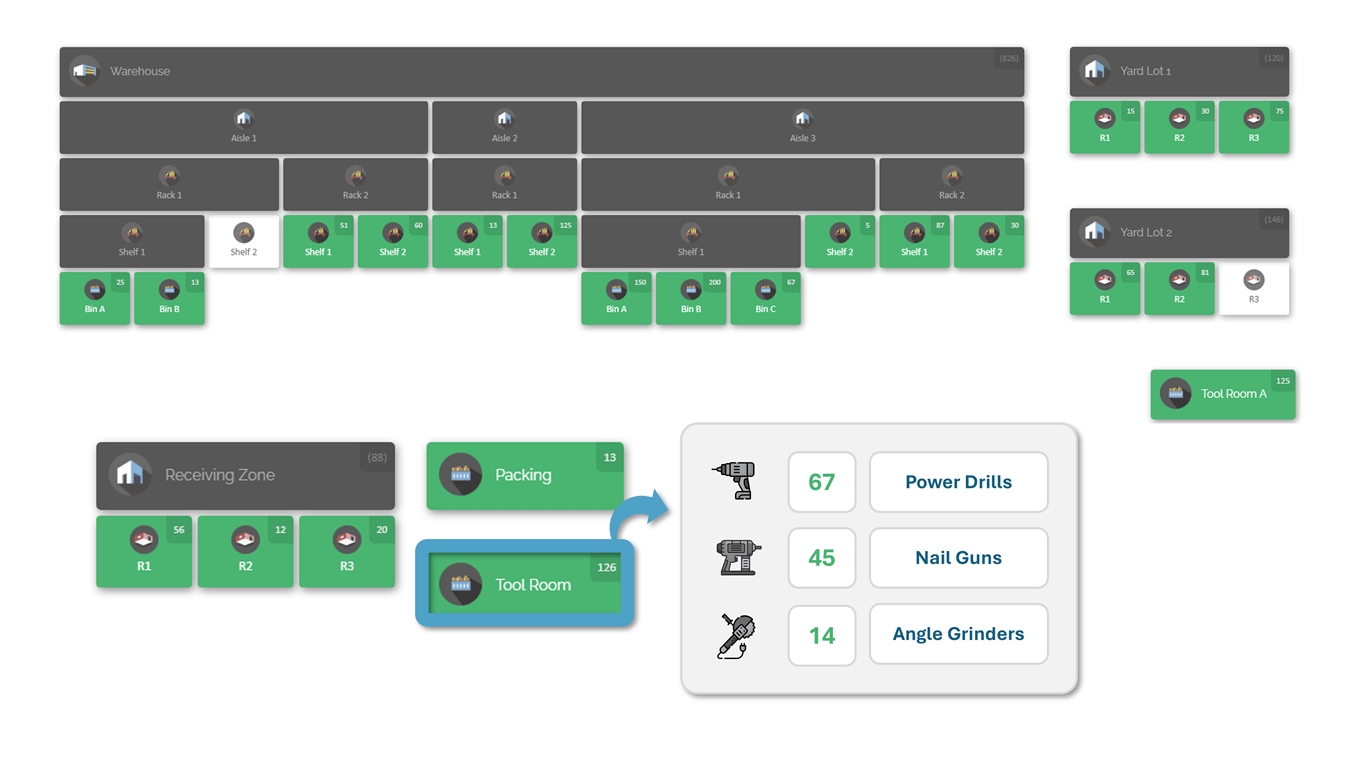
Modern inventory mapping software can put all of these ideas into practice. CyberStockroom, for example, is designed to unite inventory data with physical layout and project context. In one integrated view, it helps teams across procurement, warehouse, maintenance, and project management to see the full picture of parts and where they live. This is not a separate database – it is the working record that every department uses.
With CyberStockroom, each storage location (entire warehouses down to racks and bins) is defined within the system. Parts are slotted into those defined locations, matching the physical setup. This achieves exactly what our earlier best practices recommend: a clear location hierarchy and item assignment. Teams never have to guess where something might be. They can filter by warehouse, zone, shelf, or department and see live quantities.
Key features that support multi-department visibility include:
- Visual inventory map. The system can display the site or warehouse map on screen. Staff can click on a building or yard on the map, zoom into an aisle or rack, and see the parts stored there. This makes it easier for a user to find where a needed item is, or to know where to put a newly arrived shipment. Instead of sorting through lists of location codes, users navigate a map that resembles the actual facility.

- Multi-location and multi-warehouse support. If your operation spans construction sites, central shops, and off-site stores, CyberStockroom can manage them all in one database. Users can quickly switch context between locations but still report inventory across the organization. For example, a project manager might search for an item and immediately see “10 units at Main Warehouse, 5 units at Site A, 3 in Maintenance Store, and 0 in Site B,” all in one view.
- Real-time quantities and status. Since every transaction is logged, the system shows current on-hand and allocated stock. It also tracks statuses like “inspected,” “on hold,” or “backordered.” When a user checks an item, they see not only quantity but whether part of it is reserved or awaiting inspection. This removes uncertainty about availability.
- Drag-and-drop transfers. Moving stock from one location to another is simplified. For instance, if maintenance releases some spare parts back to central inventory, the user can select those items in CyberStockroom and choose the destination location on the map. The transfer is then recorded instantly, updating both the old and new locations. This workflow keeps everyone aligned; the next person who checks the item sees it in its new spot.
- Distribution views and reporting. CyberStockroom can generate distribution reports showing where all units of a part reside. If a procurement planner needs to know how 100 bolts are split among projects and stores, they can see that through the visual map. This is helpful for identifying surplus in one area to cover a shortage elsewhere, without extra purchasing.
- Movement history and audit trail. Every transaction (receipts, issues, adjustments, transfers) is stamped with who did it and when. If a discrepancy arises – say, a count shows missing stock – the history lets managers trace the last changes. This auditability not only helps accountability but also aids continuous improvement.
- Cross-team visibility. Ultimately, all teams see the same underlying data. The platform does not restrict viewing by department (unless intentionally set up that way); rather, it encourages an organization-wide view. This aligns incentives: for example, if project teams know production has stock in a shared warehouse, they may use that instead of delaying work for a new order. When data flows freely, coordination improves.

By mirroring the physical world in software, CyberStockroom helps turn inventory into an asset rather than a blind spot. Warehouse staff can see what projects need next, and project planners can see what’s in stock before locking in schedules. Procurement benefits because it can query the system for existing supply before making a decision. In short, CyberStockroom embodies the practices described above. It provides a practical platform to increase operational efficiency, enforce discipline, and improve inventory accuracy – all of which keep materials flowing according to plan.
Conclusion
Aligning material orders with project milestones is a critical discipline for construction inventory management. It starts with schedule-driven procurement: planning each purchase around the date a material must be ready on site. Combined with robust inventory visibility, this approach prevents costly delays, duplicate orders, and downtime. The biggest gains come when project teams, procurement, and warehouse staff share a single view of inventory – from macro (sites and warehouses) to micro (shelves and bins).
Adopting a visual mapping strategy ensures that all departments communicate with the same location “language.” It also builds trust in the data. When every receipt, issue, and transfer is logged and visible, the entire project runs smoother. Best practices like real-time updates, regular counting, and clear ownership weave together to support this visibility.
In practice, integrated inventory solutions (such as CyberStockroom) put these ideas into action. They embed inventory management into the heart of the project, connecting the physical warehouse to the project plan. As a result, inventory teams gain operational efficiency (faster searches and transfers), inventory accuracy (fewer records errors), and cross-team alignment (everyone sees the same picture).
For inventory managers and project teams, the bottom line is clear: planning procurement with milestones in mind and maintaining rigorous, shared visibility of inventory are key to on-time project delivery. By following the strategies outlined here, construction projects can reduce waste, cut costs, and keep each milestone moving as scheduled.








Leave a Reply