
Material loss on construction sites is an often-hidden drain on resources. When building a project, every missing bolt or stolen power tool can cascade into delays, extra orders, and wasted budget. The truth is that preventing loss begins with visibility. If teams across procurement, storage, and the field all share a clear, real-time picture of what is on hand and where it is, then lost items stand out immediately and redundant purchases vanish. In contrast, hand-written logs, dusty spreadsheets, and “out of sight, out of mind” storage lead to repeated mistakes.
The solution lies in combining solid processes with technology-driven tracking. This blog will outline proven strategies – from improved site security and disciplined receiving procedures to frequent cycle counts and team accountability – that together form an unbroken chain of custody for every part and tool. Alongside these processes, we show how an interactive inventory system ties it all together.
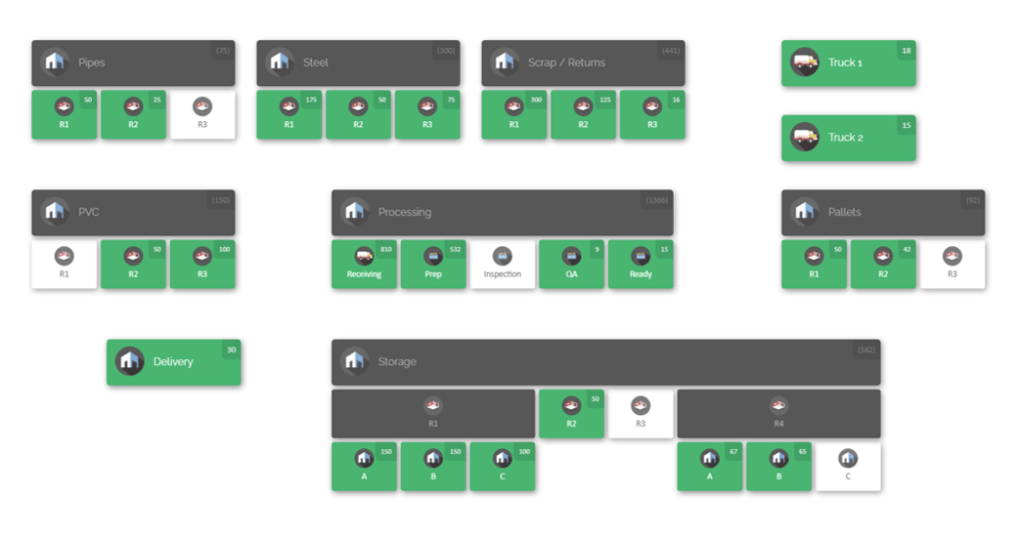
Imagine a visual site map showing all storage locations, trailers, and shelves, each tagged with exactly the stock inside. As each delivery arrives or tool is checked out, this map updates live. Everyone on the project can check the map at any time to see, for example, that “Site A storage has 50 steel studs and 20 safety harnesses,” or to trace that “Crane 2’s fuel tanks are located in the main yard.” This level of visibility prevents losses by turning ‘guesswork’ into data-driven decisions.
Common Causes of Material Loss on Site
Understanding why materials go missing is the first step to stopping it. In construction projects, several patterns tend to cause shrinkage or waste:
- Theft and Diversion: Construction sites, especially large or unsecured ones, are targets for theft. Valuable items like power tools or heavy equipment may be stolen by outsiders after hours or even by personnel. When inventory tracking is lax, a missing drill bit may not be noticed until someone buys a replacement. Theft not only wastes money but can prompt teams to over-order items “just in case,” tying up budget.
- Misplacement and Disorganization: Jobsites are dynamic. Tools and parts move from trailer to scaffold to warehouse and back. If every item isn’t returned to its designated location, it’s easily lost. For example, a crew might leave a safety harness on a scaffold for one job and forget it, forcing another crew to replace it. Small consumables (screws, welding rods, etc.) often get scattered or buried in cases, making them effectively unusable until found.
- Poor Record-Keeping: When records are manual or outdated, they fail to reflect reality. A site manager might think 100 sheets of plywood are in the yard per the log, only to discover 20 were actually cut or delivered elsewhere. Lack of up-to-date documentation (e.g. hand-written sign-out sheets that aren’t filled consistently) means spending time searching or reordering unnecessarily.
- Excess Stocking and Hoarding: The opposite problem can happen too – a lack of visibility can lead crews to order extra “just in case,” or to hoard items. If one crew stashes a generator in their trailer “just to have it,” another crew might go out and rent a new one, causing duplication. Over-ordering ties up cash and can cause materials to sit idle until expiration.
- Material Damage and Waste: Construction parts can be ruined by weather or misuse. Uncovered lumber or drywall exposed to rain may become unsalvageable. Rough handling (dropping beams, spilling cement) can destroy usable stock. When broken items aren’t recorded, it looks like they were stolen or simply lost.
Each of these issues stems from poor visibility and weak controls. If you don’t know who is responsible for an item or where it should be, it’s vulnerable. The following sections provide targeted best practices to eliminate these causes one by one.
Best Practices for Reducing Material Loss

Reducing loss on a site requires a multi-faceted approach. No single measure will solve everything, but a layered system of procedures and monitoring will cover the gaps. Below are the core practices every construction inventory team should implement, organised by function:
Rigorous Receiving and Dispatch Procedures
- Documentation on Delivery: Every incoming shipment of materials or tools must be checked in against the purchase order (PO) or delivery note upon arrival. A designated receiver (e.g. storekeeper or foreman) should verify quantities and item types, checking off each item on a goods-received slip. Any discrepancies (damages or missing pieces) should be noted immediately.
- Supervisor Sign-Off: Require a site supervisor or responsible party to sign the delivery. This creates an accountability trail from the outset. If a shipment is incomplete or incorrect, having a signature on record ensures follow-up.
- Immediate System Update: As soon as delivery is accepted, enter the items into the inventory system (digital or spreadsheet) with date/time. If using a visual system, scan the barcode or tag of each item to update the count. For example, if 100 concrete blocks arrive, one person scans the pallet tag to add +100 to the “Main Yard” stock.
- Separate Receiving Zone: Designate a clear receiving area away from open storage. This keeps new materials controlled until they’re accounted for and prevents mix-ups with existing stock.
- Controlled Issuing: Similarly, any material leaving inventory (e.g. issued to a crew) should be logged against a work order or issue slip. For example, if 20 rebar rods are taken from the yard for concrete work, record the withdrawal immediately. Linking each release to a project or crew clarifies who used what and why.
- Actionable Checklist for Receiving: Inspect packages; match items to the PO; document quantities; stamp/date the PO; record in system; label items with location.
By enforcing strong receiving and dispatch controls, you prevent errors at the start. Discrepancies are caught up front instead of smuggling into the general stock records. Even on busy sites, a consistent routine (and training personnel to follow it) means fewer loose ends.
Accurate Labeling and Material Tracking
- Unique Identification: Ensure every item or batch has a clear identifier. This could be a label on the box, a tag on equipment, or a pallet number. Use barcodes or QR codes when possible. Each code should correspond to a record in your inventory system, so scanning instantly shows the item’s details.
- Consistent Naming and Categorisation: Maintain standard names, part numbers, and units in your system. Avoid freeform descriptions. For example, “1×4 Pine Board, 8ft, Grade B” should always appear in the system by that exact name. This consistency prevents confusion when workers search or order items.
- Visual Location Marking: Label and mark physical storage locations. A shelf, rack, or bin should have an ID (e.g. “Shelf A3” or “Container B”). This makes it easy to update the system with exactly where things are. If materials move, update the location code too.
- Colour-Coding (Optional but Helpful): Use coloured labels or zone markings on-site to indicate critical information (e.g. red tags for low stock, yellow for reserved items, green for fully stocked). In a digital map system, these colours can translate into visual alerts so managers spot issues at a glance.
- Barcode/QR Code Scanning: Equip staff with a barcode scanner or a device to scan QR codes. Each time an item is checked in or out, a quick scan should log the transaction. For bulk items (like pallets of tiles), consider a two-step process: scan the pallet label, then specify quantity added or removed.
Accurate labeling ties every part to its data in the system. When everyone uses the codes, the risk of mixing up similar items drops dramatically. Work instructions and calls to other teams become clear: rather than “go to the yard and grab some wire,” you say “move 50 metres of 12AWG cable from location L4 to Site 3”, using code L4. This level of detail eliminates guesswork.
Secure and Organized Storage

- Designated Storage Areas: Assign fixed zones for classes of materials (e.g. one area for piping, another for electrical, another for timber). Physically separate them to avoid mix-ups. Use signage so crews know where to find and return items.
- Controlled Access: Restrict entry to high-value storerooms or yards. Keep gates locked after hours, and have one key custodian or access card control. If possible, fence the area or store pallets behind gates. This physical security is a first defence against theft.
- Clean and Orderly Layout: Apply 5S principles (Sort, Set in order, Shine, Standardize, Sustain). Keep shelves and floors clear of debris. Put frequently used items in easy-to-reach spots. Label shelves so nothing sits “just anywhere.” A tidy site not only boosts productivity but makes missing items stand out.
- Protection from Elements: For weather-sensitive materials (cement, plasterboard, electronics), use covered storage or shelters. Damaged materials often get discarded as “loss,” so protection saves replacement costs. Cover stacks with tarps or store them indoors when possible.
- Inventory Rotation (First-In, First-Out): Especially for consumables, use older stock before new stock to avoid expiry or degradation. Mark arrival dates on stored items. This avoids a scenario where old materials sit forgotten at the back of a container.
- Inventory Reconciliation on Storage Units: Regularly verify that what’s on each shelf/machine correlates with the system. For example, label each shelf with its intended contents (a mini “parts list”), and periodically scan that shelf to confirm. Mismatches can then be corrected before problems escalate.
An organised, secure storage regime is crucial. It turns each storage area into a reliable source of truth. Workers should instinctively know where something belongs; if they can’t find it where it should be, that immediately triggers an investigation. In the long run, well-structured storage reduces search time and protects inventory integrity.
Controlled Material Handling
- Handling Protocols: Train staff on proper handling of materials. Fragile or heavy items (glass panels, steel beams) should only be moved with the right equipment. Drops and mishandling are a form of loss. For example, use forklifts or cranes for pallets, and pallet jacks rather than dragging items.
- Check Equipment Condition: Inspect tools and equipment before use and return. A power tool that malfunctions due to misuse should be reported immediately. If a damage is found, log it in the system (e.g. “Chainsaw #12 – blade damaged, out of service”). This prevents broken items from being assumed “lost.”
- Use of Sign-Out Sheets or Tickets: For consumables like adhesives or welding rods, use a bin-and-ticket system. Each time someone takes from the bin, they remove a ticket or sign a log. At shift’s end, reconcile tickets with remaining quantities to spot discrepancies.
- Minimise On-Site Cutting and Waste: Where possible, cut materials (pipes, rebar) to size in a controlled workshop. Cut pieces generate off-cuts which are often too small to reuse, representing waste. Planning cuts carefully or using off-cut bins with sizes marked can salvage these leftovers.
- Spill Prevention: For liquids like fuel, oils, or paints, keep lids on containers and use secondary containment (spill pallets). A spilled drum counts as a loss; prevention avoids both material waste and cleanup costs.
By standardising how materials move and are used on site, you cut down accidental losses. This includes handling every delivery and issue through the correct channels, rather than ad-hoc borrowing or tossing items. When workers follow protocols, managers can trust that every movement is logged, which ties neatly into the tracking systems.
Check-In/Check-Out Systems
- Tool and Equipment Checkout: Implement a formal check-out system for tools and equipment. Before a tool is taken off the rack (or out of the warehouse), the user should sign it out or scan it in the inventory system under their name or crew. When finished, the tool is returned and signed/recorded back in.
- Chain of Custody Records: Tie each item to an individual or team. For example, “Jane Doe – Electricians” checks out a power drill. The system then knows that Jane is responsible until she checks it in again. This accountability greatly deters loss and simplifies locating a missing item.
- Colour or Tag-Based Checklists: For sites without digital scanning, a tagging system still works. Use a board listing tools with columns for “Checked Out – Who” and “Returned – Signature.” Or colour-code tags: green when available, red when checked out. Audit this list daily to catch any missing sign-offs.
- Portable Kits: For crews that frequently move, prepare kits of common tools. A kit has its own inventory sheet. The crew signs out the whole kit rather than individual items. The kit then functions like a mini-inventory that they manage.
- Transfers Between Crews: If one crew borrows from another, update the system. The same check-out/check-in process applies across sites, ensuring you always know which crew has what.
A disciplined check-out system ensures that tools (often high-value) aren’t wandering aimlessly. It enforces return and maintenance. At day’s end, crews should instinctively return everything or face accountability. When few tools actually go missing because people know exactly what is expected, a significant chunk of potential loss is eliminated.
Real-Time Inventory Tracking and Digital Documentation
- Cloud-Based Inventory System: Use a central digital platform that everyone updates. Whether it’s an industry solution or a well-structured spreadsheet, the key is that data isn’t siloed. Cloud or server-based systems mean a warehouse clerk in the office and a foreman on site see the same numbers instantly.
- Barcode and Labeling Technology: Issue labels for every unique item or bin. Whenever something moves, it should be scanned. This transforms hand-written logs into instant electronic records. If a box is scanned into “Site Trailer” at 10:15 AM, anyone checking inventory knows it has arrived and exactly when.
- Change Tracking: Ensure the system logs who made each update. This creates an audit trail. For instance, if John scans out 10 litres of fuel, the log shows the quantity, time, and John’s username. This deters careless changes and helps review discrepancies: “Who removed 10 bricks on Thursday? Oh, Steve under the HPC project.”
- Automated Alerts and Low-Stock Warnings: Set up system thresholds. This way, procurement knows to reorder before running out. Similarly, overdue check-outs (tools not returned after project end) can trigger reminders.
- Integration with Documentation: Attach documents (certificates, manuals, specs) to each item record. For example, a scaffolding tower’s record might include load charts and inspection dates. Having this at hand encourages proper use and maintenance, reducing damage losses.
These digital strategies bring accuracy. Manual logs often lag by hours or days; real-time tracking means the data you see is the data on site. Because inventory moves are recorded instantly, shrinkages become obvious (e.g. if stock doesn’t add up at day’s end). Modern construction inventory systems can even capture photos – snapping a damaged item upon return and attaching it to the record for evidence. The net result is far fewer “mystery losses” and much better inventory accuracy.
Cycle Counting and Regular Audits

- Scheduled Audits: Commit to routine physical checks. For example, perform a quick weekly headcount on fast-moving items (nails, safety gear) and a thorough monthly count of all inventory. These counts should reconcile against system records.
- Random Spot Checks: In addition to schedules, include unannounced checks on high-value materials. If site managers know an audit could happen at any time, they are likelier to keep better records.
- Independent Verification: Wherever possible, have someone other than the regular storekeeper do the count. This could be a supervisor or a rotating team member. Fresh eyes often catch errors that routine clerks miss.
- Error Investigation: Don’t just adjust the numbers. Treat each discrepancy as an investigation trigger. If 50 units of an item are missing on the count, try to trace when the last transaction was. Talk to the person who recorded the removal to understand. This discipline converts errors into learning.
- Audit Checklists: Use a standard checklist to guide counts (see sample SOPs below). Ensure counts cover both items and documentation: that physical quantities, stored invoices, and issue logs all match.
Regular audits keep data honest. Over time, they also identify patterns: if certain items often go missing, address root causes (e.g. improve locking for valuable tools). The combination of automated tracking and human verification dramatically boosts confidence in inventory accuracy. When record accuracy rises above, say, 98%, teams can plan and operate without stock uncertainty.
Cross-Department Communication and Alignment
- Unified Inventory Data: Make a shared inventory system accessible to all departments – procurement, warehouse, site supervisors, project managers, and subcontractors. When everyone logs into the same system, no team is working off stale or partial information.
- Regular Coordination Meetings: Hold brief weekly or bi-weekly supply meetings with representatives from field crews, warehouse, and purchasing. Review upcoming material needs, backorders, and storage status. This catches mismatches early (e.g. a purchasing manager learning that the site already has a delayed shipment of lumber on hand).
- Single Point of Contact: Assign one person per site (or per discipline) to manage inventory issues. For example, “Site A Inventory Lead – Maria” means others know exactly who to ask about materials. This avoids the “I-thought-he-was-handling-it” confusion.
- Standard Request Forms: Use a consistent material request and release form (paper or digital). Standard fields (item code, quantity, needed by date, requester) ensure no detail is missed. Having everyone use the same form makes approvals and tracking simpler.
- Transparency of Orders and Shipments: Update the inventory platform whenever an order is placed or arrives. For example, if purchasing orders 200 bags of cement, log it as “on order – expected June 12.” When it arrives on-site, update the status to “received – storage location assigned.” This transparency prevents redundant orders and lost shipments.
Cross-functional alignment eliminates hidden “dark corners.” When procurement, stores, and field share data, there is no room for a team to be surprised by missing materials. It also fosters accountability – if the site logs low stock of a key item, procurement can act before a shortage occurs. Good communication coupled with a single source of truth in the system is a linchpin of loss reduction.
Staff Training and Accountability
- Comprehensive Training: Everyone involved in inventory – from clerks to engineers – should be trained on the new processes and tools. Cover how to use the inventory system, labeling conventions, and the reasons for each step. Training should be ongoing, especially when new staff join.
- Written Procedures (SOPs): Develop concise Standard Operating Procedures for key tasks: receiving shipments, issuing tools, performing cycle counts, and so on. SOPs serve as reference guides so staff don’t rely on memory or ad-hoc methods.
- Accountability Roles: Clearly define who is responsible for each part of inventory management. For example, Warehouse Manager, Site Storekeeper, Project Coordinator, etc. Spell out duties in job descriptions. When accountability is formalised, people are less likely to skip steps.
- Performance Metrics: Tie accountability to measurable targets. If the goal is “99% inventory accuracy,” share performance against that metric with the team. Positive reinforcement (recognition for no shrinkage in a quarter) and constructive review of discrepancies motivate good behaviour.
- Encourage Reporting: Create a no-blame culture for mistakes. Encourage staff to report missing items or data errors immediately. If employees fear punishment, they may hide problems. If they see a loss as a learning opportunity (with a path to improvement), the team collectively gets better at prevention.
Training and accountability transform the culture. When every crew member understands how and why to follow procedures, they become part of the solution rather than liability. An informed, engaged team is the best human defense against loss.
Monitoring KPIs and Continuous Improvement
- Define Key Metrics: Track metrics such as Inventory Accuracy (percentage of items counted vs recorded), Stockout Rate (instances when materials ran out), Shrinkage Rate (value lost through theft/damage as a percentage of total inventory), and Cycle Count Compliance (percentage of planned counts completed on time).
- Dashboard Tracking: Use simple dashboards or scorecards. For instance, maintain a table showing this month’s inventory accuracy against the target of 98%. If accuracy slips, investigate root causes (training needs, process gaps).
- Review and Adjust: Hold periodic reviews (monthly or quarterly) of inventory performance. Use data to adjust reorder points, refine training, or change processes. For example, if many consumables are still unaccounted for, shorten the cycle count interval for those items.
- Benchmarking: Where possible, compare metrics across sites or time periods. Maybe Site A has a 99% accuracy rate while Site B is at 95%. Understanding why one site outperforms others (better practices, different supervisors, etc.) can yield cross-training opportunities.
- Continuous Education: Update procedures as you learn. Perhaps you discover a new type of barcode makes scanning faster, or that some labels fade in the sun – revise accordingly. Inventory management should improve iteratively.
A disciplined focus on KPIs and improvement makes the process self-correcting. By measuring what matters, teams can celebrate success and quickly fix failures. Over time, this leads to leaner inventories and robust parts visibility everywhere.
KPI Table (Examples)
| KPI | Definition | Target/Threshold |
|---|---|---|
| Inventory Accuracy Rate | (Quantity matched in physical count) ÷ (Quantity recorded) × 100% | ≥ 98% |
| Cycle Count Coverage | (Counts completed) ÷ (Counts scheduled) × 100% | 100% of scheduled counts |
| Stockout Incidents | Number of times material ran out when needed | 0 (critical items), minimal otherwise |
| Shrinkage/Loss Rate | (Value of lost/damaged stock) ÷ (Value of stock used) × 100% | < 1% (ideally) |
| On-Time Delivery Rate | (Deliveries received on promised date) ÷ (Total deliveries) × 100% | ≥ 95% (by suppliers, tracked via system) |
| Supplier Fill Rate | (Quantity delivered vs ordered) × 100% | ≥ 99% |
| Asset Utilization Rate | (Hours of use) ÷ (Hours available) × 100% | Varies by asset, use as benchmark |
| Material Turnover Time | Days of stock on hand = (Average inventory ÷ daily usage) | Optimise per item, avoid long turns |
Sample KPIs for Inventory Accuracy, Site Efficiency, and Loss Prevention.
Monitoring such KPIs keeps the entire organisation aligned. Executives and site managers alike can see that improving inventory accuracy by just a couple of percentage points translates to lower costs, fewer delays, and a smoother workflow.
Leveraging CyberStockroom for Visual Inventory Tracking
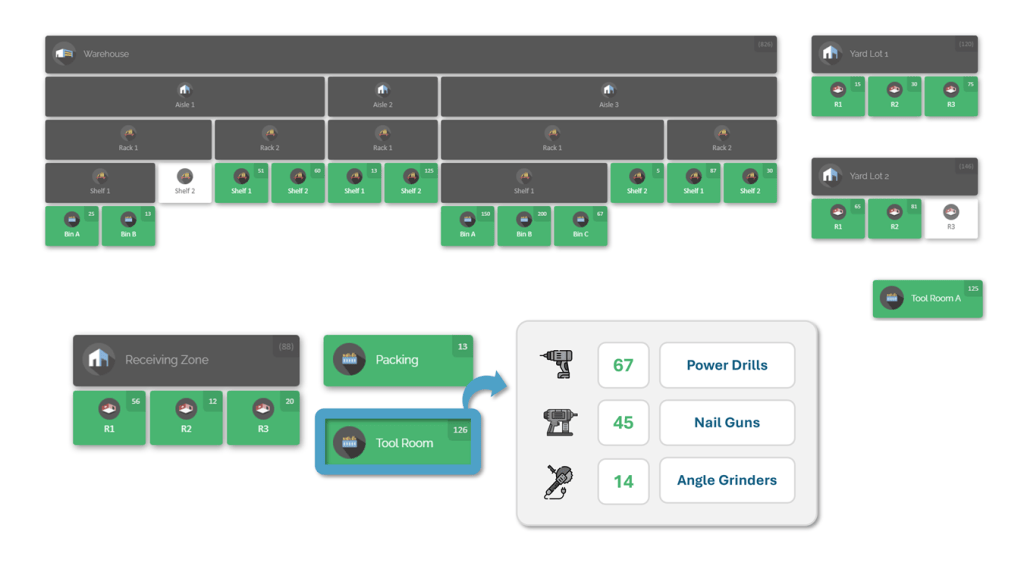
Integrating advanced inventory software can supercharge all the practices above by providing a unified visual map of your entire operation. CyberStockroom is one platform designed around exactly this concept. Rather than navigating a maze of spreadsheets, users interact with a digital layout of storage locations – warehouses, containers, vehicles, and job sites – each tagged with live inventory data. Below we describe how CyberStockroom’s features align with the best practices we’ve discussed, making implementation natural and effective.
- Interactive Visual Map: CyberStockroom’s core is its inventory map interface. You create a map of your entire site network – from the main warehouse to outdoor storage yards and even trucks or trailers. Each “location” on this map can be clicked to show all items stored there. This solves cross-department visibility: whether you are in procurement, warehousing or on the field, you all see the same map. For example, a storekeeper can assign a new shipment of electrical components to “Building A Storage – Shelf 3,” and immediately a project manager sees that these parts are at Building A, eliminating cross-site confusion.

- Drag-and-Drop Transfers: Moving stock between locations is as simple as dragging the item icon on the map or selecting a new location from a list. For instance, if 20 rolls of wire are shipped from the warehouse to Site C, the warehouse clerk drags the wire entry from “Main Warehouse” to “Site C Yard” on the map. The system instantly updates the item’s recorded location. This intuitive transfer feature enforces the receiving/dispatch protocol digitally – every transfer generates a record, so nothing physically moves without the system knowing. It also means materials aren’t inadvertently counted in two places or left off the books.
- Barcode Scanning: CyberStockroom supports barcodes to make receiving and issuing fast and accurate. When new inventory arrives, staff print barcode labels from the system or use pre-printed tags. Each label links to the item’s database record. Scanning the code with a handheld scanner or smartphone instantly pulls up the item details. This is especially useful in a busy receiving dock – staff can scan a pallet of tiles and just enter quantity and destination location, rather than typing out product codes. On issue, scanning logs the check-out. Thus, each movement is tied to a quick scan rather than a slow manual entry, virtually eliminating transcription errors.
- Custom Fields & Attachments: Every item record in CyberStockroom can include custom fields and file attachments. This means you can store important documents with each asset: safety certificates with PPE, manuals with machines, inspection tags with scaffolds. For example, a heavy generator’s record might have its last service date and fuel type noted. This supports proper handling and accountability. If a forklift is issued, a supervisor can immediately review its last inspection checklist stored in CyberStockroom before use.
- Activity History and Audit Trails: Every transaction (receiving, issuing, transferring, adjusting) is logged in an audit trail. You can view the history of any item: who moved it, when and from where to where. These logs support regular audits – discrepancies become easy to investigate. If a tool is missing, managers can pull its log and see “Jane Smith checked out hammer drill #5 on Sept 10.” Combined with accountability (each record has user info), it’s straightforward to trace losses back to a root cause or person, turning inventories into much more than static lists – they become dynamic, traceable records.
- User Accounts and Permissions: The platform supports multiple users with different access levels. For example, warehouse staff may have permission to adjust stock levels, while site workers can only move items via scanning. This ensures only authorised personnel can perform certain actions, reinforcing the procedural controls. All actions by a user are time-stamped, linking them back to their role.
- Multi-Location Visibility: Since CyberStockroom is designed for multiple warehouses and sites, it inherently addresses cross-department needs. It can show all company locations in one interface. This means if one project runs low on a part, a manager can immediately see which other site has extra. It eliminates the old problem of “no one told me Site B had 100 units in reserve.” By having a single source of truth, teams stay aligned without endless phone calls.

In practice, using CyberStockroom follows the same principles as our generic advice, only streamlined:
- Receiving: Scan a delivery into the system, assign its location on the map, and record details. The system’s colours or notifications can alert if more than expected arrives, catching supplier errors.
- Storage: All stock sits at labelled spots on the map, exactly like the warehouse layout. If someone walks into a storeroom, they look at the map on a screen and match shelf IDs with the map’s labels.
- Issuing: Crews check out items on the spot by scanning – no more paper sign-outs lost in trucks. CyberStockroom’s logs automatically record the user and time, reinforcing accountability.
- Auditing: Managers run inventory reports from CyberStockroom to prepare for cycle counts. They can also export lists for physical verification. The system highlights discrepancies between system counts and physical counts, making reconciliations clear and fast.
Through its visual map, integrated data, and simple interface, CyberStockroom brings to life the policies above. Instead of seeing inventory as numbers in columns, everyone sees it as places on a map. This shared visual understanding closes the visibility gap between teams and prevents items from disappearing unnoticed.
Risk and Mitigation Matrix

Implementing any new system involves risk. Below is a matrix identifying common risks during rollout and recommended mitigations:
| Risk | Potential Impact | Mitigation Strategy |
|---|---|---|
| Data Entry Errors | Inventory mismatches, false shortages or overstock | Cross-check data entry with physical counts; back-up data; train double-checks. |
| Staff Resistance to Change | Poor adoption, workarounds with old methods | Provide clear training and ongoing support; highlight benefits; involve users in design. |
| Theft During Transition | Loss of items if new processes are not fully enforced | Maintain existing security practices during rollout; implement parallel checks. |
| Technical Downtime or Glitches | Inability to update records, leading to delayed transactions | Ensure reliable internet/connectivity; choose stable platform; have offline SOPs temporarily. |
| Incomplete Audits/Cycle Counts | Persistent inaccuracies | Automate reminders for counts; assign clear responsibilities; audit audit results. |
| Overreliance on System | Complacency could hide physical security gaps | Continue physical security measures (locks, cameras) alongside system. |
| Insufficient Tagging Coverage | Some items may not be tracked if missed in labeling | Prioritise high-value items; use barcode scans on new receipts; gradually tag remainder. |
| Integration Complexity | If integrating with other systems, could cause sync issues | Proceed in phases; thoroughly test integrations; have manual override plans. |
Table: Risk/mitigation matrix for implementing a visual inventory tracking system.
By anticipating these issues and planning for them, teams can avoid major setbacks. For example, scheduling data entry validation ensures that the map’s locations match reality from the start. Regular check-ins during rollout catch discontent early. The goal is to make the transition almost invisible to workers, so operations continue smoothly.
Sample SOPs and Checklists
Below are outlines and checklists to turn best practices into daily routines. These samples should be customised to your organisation’s specifics but illustrate the level of detail needed.
Sample SOP: Receiving Materials
- Arrival Notification: Confirm expected delivery on schedule. Notify site receiving area when the truck is en route.
- Document Verification: Upon delivery, the storekeeper compares items against the PO and delivery note: item codes, descriptions, quantities.
- Inspection: Check for damage (dents, moisture, tears). If damaged, note it on the delivery receipt with photo if possible.
- Quantity Check: Count all units received. Use a helper for large deliveries. If palletised, count labels or bundles.
- System Entry: Scan each item’s barcode and enter quantity into the inventory system, assigning it to the designated location (e.g. Warehouse A, Rack 2). If items lack barcodes, log them by part number.
- Signature and Documentation: Have a supervisor sign the delivery receipt (physical or digital) to confirm receipt. File or attach signed document to the inventory record.
- Labeling and Storage: Affix barcode labels to products or shelf locations if new. Move items promptly to their storage area. Ensure they are placed on the correct shelf or zone.
- Notify Stakeholders: If materials were urgent, notify the relevant foreman or department that stock is available.
- Record Any Discrepancies: If quantities differ from PO, immediately raise an issue with procurement. Do not finalize the receipt entry until confirmed.
Checklist: Material Receiving
- Delivery van parked in designated zone.
- Delivery note and PO present.
- Quantities matched against PO line by line.
- All items checked for damage.
- Items scanned/entered into the system with correct quantities.
- Supervisor signature obtained on receipt.
- Inventory location (rack/bin) confirmed for each item.
- New stock labeled and shelved correctly.
- Discrepancies logged and reported.
Sample SOP: Cycle Count Audit
- Schedule Counts: Define which items are counted on which day (e.g. critical items daily, all items monthly). Post the cycle count schedule where stores staff can see it.
- Pre-count Preparation: Generate an inventory report from the system for the items/locations to be counted. Prepare count sheets or have tablets ready with scanning app.
- Counting Process: For each item on the list, physically count units in the location. Mark the count on the sheet or confirm by scanning barcodes.
- Note Discrepancies: If the physical count does not match the system count, flag it. Check for misplacement (e.g. item may be in a different bin) before finalizing.
- Immediate Updates: After counting a location, update the system to reflect the correct quantity. Include notes on any adjustments made.
- Review and Report: After completing the count, compare totals. Investigate causes of any large discrepancies (e.g. theft, mis-scan).
- Management Approval: Have a supervisor sign off on the cycle count results and any stock adjustments.
Checklist: Cycle Count
- Counts scheduled and assigned to staff.
- Inventory report printed or available on device.
- Counting area prepared, bin tags visible.
- All counted items scanned or recorded accurately.
- Errors or missing stock noted for follow-up.
- System updated with actual counts.
- Supervisor reviews and signs off.
By following these procedures and checklists, consistency is ensured across shifts and teams. The sample SOPs above cover high-level processes; in practice, each step might have more detailed sub-steps or forms depending on company policy.
Key Performance Indicators (KPI)
To keep progress on track, use the following table of KPIs tailored for inventory control. Adjust thresholds to fit your business needs:
| KPI | Calculation | Ideal Target | Action If off-target |
|---|---|---|---|
| Inventory Accuracy (%) | (Physical Count ÷ System Count) × 100 | ≥ 98% | Review audit logs; increase count frequency; retrain staff. |
| Cycle Count Completion | (Counts Done ÷ Counts Planned) × 100 | 100% | Ensure count schedule and responsibilities are clear. |
| Stockout Incidents | Number of times an item was unavailable when needed | 0 for critical items | Evaluate forecasting; improve reorder points; check receiving delays. |
| Days Inventory Outstanding | (Average Inventory ÷ Cost of Goods Sold) × 365 | Lower is better (depends on industry) | Review slow-moving items; optimize ordering. |
| Shrinkage Rate (%) | (Value of Lost/Damaged ÷ Value of Inventory) × 100 | < 1% | Strengthen security; audit differences; trace root causes. |
| Order Fulfillment Time | Average time from order to delivery | On-target vendor agreement (e.g. ≤ 3 days) | Follow up with supplier performance; adjust lead times. |
| Utilization of Tool Assets (%) | (Time in Use ÷ Time Available) × 100 | High utilisation without overuse | Reassign underused tools; review scheduling. |
| Costs Saved (comparison) | (Budgeted spend – Actual spend) for replacements | Positive (favourable variance) | Record savings and investigate high variances. |
Table: Example KPIs to monitor inventory performance and material loss.
Regularly review these KPIs with the team and senior management. They provide a clear scorecard of how well material loss is being controlled and where further action is needed.
Implementation Summary and Next Steps
By now, you have a comprehensive framework for slashing material loss and boosting inventory visibility:
- Understand the Problems: You know the main causes of loss on site (theft, waste, poor process).
- Adopt Best Practices: You have checklists and SOPs for receiving, issuing, storing, and auditing inventory.
- Leverage Technology: With a visual system like CyberStockroom, all departments share a live inventory map, enforcing the processes digitally.
- Measure and Improve: KPIs and audits keep the system honest, and regular reviews drive continuous improvement.
Next steps are to customize these templates to your organisation, schedule the rollout, and get commitment from all stakeholders. Assign clear owners for each task above, and build accountability into daily habits. With diligence and the right tools, you will achieve full parts visibility, reduce material loss drastically, and keep your construction projects running smoothly.









Leave a Reply