
On a large construction site, industrial project, fabrication campus or manufacturing facility, materials rarely stay in one place for long. Structural components arrive from suppliers. Consumables move from central stores to production. Mechanical parts wait for inspection. Electrical materials are staged by work package. Tools move between departments. Fabricated assemblies leave a workshop and sit in a yard until the field team is ready. Spare parts may be held in a warehouse, maintenance crib, container or production-side storage area.
The physical movement is complex, but the bigger problem is often visibility.
When the location of material lives in spreadsheets, whiteboards, delivery notes, emails and individual memory, the organisation may technically own the stock without having practical control over it. A supervisor can know that 40 valves are on site and still lose an hour because nobody knows which rack, laydown zone or container holds them. Procurement may see adequate stock while production believes it is short. Warehouse staff may have moved a pallet to create space without notifying the department that expects to find it in the original location.
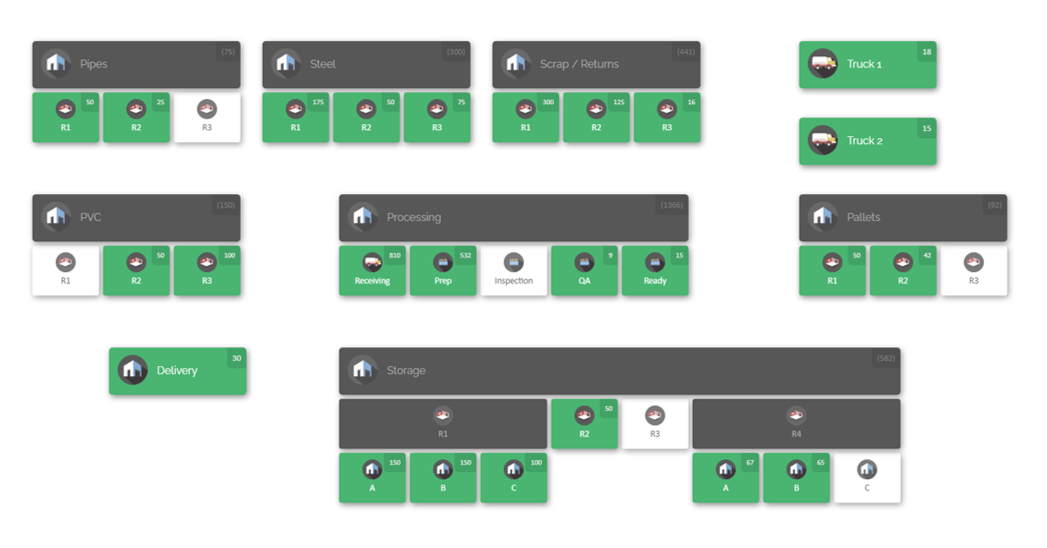
A well-designed laydown yard inventory map closes that gap by connecting inventory records to the physical layout of the operation. Instead of answering only, “Do we have this part?”, the inventory system must also answer, “Where is it, how much is there, what state is it in, and how do I get to it?” Visual management, clear location standards and point-of-use material strategies are well-established ways of reducing unnecessary movement and making material flow easier to understand.
That is the purpose of this guide. The goal is not simply to produce a laydown yard inventory map job site managers can display in an office. The goal is to create an operational location system that receiving, inventory, warehouse, production, maintenance, quality, procurement and field teams can use to find and move materials with less searching, fewer misunderstandings and better inventory accuracy.
Turn the Yard From Storage Space Into an Inventory System

A laydown yard is often treated as open ground until material begins arriving. That may work for a small number of deliveries, but it becomes difficult to manage once the volume of material, number of crews, and frequency of movement increase.
The first shipment may be placed wherever unloading is easiest, with the next delivery positioned beside it. As more material arrives, existing pallets get moved to create space, crews remove partial quantities from bundles, and unofficial staging areas begin appearing closer to active work zones. Returned material may come back without a defined location, while temporary storage areas gradually become permanent. Before long, the physical yard no longer resembles the original logistics plan.
The result is a storage area that may still have space, but no dependable address system.
Construction material planning works best when storage is considered alongside the project schedule, delivery sequence, site access, and installation requirements rather than treated as an afterthought. Material areas also need to remain organized so that pedestrian routes, vehicle access, and emergency pathways are not gradually consumed by uncontrolled storage.
Large manufacturing environments face a similar challenge in a different form. Inventory may be distributed across receiving, central stores, production supermarkets, maintenance areas, fabrication, quality hold locations, outside yards, and departmental stockrooms. Without a shared location structure, individual departments can begin managing those areas differently, creating inconsistent naming, duplicate records, and unnecessary searching.
A good yard map should therefore do more than show large rectangles labeled “Steel,” “Electrical,” and “Mechanical.” It should become part of the inventory-control process by connecting each material or part to a defined physical location.
Once these physical relationships are represented in the inventory system, the organization can begin improving access in a more systematic way. Search time becomes easier to measure, frequently used materials can be repositioned, duplicate storage becomes more visible, and receiving teams have clearer instructions about where deliveries belong. Departments can also see shared stock without relying on parallel spreadsheets, while inventory audits can be organized by physical area instead of requiring teams to search the entire site.
Most importantly, the map gives everyone a common language for discussing location. “Somewhere in the north yard” becomes “North Yard, Mechanical Zone, Row M2, Bay 04,” while “in maintenance” becomes “Maintenance Crib, Rack C, Shelf 03.”
That difference may sound simple, but on a large construction site or manufacturing facility, it can significantly improve how materials are received, stored, found, moved, and verified.
What a High-Performance Laydown Yard Inventory Map Must Do

Before drawing zones, decide what the map actually needs to accomplish. A common mistake is starting with software or a drawing tool when the better starting point is operational behavior.
Begin by identifying the questions people regularly struggle to answer. Teams need to know where material is located, how much is available, which department is responsible for it, whether it has been received or inspected, and whether it has been released for use. They may also need to distinguish reserve inventory from material already staged for installation, confirm whether stock has moved, determine where the next delivery should go, or verify whether equipment such as a forklift can reach a location without requiring other loads to be moved first.
The map should also support broader cross-department questions. Warehouse teams may need visibility into stock already held by maintenance, while procurement may need to determine whether a reported shortage is genuine or simply the result of inventory that is difficult to locate.
A strong material map should help answer these questions consistently by combining four connected layers.
- The physical layer represents the actual site, including buildings, outdoor yards, containers, warehouses, production areas, storage racks, access roads, loading areas, aisles, and other relevant spaces. This layer should be recognizable to the people who physically receive, move, pick, and count inventory.
- The location layer divides that physical environment into uniquely identifiable inventory locations. This is the step that turns general storage space into defined addresses that can be referenced consistently across teams.
- The inventory layer connects products, parts, and materials to those locations along with their recorded quantities. This allows users to move beyond knowing that an item exists somewhere on site and instead identify where it is actually stored.
- The operating layer defines how inventory enters a location, leaves it, moves between locations, gets counted, and is corrected when the digital record no longer matches physical reality.
These layers are what make the map useful beyond the warehouse team. They turn a site drawing into an operational inventory tool that supports location accuracy, movement control, cross-department visibility, and better material planning.
Build the map around material flow, not departmental ownership
On many sites, the warehouse organizes stock according to receiving and storage logic, while production or field teams think about the same material in terms of installation sequence. Neither view is necessarily wrong. The problem begins when one department’s structure makes sense only to that department and other teams start creating their own parallel way of tracking the same inventory.
For example, warehouse personnel may group stainless fittings together because they are physically similar, while the piping team thinks in terms of Area A, Area B, and Area C. Procurement may organize the same material by purchase order, planning may refer to work packages, and quality may separate inspected material from stock that has not yet been released.
A strong laydown yard inventory system needs to connect these different perspectives without allowing each department to create its own unofficial inventory record. The physical location should remain consistent even when teams use the inventory for different operational purposes.
Lean material-handling practices offer a useful principle here: understand each part in relation to where it is stored, where it is used, and how it moves through the operation. The yard equivalent is a location plan for every material class.
For each important group of stock, define:
| Question | Example |
|---|---|
| Where does it enter the site? | Gate 2 / Receiving |
| Where is it checked? | Receiving Inspection Zone |
| Where is reserve stock stored? | North Yard / Mechanical Reserve |
| Where is active stock stored? | Mechanical Yard / Row M3 |
| Where is it prepared for work? | Mechanical Staging |
| Where is it consumed? | Process Area B |
| Who records movement? | Receiving / Material Control |
| What happens to surplus? | Returns Review Zone |
Defining these points gives each material group a clear path through the site and helps different departments work from the same location structure. Receiving knows where new deliveries should enter the system, material control knows where reserve and active stock belong, field teams know where work-ready material is staged, and surplus has a defined destination rather than becoming miscellaneous yard inventory.
This turns the map into an operational model of material flow rather than a collection of labeled storage boxes.
Design for access, not maximum storage density
A yard packed to maximum capacity may look efficient on a drawing while performing poorly in practice. Every pallet, bundle, or component occupying space also creates a handling requirement, and the layout should account for how often that material needs to be accessed and what equipment is required to move it.
If retrieving one load requires moving two unrelated loads first, the yard has created unnecessary handling. Likewise, if high-frequency materials are stored at the far end of the site, labor and equipment spend more time traveling instead of supporting production. Lean material-handling practices aim to reduce unnecessary movement by placing inventory where it supports a more direct and understandable flow.
When mapping the yard, therefore, do not ask only “How much can we fit here?” A more useful question is: “How quickly can the right crew retrieve the right material without disturbing unrelated inventory?”
That question changes the layout. Fast-moving stock may belong closer to dispatch points or frequently used routes, while bulky reserve material can occupy less convenient space. Long components may need dedicated zones designed around the equipment that handles them, and materials that are often moved together may benefit from being located near one another. Inspection, quarantine, and unreleased stock should remain clearly separated from material that is ready for use.
The objective is not to maximize storage density at all costs. It is to balance space utilization with access, handling effort, travel time, and the needs of the crews using the yard.
Protect traffic and material-handling routes
The inventory map should also reflect the site’s traffic and material-handling plan. Vehicle routes, pedestrian paths, loading areas, and storage positions should not compete for the same space, and inventory should not gradually expand into areas required for access or movement.
A useful map distinguishes between several different types of space:
- Storage space, where inventory may be placed
- Movement space, which needs to remain open for people and equipment
- Handling space, where loads are picked, turned, placed, or broken down
- Controlled space, such as inspection, quarantine, or restricted-material areas
- Future space, which may be needed for upcoming project phases
Treating these areas separately helps prevent storage decisions from interfering with normal site movement. It also makes it easier to identify when a location that appears empty is actually unavailable because it serves another operational purpose.
Aisle widths and handling clearances should not be copied from a generic diagram and assumed to be suitable. The space required depends on factors such as the vehicles being used, attachments, load dimensions, turning requirements, visibility, site conditions, fire access, and applicable regulations. Outdoor routes may also need to account for surface conditions, drainage, and the type of traffic expected to use them.
The map should therefore support the traffic plan rather than compete with it, preserving enough space for materials to be stored, accessed, moved, and handled safely throughout the life of the project.
Separate inventory location from inventory status
“Where is it?” and “Can we use it?” are two different questions, and the inventory system should treat them that way. A pallet may be physically located in the mechanical laydown yard while still waiting for inspection. Another load could already be in a production staging area but reserved for a specific work order, while surplus material may be waiting for disposition.
When location names are used to represent both physical position and business status, the structure quickly becomes confusing. Labels such as “Hold,” “Urgent,” “Tuesday Install,” or “Waiting for QA” may describe what is happening to the material, but they do not tell someone where to physically find it.
A stronger approach is to keep the physical location stable and track operational status separately through the agreed inventory process. This allows receiving to update an item’s process state without pretending that it has moved, quality to release material without changing its physical address, and production to see that material is nearby even if it is not yet available for use.
Separating location from status creates a clearer inventory model because users can answer both questions independently: where is the material, and what is its current operational state?
Make the physical yard match the digital map
A digital location such as NY-MECH-R02-B05 is only useful if someone walking through North Yard can clearly identify Row 02 and Bay 05. The physical environment and the digital inventory structure should reinforce one another rather than require workers to translate between different naming systems.
Use large, durable, easy-to-read physical identifiers and position them where operators naturally approach the location. Where practical, repeat identifiers at both ends of rows or lanes so crews can confirm the correct location without entering a congested storage area simply to read a sign.
The same discipline applies inside manufacturing facilities. If the inventory map identifies a location as:
Plant 1 → Maintenance → Rack D → Shelf 4
the physical rack and shelf should use those same identifiers.
This is visual management in a practical form. When the labels employees see in the workplace match the locations shown in the inventory system, materials become easier to find, movements are easier to record accurately, and audits become easier to perform. The digital map and the physical storage environment should function as two parts of the same location system.
How to Map a Laydown Yard for Faster Material Access

The strongest laydown yard inventory maps are developed from the physical operation outward. Instead of beginning by importing thousands of parts into a system, start by building the location structure those materials will occupy.
This process can be applied to a new job site, an existing yard that has become difficult to control, or a manufacturing facility trying to improve inventory visibility across several departments.
Start by walking the material flow
Begin by physically following the path a typical delivery takes from the site entrance to its eventual point of use. If the site already exists, start at the gate and observe what actually happens rather than relying only on drawings or written procedures.
Identify where vehicles report, where unloading takes place, where receiving documentation is resolved, and where material waits for inspection. Continue through long-term storage, active storage, staging, installation, and any return or surplus process. The same exercise can be used inside a manufacturing facility by following material from receiving into central storage, production, maintenance or assembly, and then through returns or surplus handling.
While walking the process, document three things: physical locations, movement paths, and decision points. Decision points deserve particular attention because they are often where responsibility, availability, or status changes. Receiving inspection, quality release, departmental issue, staging, and returns are common examples.
These handoffs are also where inventory visibility frequently begins to break down. Understanding the real movement of material before designing the map helps ensure the location structure reflects actual work rather than an idealized version of the process.
Define the outer boundaries first
Do not begin by creating individual bays, shelves, or bins. Start with the major physical areas that people already recognize.
For a construction or industrial project, these might include:
- Site
- Warehouse
- North Laydown Yard
- South Laydown Yard
- Fabrication Shop
- Maintenance Store
- Production Building
- Tool Store
- Returns Area
For a multi-site organization, the highest level might instead include:
- Project Alpha
- Project Bravo
- Main Manufacturing Plant
- Central Warehouse
This top-level hierarchy gives users a clear overview before they move into more detailed locations.
Divide major areas according to operational purpose
Once the outer structure is clear, divide each major area into zones that reflect how the space is actually used.
A large construction laydown yard might contain areas for:
- Receiving
- Structural steel
- Mechanical
- Electrical
- Piping
- Formwork
- Equipment
- Fast-moving materials
- Project reserve
- Inspection hold
- Returns
- Outbound staging
A manufacturing facility might instead organize space around receiving, raw materials, purchased parts, fabrication, assembly, production-line supply, maintenance, quality hold, finished goods, and returns.
The right structure should be detailed enough to direct someone to the correct area but simple enough that new employees, contractors, and occasional users can understand it quickly.
Over-classification can be just as harmful as under-classification. If every small patch of floor receives its own location code, employees may struggle to maintain the system. If an entire yard is represented by one location, the map will do little to reduce search time.
A useful rule is to create the smallest physical location that teams can reliably identify and maintain.
Design the hierarchy before designing location names
Location codes work best when they are generated from a logical physical hierarchy rather than invented first.
Suppose the North Laydown Yard contains separate Mechanical and Electrical zones, with four rows in Mechanical and six bays in each row. The structure might look like:
North Laydown Yard → Mechanical → Row 01 → Bay 01
A corresponding location code could be:
NY-MECH-R01-B01
The abbreviation itself is less important than the structure behind it. The same principle can be applied inside a warehouse:
WH-A03-R02-S04
Warehouse → Aisle 03 → Rack 02 → Shelf 04
Or across a manufacturing department:
P1-MNT-RC-B12
Plant 1 → Maintenance → Rack C → Bin 12
Keep codes readable and avoid identifiers that require employees to carry a decoding guide just to find a storage location.
A simple test is to give the location code to someone who understands the site but does not work in that storage area every day. If that person cannot reasonably find the location, simplify the naming structure.
Map the travel network before filling storage zones
Mark major movement routes before assigning inventory space. Include delivery paths, forklift or telehandler routes, pedestrian walkways, crossings, loading areas, and emergency access where relevant.
Storage should then be designed around those movement routes.
This order matters because when storage is drawn first, teams are often tempted to use every available piece of ground and leave travel routes as whatever space remains. When movement is planned first, the yard begins to function as a logistics system rather than simply a collection of storage areas.
The resulting map should make it clear which areas are intended for inventory and which must remain available for people, vehicles, loading, and emergency access.
Identify handling constraints
Not every item can be placed in every available location. Material characteristics, handling requirements, environmental conditions, and operational restrictions should influence storage assignment.
Long steel sections, pipe, and cable reels require different handling arrangements from boxes of fittings. Fragile equipment may need protected storage, while weather-sensitive materials may require enclosed areas. Heavy components may depend on crane or forklift access, and high-value items may require more controlled locations. Material awaiting inspection should also remain distinguishable from stock that has already been released for use.
A simple planning table can help establish suitable locations for major material classes:
| Material class | Preferred area | Access requirement | Storage rule |
|---|---|---|---|
| Structural members | Structural yard | Heavy handling equipment | Ground-level designated bays |
| Mechanical equipment | Protected mechanical zone | Lifting access | Avoid uncontrolled stacking |
| Pipe and tube | Pipe storage | Side or end loading | Separate by specification/work area |
| Small fittings | Warehouse/racked storage | Manual or mechanical pick | Labeled rack/bin locations |
| Fast-moving consumables | Active stores | Frequent access | Near issue point |
| Inspection hold | Controlled hold zone | Restricted movement | Clearly separated from released stock |
| Surplus/returns | Returns zone | Periodic collection | Do not mix with active inventory |
This is a planning tool rather than a universal storage specification. Final storage arrangements should always reflect material characteristics, manufacturer requirements, project rules, and applicable safety requirements.
Classify inventory by movement frequency
Location should reflect how inventory is actually used. Frequently moved stock generally should not require the longest journey through the yard while rarely accessed reserve material occupies the easiest position.
Start with broad movement categories rather than overly complicated formulas. High-frequency inventory should be easy to reach from its normal delivery or issue route, while medium-frequency inventory can occupy slightly less convenient areas as long as it remains directly accessible. Low-frequency or reserve inventory can use more distant locations provided retrieval remains safe and predictable.
Project-specific staged inventory should be positioned according to when and where it will be consumed.
Do not classify movement solely by the number of units stored. A pallet containing a thousand washers may move only once a month, while a single shared lifting accessory may be issued several times a day. What matters for layout planning is how frequently the physical inventory moves, not simply how many units exist.
Create a receiving zone instead of receiving directly into the entire yard
Receiving is one of the most important control points in the location system. New material should first enter a defined receiving process where the team identifies what arrived, checks it against the appropriate information, records quantity and condition according to local procedures, and assigns a destination.
Without this control point, the delivery driver or equipment operator can effectively become the person deciding where inventory belongs. That is one of the fastest ways for location records to become unreliable.
Receiving should not become permanent storage either. Establish an internal process for moving checked material from receiving into its assigned location within a reasonable operational timeframe.
High-volume projects may benefit from separate receiving positions for:
- Received but not yet processed
- Inspection or quality hold
- Ready for put-away
- Priority cross-dock or direct-to-workface material
The terminology can vary by site, but the principle remains the same: new inventory should have a known condition and a known destination before it disappears into the wider yard.
Give every repeat-use item a home location
A defined home location removes a common source of ambiguity. Material may move temporarily for staging, installation, or project needs, but there should still be a recognized location where the organization normally expects that inventory to be stored.
For example:
3-inch stainless elbows → Warehouse / Piping / Rack P03 / Bin 08
M20 anchors → Construction Stores / Fasteners / Rack F02 / Bin 12
Maintenance bearings → Maintenance Crib / Bearings / Rack B / Shelf 03
Electrical glands → Electrical Store / Rack E05 / Bin 14
For larger materials, the home location may be a yard position rather than a bin:
6-inch carbon steel pipe → North Yard / Pipe Zone / Row 03 / Bay 02
A home location does not mean inventory can never move. It means movement away from the normal position becomes a deliberate and visible transaction rather than random storage.
Define overflow before you need it
Most yards eventually operate beyond their ideal storage capacity. The mistake is assuming overflow will never happen and improvising only after the normal locations become full.
Define overflow areas in advance and, just as importantly, decide how they will appear in the inventory system. If material normally stored in Mechanical Bay M04 is temporarily moved to Overflow O02, the record should show O02 as the current location.
Leaving the system pointed at M04 creates false confidence because the quantity may still be correct while the location is wrong.
This is why quantity accuracy and location accuracy should be treated as separate measures. An organization can correctly record one hundred units and still have a serious operational problem if nobody can reliably find those units.
Create active storage and reserve storage deliberately
Manufacturing and construction operations can often reduce congestion by separating working inventory from reserve inventory.
Suppose a project has 500 identical fittings. Field crews may not need immediate access to all 500. Keeping 50 units in an accessible active location and the remaining 450 in reserve can reduce congestion without sacrificing visibility.
The same approach applies in manufacturing, where a production-side location can hold the working quantity while reserve stock remains in central storage.
The important requirement is that the map shows these as different physical locations. A total such as “500 available” should not hide the fact that most of the inventory may be located several buildings away from the point of use.
Map staging areas as temporary inventory locations
A staging area becomes part of the inventory system as soon as material is placed there. It should not be treated as neutral or untracked space simply because the material is expected to move again soon.
Create defined locations for operational areas such as:
- Outbound staging
- Department staging
- Installation staging
- Production-line staging
- Finished fabrication staging
- Returns staging
Movements into and out of these areas should be recorded just like movements between permanent locations.
Temporary storage is one of the easiest places for inventory to become difficult to find. Material may be expected to remain there only briefly, but a short delay can become several days. The employee who created the staging pile may move to another shift, department, or project, leaving the material physically present but organizationally invisible.
Treating staging as a real location prevents that gap.
Map quality and inspection areas separately
Controlled or unreleased material should not be mixed with ordinary available inventory simply because the two are physically close.
If incoming material requires acceptance, testing, inspection, or documentation before use, create a clearly identifiable physical area for it. The map should allow users to distinguish between where the material physically exists and whether the organization’s process currently allows it to be issued.
This prevents one department from interpreting “on site” as “available for use.”
That distinction is particularly important in manufacturing environments where warehouse, quality, maintenance, and production teams may each view the same inventory through a different operational lens.
Use work packages and departments without fragmenting the inventory record
Departments need useful operational views, but they should not maintain disconnected versions of the same inventory.
Suppose electrical, mechanical, fabrication, and maintenance teams all use the same fastener. Maintaining four independent spreadsheet quantities creates unnecessary reconciliation work and makes it harder to determine the organization’s actual total.
A stronger model uses one inventory structure in which the same product can exist across multiple mapped locations:
Central Warehouse: 1,200
Electrical Store: 300
Mechanical Store: 250
Fabrication: 175
Maintenance: 100
This provides both local and organization-wide visibility. Each department can understand the quantity available in its area while the organization can still see the total and where that inventory physically resides.
Multi-location visibility is especially useful in factories and large project environments because the same product may be distributed across buildings, departments, storage areas, and yards. CyberStockroom’s visual inventory model supports this by showing the contents of mapped locations and how products are distributed across different parts of the operation.
Record moves when the physical move happens
Transaction discipline determines whether the map remains trustworthy after implementation. Even a perfectly designed initial map can become inaccurate quickly if physical movements are not reflected in the inventory record.
A simple rule helps:
Physical move = inventory location update
If material moves from North Yard Bay 02 to Mechanical Staging, the inventory record should change from North Yard Bay 02 to Mechanical Staging when that move occurs.
Avoid relying on someone to remember the change later or maintaining separate movement notes that still need to be entered into the inventory system unless the site’s process explicitly requires that approach and clearly defines responsibility for closing the loop.
CyberStockroom supports inventory transfers between mapped locations, along with Activity History that can help teams review inventory movements and related actions.
Movement history is valuable for more than record keeping. It can help answer practical questions about why a bay is unexpectedly empty, where material was moved, when a quantity changed, and which transaction led to the current location.
A current map explains where inventory is now. Movement history helps explain how it got there.
Build counting into the map
Do not wait for an annual inventory count to discover that the digital map has drifted away from the physical yard.
Organize cycle counting around defined locations and movement risk. High-activity areas generally deserve more frequent attention than stable reserve locations because more transactions create more opportunities for location and quantity errors.
A cycle-counting routine might rotate through areas such as:
- Receiving
- Active issue locations
- High-value inventory
- Fast-moving stock
- Shared departmental parts
- Frequently used staging zones
- Locations with previous discrepancies
CyberStockroom supports cycle counting and inventory adjustments within the mapped inventory structure, allowing locations to become practical units for verification.
When a discrepancy is found, do more than correct the number. Investigate why the record and physical inventory separated.
The cause may be an unrecorded move, an incorrect location selection, confusing location names, an area that is too large to count reliably, unofficial departmental storage, or return material being mixed with active stock.
Each discrepancy provides information about how well the process is working. Treat it as feedback about the location system, not simply as a number that needs to be corrected.
Review the map as the project changes
Construction sites and industrial operations evolve over time, so the inventory map needs to evolve with them.
Early in a project, large areas may be dedicated to civil or structural material. Later, mechanical and electrical inventory may require more space. Near completion, commissioning spares, punch-list materials, returns, and surplus stock may become more important than the large construction components that dominated earlier phases.
Schedule a formal review of the location structure whenever the project enters a major phase. During that review, consider which locations are no longer needed, which areas are becoming overloaded, and which zones are generating excessive travel. Look for departments that have created unofficial overflow, materials that are repeatedly moved before use, routes that are becoming congested, and new storage demand expected during the next stage of work.
The purpose is to keep the map aligned with the physical operation rather than allowing the digital structure to preserve a layout that no longer exists.
When changes are required, update both the physical identifiers and the digital map together. Never change one without changing the other.
How to Maintain Parts Visibility Across Departments

Mapping the yard solves only half the problem. The other half is organizational, because large manufacturing and industrial construction environments usually involve several groups interacting with the same material. Procurement may order it, receiving accepts it, quality inspects it, inventory control stores it, production or field crews consume it, maintenance may use shared stock, and finance may depend on inventory information for planning.
The inventory system needs to support those different responsibilities without allowing each department to create its own information silo. Cross-department visibility does not mean every team should organize inventory however it prefers. It means every department should be able to interpret the same location, quantity, and status information consistently.
Create one physical vocabulary
Choose one formal naming convention for locations and use it across the organization. The warehouse should not refer to a position as “Rack 4” while maintenance calls it “Old Compressor Side” and production calls it “Behind Line 2.”
Informal language will always exist, but the official inventory address should remain consistent. Use the same hierarchy on physical signs, within the inventory map, in internal requests, during counts, and in training.
When different departments discuss inventory, they should all be describing the same physical geography.
Build a shared definition of “available”
Quantity without operational context can easily create disagreement. Procurement may see 100 units in the system and conclude that no purchase is needed, while production reports that none are available. Both statements could be correct if all 100 units are on inspection hold or reserved for another work package.
Define the inventory states that matter to your operation. For example:
- Received means physically on site but not fully processed.
- Held means physically present but not available for normal issue.
- Available means eligible to be issued.
- Reserved means allocated to a defined requirement.
- Staged means positioned for near-term work.
- Issued means transferred out of controlled stock under the organization’s normal procedure.
- Return pending means removed from the active requirement but not yet returned to usable inventory.
The exact terminology is less important than consistency. A shared definition prevents different departments from interpreting the same inventory quantity in different ways.
Maintain useful information about every important part
A mature cross-department inventory system needs more than a description and quantity. Important items may require additional information about how they are identified, where they are stored, who uses them, and how they relate to upcoming work.
Useful inventory fields may include:
| Field | Why it matters |
|---|---|
| Part/material identifier | Gives every team a common reference |
| Description | Helps users recognize the item |
| Material category | Supports organization |
| Current location | Answers where it is |
| Quantity | Answers how much is there |
| Department/work area | Supports local planning |
| Work package/project phase | Helps connect stock to demand |
| Normal home location | Shows where stock should normally reside |
| Storage requirements | Reduces inappropriate placement |
| Item image where useful | Helps identify visually similar components |
| Serial or identifying information where required | Supports unique-item control |
| Relevant local classification | Supports the operating process |
CyberStockroom supports product images and custom fields alongside mapped locations, allowing organizations to structure item information around their own inventory requirements.
Avoid adding fields simply because the system allows them. Each field should support a real operational decision, because unnecessary information creates additional maintenance work and increases the likelihood that records become outdated.
Give each process an owner
Shared visibility should not create shared ambiguity. Every significant inventory transaction should have a clearly defined role responsible for recording or verifying it.
A simple operating model might look like this:
| Event | Primary owner | Required inventory action |
|---|---|---|
| Delivery arrives | Receiving | Confirm material and initial location |
| Material put away | Material control | Record final storage location |
| Material moved to another zone | Person/team controlling the move | Transfer mapped location |
| Material issued to department | Stores/material control | Record departmental or destination location |
| Stock returned | Receiving/returns | Move to returns area and reconcile condition |
| Physical discrepancy found | Inventory control | Investigate and adjust according to procedure |
| Location physically changed | Location administrator/material control | Update map and signage |
| Cycle count completed | Inventory team | Reconcile physical and recorded quantity |
The specific job titles may vary. What matters is ensuring that no transaction disappears into the gap between departments because everyone assumed someone else would update the record.
Treat transfers as handovers
When inventory crosses a departmental boundary, treat it as a handover rather than a casual move.
Examples include:
Central Stores → Maintenance
Warehouse → Production
Fabrication → Field Staging
Receiving → Quality Hold
North Laydown Yard → Installation Staging
Each handover changes who depends on the accuracy of the location record. The transferring team should not consider the process complete simply because a forklift has physically deposited the material. The location and relevant inventory information need to move with it.
This becomes especially important on large sites because physical distance can hide errors. A pallet moved a short distance inside a small storeroom may still be found by walking around. A pallet transferred across a large project or plant can effectively disappear if the new location is not recorded.
Eliminate departmental shadow inventories
Shadow inventory develops when teams track stock outside the standard process because they do not trust the central inventory view. A maintenance supervisor may keep a spreadsheet, production may write quantities on a whiteboard, a project engineer may maintain a separate material tracker, and warehouse personnel may keep personal notes showing where items “really are.”
These workarounds often begin for understandable reasons, but once multiple records exist, disagreement becomes almost inevitable.
The solution is not simply to ban spreadsheets or informal tools. First determine why teams created them. They may need better location detail, faster access to inventory information, department-specific categorization, visibility into stock outside the main warehouse, clearer staging information, or greater confidence that transfers are being updated correctly.
Address those needs within the standard inventory process first. Once the shared system provides the visibility teams require, redundant shadow records can be retired without removing useful operational information.
Make shared stock visibly shared
Common parts create a particular challenge because several departments may consume the same bearing, fastener, gasket, electrical component, or other standard item. Over time, each team may begin protecting itself by maintaining local stock, leaving the organization with more inventory than anyone realizes.
A multi-location inventory model makes that distribution visible. Instead of hearing “Maintenance says it has none,” users can see how the same item is distributed across the operation:
Central Warehouse: 60
Maintenance: 8
Production Line 1: 12
Production Line 2: 6
Fabrication: 10
That visibility does not automatically mean the stock should be redistributed. Departments may have valid operational reasons for maintaining local quantities. The advantage is that purchasing, maintenance, production, and inventory teams can make decisions using organization-wide visibility rather than local assumptions.
CyberStockroom’s product-distribution view supports this type of multi-location visibility by allowing users to see how a selected product is distributed across mapped locations.
Put inventory close to use only when you can still control it
Point-of-use inventory can reduce travel and improve material access, but uncontrolled point-of-use stock simply creates smaller inventory problems throughout the site.
Local storage should still be represented within the shared inventory structure. A production-side rack, field container, maintenance cabinet, or work-package staging area should be treated as a defined location rather than as inventory that disappears once it leaves central stores.
When local stock remains mapped alongside central inventory, decentralized storage no longer requires decentralized visibility.
Make exception material obvious
Normal inventory should follow the normal material flow. Exceptions need clearly defined locations or operating states so they are easier to identify and manage.
These might include:
- Damaged material
- Unknown material
- Returns awaiting inspection
- Inventory under discrepancy investigation
- Urgent priority material
- Unidentified deliveries
- Obsolete stock
- Surplus pending disposition
The weakest approach is to create an unofficial corner where problem material is placed “temporarily.” Exception inventory usually requires more visibility than normal inventory, not less, because it is already outside the expected process.
Run cross-functional location reviews
Inventory accuracy should not be treated as a warehouse-only metric. Short cross-functional reviews can help identify where inventory visibility is beginning to weaken across the operation.
Useful topics include:
- High-search items
- Stockouts where the system showed inventory available
- Repeated location discrepancies
- Congested storage zones
- Unrecorded departmental stock
- Materials repeatedly transferred between locations
- Aged staging inventory
- Upcoming changes to the site layout
- Parts duplicated across departments
- Problem receiving or return flows
The purpose is not to make every department responsible for inventory administration. It is to make inventory visibility a shared operational concern.
Warehouse, maintenance, production, project, quality, and procurement teams may each interact with inventory differently, but they all depend on the same underlying physical truth. When location names, inventory states, ownership, movement rules, and shared stock visibility are consistent across departments, the organization spends less time reconciling different versions of reality and more time acting on reliable inventory information.
How CyberStockroom Supports a Map-First Inventory Process
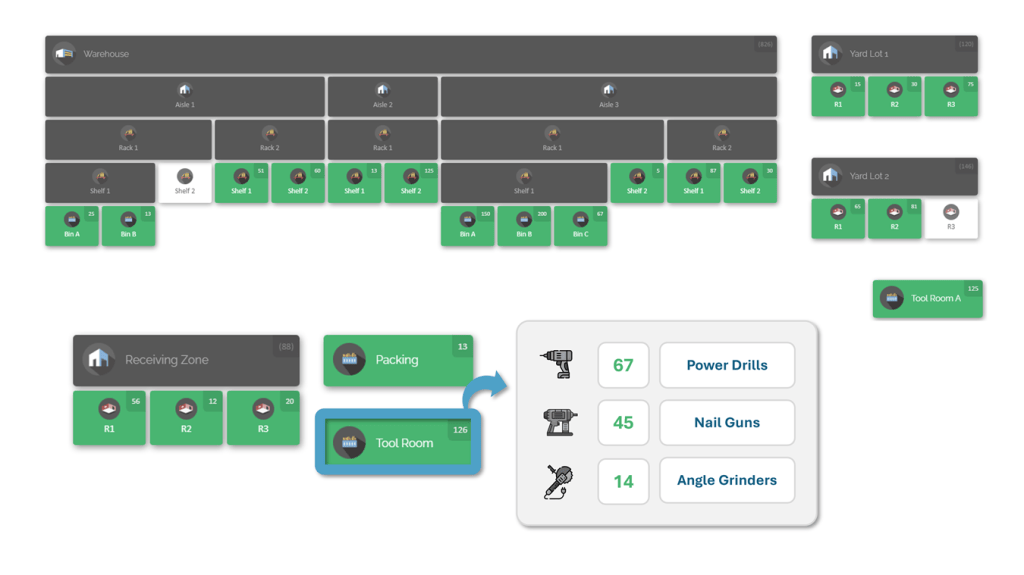
Once the physical location structure and operating rules are defined, the inventory platform should make those rules easier to follow. This is where CyberStockroom’s map-based approach fits particularly well in laydown yards, large job sites, and multi-department manufacturing environments.
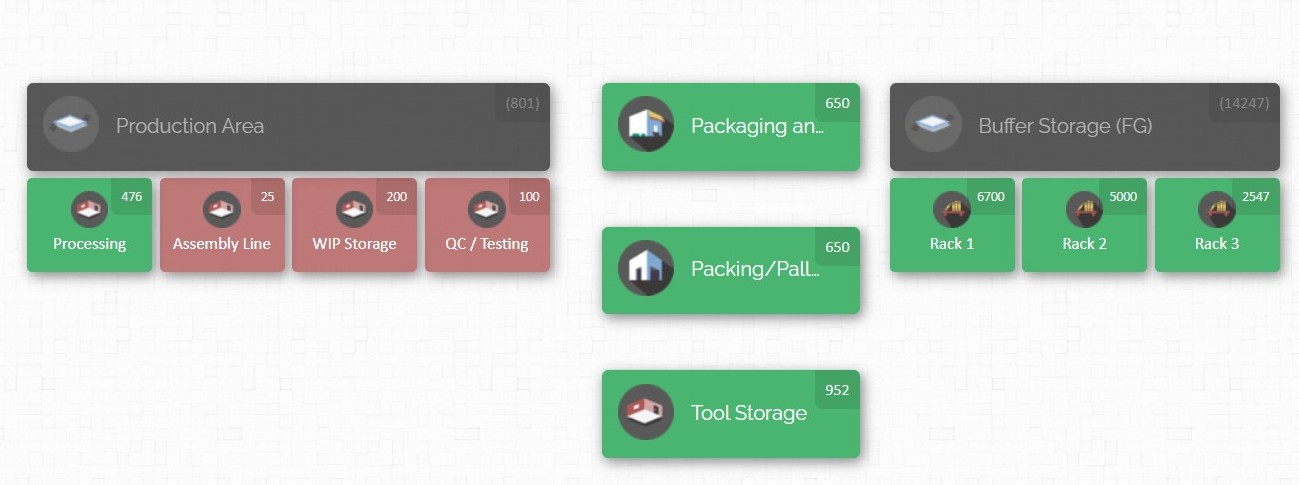
The platform is centered on visual inventory locations rather than requiring users to think about stock only through rows of data. Organizations can represent their operation as locations and sub-locations, arrange those areas to reflect how the business is physically understood, and associate products and quantities with them.
That directly addresses one of the fundamental challenges in material control: a quantity without physical context is not enough.
Build the organization as a hierarchy of locations
A large industrial operation rarely consists of a single stockroom. Inventory may be distributed across warehouses, laydown yards, maintenance areas, manufacturing departments, staging zones, and other storage locations.
CyberStockroom supports locations and sub-locations, allowing the inventory map to follow this type of physical hierarchy.
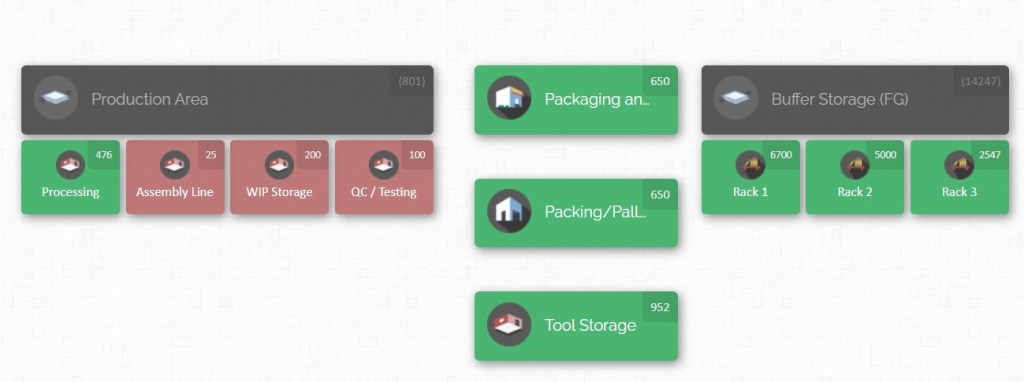
This is valuable for cross-department visibility because each team can work at the level that matters to them without losing the broader organizational view. Maintenance can focus on its own storage areas, warehouse personnel can work within the warehouse structure, material control can look across the site, and management can understand how inventory is distributed at a higher level.
Everyone is still working from the same underlying location model.
See what is stored at a specific location
One of the most basic questions in yard and warehouse management is also one of the hardest to answer reliably with a spreadsheet: What is physically stored in this area?
CyberStockroom allows users to view the contents of mapped locations along with the quantities assigned to them. This can support activities such as:
- Cycle counting
- Yard walks
- Department reviews
- Receiving
- Staging
- Location clean-up
- Project-phase changes
For example, a supervisor reviewing North Yard / Mechanical / Row M3 can compare what the map says should be there with what is physically present.
That is much more useful operationally than searching an item master one part number at a time.
See where a product is distributed
The opposite question is equally important: Where are all the units of this part located?
CyberStockroom can show how a selected product is distributed across mapped locations. This becomes especially useful when several departments use the same item.
Suppose a plant has 80 units of a critical component distributed across:
Central Store
Production
Maintenance
Fabrication
Project StagingInstead of contacting each department or checking several separate lists, teams can work from one view of how the inventory is distributed across the operation.
That gives purchasing, replenishment, and transfer decisions better physical context.
Transfer inventory between mapped locations
Location systems become unreliable when moving the physical item is easier than updating the record.
CyberStockroom supports transfers between mapped locations, including drag-and-drop movement within the visual inventory interface. On a construction site, this can represent movements such as:
Warehouse → Laydown Yard
Laydown Yard → Field Staging
Container A → Container B
Structural Zone → Installation StagingIn a manufacturing environment, the same principle can apply to:
Central Stores → Production
Production → Maintenance
Receiving → Quality Area
Warehouse → Department StockroomThe value is that the platform supports the behavior the operation already needs: when inventory changes physical location, the recorded location should change with it.

Maintain history around inventory movement
A map shows the current inventory position. Movement history helps explain how the inventory reached that position.
CyberStockroom maintains Activity History around inventory actions and transfers, which can support investigations into unexpected stock differences, departmental transfers, repeated corrections, inventory appearing in unusual locations, changes made during earlier shifts, and movements into or out of staging areas.
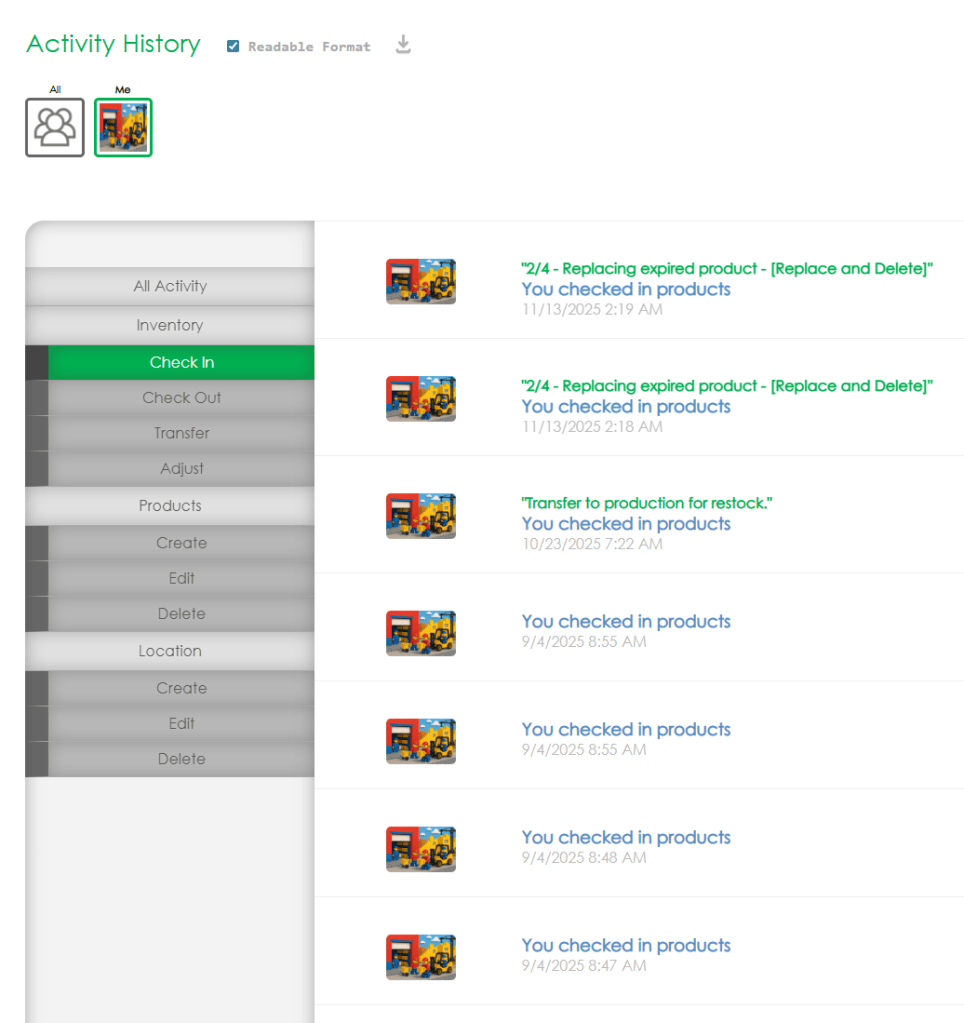
This becomes especially useful when multiple departments share inventory. Without movement history, a warehouse team may see only that several units are no longer in Location A. With a recorded history, the team has a better starting point for determining whether the inventory was transferred and where it went.
A current map answers where the stock is now. Activity History helps explain what happened before it got there.
Support visual cycle counting and location checks
The inventory map can also provide a practical structure for physical verification. Instead of asking employees to “count the yard,” counting work can be assigned to specific mapped locations.
For example:
Today: North Yard / Mechanical / Row 01
Tomorrow: North Yard / Mechanical / Row 02
Next: Warehouse / Fasteners / Rack FCyberStockroom supports cycle counting and inventory adjustments within its inventory workflow, allowing physical locations to become useful units for checking stock.
This also makes it easier to identify patterns. If one staging area repeatedly produces discrepancies, the issue may be weak movement control rather than poor counting. If another department consistently maintains high location accuracy, its process may provide a useful model for other areas.
The map therefore supports not only counting, but also investigation into why certain locations remain accurate while others repeatedly drift.
Use custom fields to organize material in ways departments understand
Physical location should remain the foundation of the inventory model, but organizations often need additional context to support planning and identification.
CyberStockroom supports custom fields that can be used to carry information relevant to the business.
Use these fields selectively. The map should remain the primary answer to where the inventory is located, while additional fields can help explain what it is, why it is there, and who it supports.
Give multiple departments a shared visual reference
The real value of the map is not simply that inventory personnel can see it. The greater benefit is that different departments no longer need to translate inventory information between separate mental models and tracking systems.
When a production supervisor, maintenance planner, and warehouse controller discuss a shortage, they can work from the same mapped location structure. When a project manager asks where a delivery was staged, the answer can reference a defined site location. When material control reorganizes a yard, the digital location structure can be updated to reflect the new physical arrangement.
CyberStockroom provides a shared visual inventory environment built around locations, sub-locations, and inventory quantities. This gives teams a common reference for understanding where stock is stored across the organization.
The operational value depends on combining that visibility with disciplined procedures. Software cannot make an inaccurate physical location accurate, and it cannot compensate for employees who repeatedly move stock without recording the change. It also cannot determine the safest storage arrangement for an unusual load or establish a project’s inspection requirements.
What it can do is provide a clearer framework for representing the physical operation, maintaining inventory by location, recording movement, and giving multiple departments a shared picture of where stock exists.
When the digital map reflects a well-defined physical process, CyberStockroom becomes part of the operating system for location visibility rather than simply another place to store inventory data.

Operating Cadence for Keeping the Map Accurate
A visual inventory map stays useful only when it reflects the physical operation. Instead of treating map maintenance as an occasional cleanup project, build location accuracy into everyday receiving, movement, counting, and review activities.
Key practices include:
- Make receiving the first accuracy checkpoint. Confirm where material is, where it should go, and who is responsible for recording the location before it enters the wider yard or facility.
- Use a consistent put-away process. Follow a repeatable sequence for verifying, assigning, moving, and recording inventory so material reaches a known location every time.
- Create a transfer standard. Treat every move between mapped locations as an inventory transaction, even when the physical distance is small.
- Review high-activity locations regularly. Focus attention on receiving, staging, returns, fast-moving stock, shared inventory, overflow, and other areas where frequent movement increases the risk of errors.
- Cycle count based on risk. Prioritize high-movement, high-value, shared, frequently transferred, or historically inaccurate inventory and locations rather than counting everything at the same frequency.
- Measure location and quantity accuracy separately. A correct quantity is not enough if the material is stored somewhere different from the recorded location.
- Control changes to the map. Define who can create, rename, consolidate, or remove locations so departments do not accidentally build duplicate or conflicting location structures.
- Review obsolete and duplicate locations. Remove or update locations that no longer match the physical site so inventory cannot be assigned to areas that no longer exist.
- Use discrepancies to improve the process. Categorize recurring errors such as unrecorded transfers, receiving mistakes, uncontrolled staging, or incorrect locations and use those patterns to identify where the workflow needs attention.
- Keep the physical storage environment disciplined. Digital mapping works best when physical boundaries, labels, storage areas, and travel routes are clear and consistently maintained.
- Train employees for real decisions. Teach people how to respond when locations are full, material is returned, inventory is found in the wrong place, or temporary storage is needed, not just how to navigate the software.
The goal is to make location accuracy part of normal material handling. When these practices become routine, the inventory map is much more likely to remain aligned with the physical operation.
Measure Whether the Laydown Yard Is Actually Getting Faster
A successful job site inventory mapping program should improve more than visibility. It should help teams find, access, move, and manage material more efficiently. Establish a baseline first, then track a small set of practical measures to see whether the yard is actually becoming easier to operate.
Key measures include:
- Material search time: Track how long workers spend locating the correct material. This helps separate visibility problems from physical access problems.
- Retrieval time: Measure how long it takes to physically access and remove material once its location is known. Long retrieval times can reveal poor slotting or congestion.
- Location accuracy: Compare recorded inventory locations with actual physical positions to determine whether the map remains trustworthy.
- Quantity accuracy: Verify that recorded quantities match physical stock and investigate whether discrepancies come from counting, issuing, or transfer problems.
- Receiving-to-put-away time: Monitor how long new inventory remains in receiving before reaching its assigned location. Excessive dwell time may signal unclear assignments, inspection delays, or capacity constraints.
- Unrecorded transfer rate: Track material that has moved physically without a corresponding location update. Frequent unrecorded transfers can quickly reduce confidence in the map.
- Double-handling events: Identify material that is moved repeatedly because of poor initial placement, unnecessary overflow, or weak delivery planning.
- Staging dwell time: Measure how long inventory remains in temporary staging areas to prevent short-term locations from becoming uncontrolled long-term storage.
- Departmental stock duplication: Compare shared inventory across departments to determine whether local stock levels are intentional or the result of poor cross-team visibility.
- Stockout investigations: Determine whether reported shortages are genuine supply problems or inventory that exists elsewhere, is reserved, on hold, or recorded incorrectly.
- Distance traveled for common picks: Review travel patterns for frequently requested material and re-slot items where unnecessary movement can be reduced.
- Map adoption: Look at whether teams actually use formal locations, record transfers consistently, reduce shadow spreadsheets, and rely on the map during normal work.
Use a Practical Implementation Sequence
Roll out the system in stages rather than trying to perfect every location at once. Begin with the physical structure and highest-value inventory flows, then connect departmental locations and use performance data to improve slotting, movement controls, staging, and location accuracy.
The goal is a steady progression from visibility → control → optimization.
Final Playbook for a Map-Driven Yard
The most effective laydown yards are not necessarily the largest, most automated, or most densely packed. They are the easiest to understand and operate.
A delivery arrives and has a defined destination. Material control can see where capacity remains. Production can identify where a required component is stored, maintenance can see shared parts without calling the warehouse, and procurement can distinguish a genuine shortage from stock already distributed across the site. Quality-controlled inventory remains distinct from usable stock, temporary staging stays visible, and every physical movement is reflected in the location record.
When the site changes, the map changes with it.
That operating discipline is what turns a laydown yard inventory map into a practical material-access system.
The physical design matters because storage areas need to work with delivery routes, handling equipment, project phases, pedestrian movement, and access requirements. The inventory design matters just as much. Every important area needs a clear identity, locations should follow a logical hierarchy, and materials should have defined homes. Active stock, reserve inventory, inspection areas, staging locations, and returns should remain distinguishable rather than blending into one general storage area.
The operating process is what keeps the physical and digital systems aligned.
For a new yard, begin with material flow before assigning storage locations. For an existing yard, walk the site and document the current physical reality before trying to reorganize it. In a manufacturing plant, extend the same mapping logic through receiving, warehouses, production, maintenance, fabrication, and departmental stock locations.
For multi-department inventory, establish one shared physical-location vocabulary rather than allowing every team to create its own version. For faster material access, position inventory according to movement frequency, handling needs, and point of use instead of simply filling whichever space happens to be available.
Better inventory accuracy depends on the same discipline. Treat meaningful physical movements as inventory transactions, verify stock by mapped location, and investigate discrepancies rather than correcting quantities without understanding why the record and physical inventory separated.
Sustainable improvement also requires measurement. Search time, retrieval time, location accuracy, transfer errors, staging dwell time, repeated handling, and other operational indicators provide a clearer picture of yard performance than appearance alone.
This is also where a visual inventory platform can strengthen the operating model.
CyberStockroom enables teams to create maps of locations and sub-locations, see the inventory held within particular areas, view quantities across mapped locations, examine how a product is distributed, move inventory between locations, and review Activity History around inventory actions and transfers. These capabilities align closely with the practical needs of large laydown yards and multi-department manufacturing operations: location visibility, inventory organization, movement control, and a shared view of where material is held.
The key is to treat the map as part of daily operations rather than as another document that occasionally gets updated.
When a new rack is installed, add it to the map. When a temporary laydown zone opens, represent it as a location. When maintenance establishes a local parts area, include it in the same inventory structure. When material moves to production or staging, update the location. When a staging area closes, remove or deactivate it from the active structure. When cycle counting reveals repeated discrepancies, investigate the process causing them. When the project enters a new phase, review the yard before the next wave of material arrives.
A reliable laydown yard inventory map is ultimately a shared model of physical reality. It helps people understand where inventory belongs, where it currently sits, and how different parts of a complex operation connect.
The benefits extend well beyond the inventory department. Receiving gains clearer destinations for incoming material, while warehouse and material-control teams spend less time answering basic location questions. Production and field crews approach material requests with better information, maintenance can see stock outside its immediate storeroom, and procurement gains a clearer picture of inventory distributed across the site.
Management also gains better visibility into where inventory is accumulating, where material is being moved repeatedly, and which locations are becoming difficult to control. The organization stops treating inventory visibility as a warehouse-only concern and begins treating it as part of the wider operating system.
That is the standard to aim for. The objective is not simply a tidy yard, accurate quantities, or a digital drawing of the site. It is a physical and digital location system that allows the people receiving, storing, moving, planning, and consuming material to answer the same fundamental questions:
- What do we have?
- Where is it?
- How much is there?
- Is it in the right place?
- Can the team that needs it access it efficiently?
When those questions can be answered consistently across warehouses, laydown yards, production areas, departmental stockrooms, and staging locations, the inventory map is doing what it was designed to do.









Leave a Reply