
Construction projects rely on having the right materials ready at the right time and place. Effective material staging means planning, ordering, grouping and storing project supplies so that crews never run out of what they need. In a large project this involves many teams (procurement, stores, warehouse, trades, site crews) and multiple locations (on-site yards, laydown areas, warehouses). The key is visibility: every team should know exactly how much of each part is on hand and where it is stored.
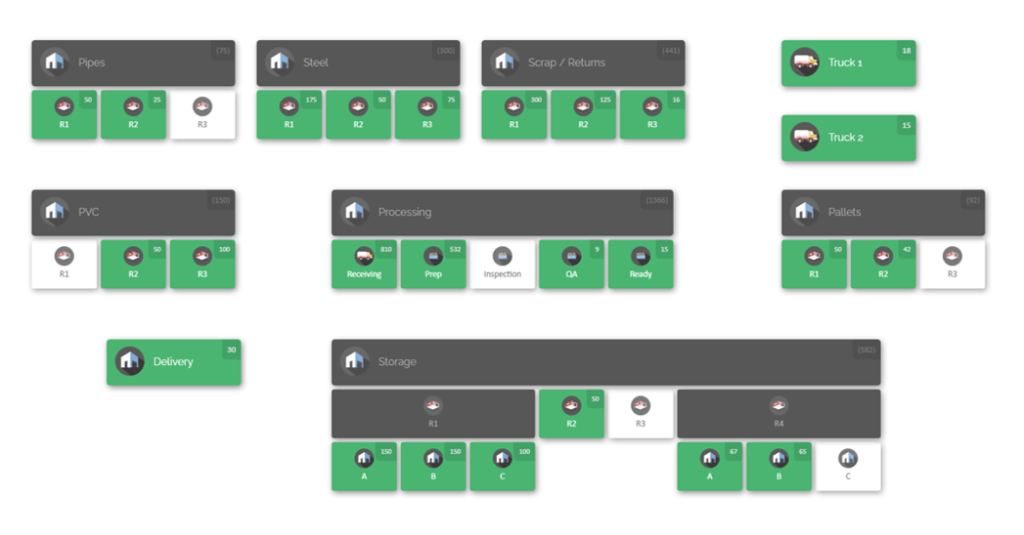
By creating an interactive inventory map of storage zones, warehouses and staging areas, project managers can coordinate material usage with each project phase. This visual approach ensures that early-phase materials (e.g. foundations, structural steel) are staged and consumed before finishing-phase items (drywall, finishes), eliminating needless delays and double-handling. The result is smoother workflows, fewer stockouts and a fully aligned inventory process across all departments.
The Role of Material Staging in Construction
Material staging (sometimes called pre-staging or laydown planning) is the process of gathering and organising all the parts needed for a project before they are required on site. This typically starts during project planning: once engineering drawings and bill-of-materials are finalised, inventory teams schedule orders and delivery dates. By the time a new phase is about to begin (for example, slab pouring, framing or MEP installation), the necessary items are already received, inspected and stored. The alternative is just‑in‑time delivery, where parts arrive as needed; while this can save storage space, it is risky during construction delays or supply chain disruptions. Staging mitigates those risks by ensuring materials are on hand when crews need them.
A good staging plan breaks materials down by work scope and timing. Items for early phases (foundation concrete, rebar, structural steel, underground piping) are grouped and stored where they can be loaded out first. Items for later phases (interior finishes, paint, fixtures) are stored separately, perhaps in the back of a yard or in trailers. Within each phase, related trades’ materials can be kept together: electrical conduits and wiring near electrical panels, plumbing fittings with plumbing equipment, etc. This way, when a sub‑task starts, its kit of parts (for example, a valve plus its gaskets and bolts) is ready to go. Strategic staging like this avoids workers having to wander through the site hunting for parts or waiting for late deliveries. It also prevents errors like an electrician grabbing a component intended for another trade, because every zone is clearly marked for its content and phase.
Organizing Materials by Project Phase

Once all materials are received and logged, organisation is critical. Materials should be grouped by project phase and trade in the staging area. For example, one yard zone could hold Phase 1: Excavation items, another Phase 2: Structure, and a third Phase 3: Finishes. Within each zone, pile or rack items by type. Heavy long items like lumber or pipes can lie on the ground or cradles, while pallets of hardware or bricks go on racks. Smaller parts (fasteners, connectors) belong in labelled bins or crates. As a general rule, place materials needed earliest (foundations, framing) toward the front of the yard, and finishing materials (drywall, trim) toward the back. This reduces handling – crews pull early‑phase items out first without needing to reshuffle.
Clear labelling and signage is essential. Every storage area (aisle, rack, bin, container) should have an identifier (e.g. “Zone A – Phase 1 Steel” or “Bin 12 – Drywall”). Large items and piles should have weatherproof labels with part descriptions and counts. Colour-coding can also help: for instance, marking all Phase 1 materials with red tags, Phase 2 with blue, etc. This visual scheme means any worker can glance at a label and know exactly what belongs where. When barcodes are used, they are attached to both items and location signs. That way a crew can scan a pallet of fittings and the rack label to immediately record the exact location in the inventory system.
While staging areas are meant to hold materials, they also need to be secure and safe. Valuable or hazardous items (fuels, chemicals, premium tools) should be locked or enclosed separately. Keep clear, wide aisles so forklifts and workers can move freely. Mark pedestrian paths and machinery zones. Cover or shelter weather‑sensitive stock (like cement or drywall) with tarps or temporary sheds. Plan for heavy equipment too: store large beams or precast elements within the reach of cranes or forklifts, and reserve fuel and charging spots near machine parking areas. An organised, orderly layout not only speeds up retrieval but also reduces loss and damage.
Best Practices for Multi-Department Inventory Visibility

Effective staging is not just about the physical layout; it also depends on processes and communication across departments. Construction sites often involve many stakeholders: procurement buyers, warehouse staff, subcontractors, and field crews. To keep everyone aligned, implement these best practices:
- Centralise inventory data. Use a unified system or spreadsheet that all teams update. Whether on paper or software, there should be one source of truth. When new material arrives, the warehouse logs it immediately. If a crew uses stock, someone records that transaction right away. This prevents one team from ordering duplicates or missing critical shortages. In practice, this means avoiding separate lists for each trade – instead, have a shared inventory ledger. For example, if the electrical team takes conduit pieces, the warehouse team should adjust the count in the central system so the foreman always sees real‑time levels.
- Implement real-time tracking with scanning. Reduce human error by using barcode scanner for every inventory movement. On delivery, scan each item in as it is unloaded. When moving materials from one zone to another, scan at both origin and destination. At checkout, when a crew pulls parts for installation, scan those parts out. Scanning ensures the system’s counts stay accurate. Modern handheld scanners (or even smart devices with scanning apps) can upload changes instantly.
- Standardise labels and processes. Every item should have a unique identifier (a SKU or part number) clearly printed or attached. All storage locations (racks, bins, lockers) must be labelled too. Create and enforce simple operating procedures: for example, a receiving procedure might be “verify delivery quantities, label pallets, scan them into Zone A staging.” For any material move or usage, require scanning both the item and the from/to locations. Consistency is key – make scanning part of the routine for every transaction. Well-defined processes ensure one team doesn’t accidentally “borrow” parts without logging them. With consistent labelling and scanning across all departments, training new workers becomes much easier and mistakes drop dramatically.
- Conduct regular cycle counts and audits. Even the best system can drift from reality if small errors accumulate. Schedule routine counts of high-use items so that records match the actual stock. For instance, count one section or category each week on a rolling basis. Prioritise auditing critical parts (the fasteners, safety gear, pumps, etc.) and high-value stock. After each count, reconcile any discrepancies immediately: investigate why the system shows 20 whereas the shelf has 18. Prompt corrections avoid the “system says we have it” trap that causes surprise stockouts. Periodically (say, monthly or at phase transitions) do a full inventory check of the staging area. Reliable counts are the foundation of visibility – if the numbers are wrong, even the best map won’t help.
- Set up issuing and return procedures. Treat parts issuance like a check-out process. Whenever someone takes materials (to a work area or another department), document it. This can be a simple issue slip, an entry in a logbook, or better, a quick form in the inventory app. Note what was taken, who took it, and when. Requiring teams to sign out items (even digitally) creates accountability. For example, if the plumbing crew takes pipe fittings, having a record of that means the stores team and other trades know the new on-hand count. Some operations colour-code or flag high-value items (like specialized tools) to highlight them during audits. Any off-site returns (unused parts brought back) should also be scanned back in. This disciplined issue/return process prevents items from vanishing in limbo between teams.
- Establish clear communication channels. In multi-department operations, it’s important to keep all teams informed of inventory status and changes. Hold briefings or use shared dashboards for key updates. For instance, if the site warehouse is running low on a critical material, post an alert (via app or email) so procurement can expedite a reorder. Similarly, if a delivery delay occurs, notify affected teams. Shared visibility means fewer last-minute surprises. A good practice is to have one person (or a small inventory team) oversee the central count and communications so that departments don’t have to chase each other for information.
Digital Inventory Mapping: An Overview

To put these practices into action, many construction and manufacturing teams turn to visual mapping tools. Digital inventory maps are interactive site plans where every storage location is drawn and defined. Instead of a text list of bins, you see a 2D view of your warehouse aisles, laydown yards, truck beds or tool rooms. Each zone on the map is a clickable area. For example, imagine a web dashboard that shows your entire project site from above, with overlays for Warehouse A, Yard Staging B, and Job Trailer C. On that map, each shelf or pallet rack is marked and can display how many of each part is in it.
This visual approach has huge advantages. First, it makes navigation intuitive. Users no longer have to memorize rack numbers or dig through logbooks – they click on the aisle or rack they’re standing in, and see all the parts stored there. Second, it ties directly to physical locations: a scan of a label can highlight that spot on the map. Third, it supports multi-location operations. If you have multiple yards or even vehicles, you can create sub-maps for each and see them all on a single dashboard. So a foreman could view Site Laydown Yard and Off-Site Warehouse side by side, with inventory in each clearly indicated.
Interactive inventory mapping also helps with space optimisation and logistics planning. Planners can rearrange the digital layout to match real life (re-labelling or re-arranging zones on-screen as bins are moved). They can plan where to stage next phases by moving items on the digital map. Some systems even allow drag‑and‑drop transfers: for example, clicking and dragging a part from “Warehouse” to “Yard Lot 1” instantly moves the stock and updates the count. This visual, map-driven method brings clarity to complex storage areas. It helps teams reduce search time (just click and find) and avoid misplaced items (if an item exists on the map, it must have a location).
Achieving Cross-Team Alignment and Efficiency

Once an inventory map and standard processes are in place, all departments share a common view of the site’s supplies. This prevents the chaos of “partial truths.” Without visibility, each group might see only its own records: the buyer thinks 100 bolts are in stores, the warehouse shows 80, and the site foreman hears “none left.” But with a unified system and map, everyone sees the same up‑to‑date information. For example, when maintenance withdraws a spare pump, they scan it out and the maintenance storeroom’s count goes down in real time – and all other teams (production, purchasing, etc.) immediately see that updated count.
Transparent inventory data also streamlines decision making. Scheduling and resupply decisions rely on knowing “how many of what we have and where.” If the production manager can see the exact stock levels on a visual dashboard, they will not over-order parts that are already available on site. Similarly, project accountants or cost controllers see accurate quantities, avoiding surprise expenses. In terms of workflow, inventory visibility supports lean principles: it reduces wasted motion (workers aren’t running around lost), minimizes waiting (machines don’t stop for missing parts), and cuts unnecessary transports (if a part is misplaced, the map flags it rather than sending crews off in the wrong direction). Essentially, every handoff – from receiving to stores to the work team – happens according to the same playbook.
When teams are aligned, operational efficiency soars. Day‑to-day tasks like audits and inventory counts become faster because the map itself can guide them. An auditor can literally drive from rack to rack on the map, ticking off items systematically. Audits catch discrepancies early, so teams fix them before they cascade. Likewise, space utilization improves: managers can identify underused zones on the map and reorganise (perhaps moving slow‑moving stock into compact storage to free high-traffic space). Training new employees also benefits – with a map, newcomers learn layout visually instead of memorizing codes. In short, visual management turns inventory information into action. Every department – procurement, storekeeping, field crew – works from the same “map”, so everyone acts on one operational truth.
Step-by-Step: Building Your Staging Map
- Plan your layout by phase. Start by sketching a physical layout of your storage areas divided by project phase. For example, designate one bay or container for Phase 1 materials, another for Phase 2, etc. Within each, list the trades or item categories. Align this plan with your project schedule so that each group of materials will be accessible when needed.
- Define and label zones on the digital map. Using inventory mapping software, create locations for each area in your layout. This means drawing the warehouse floorplan or yard map and adding labels (e.g. “Building A – Phase 1 Materials” or “Yard Lot East – Phase 2 Concrete”). If the tool allows, colour‑code or tag zones by phase. Accurate labeling is crucial: it should match the physical signs on site so there’s no confusion.
- Import or create item records. Populate the system with your inventory list. Many teams start by importing existing spreadsheets of parts (item codes, descriptions, quantities). Each item should have a part number, description, and optionally an image. Assign each item to the proper location on the map where it will be stored. If your site uses barcodes, make sure those are recorded in the item’s profile. At this stage you’re effectively building the digital twin of your inventory.
- Set up scanning and data capture. If using barcodes, label each pallet, bin or rack location and ensure scanners are ready. Train staff to scan at key points: when goods arrive, when moving between zones, and when issuing to crews. The goal is that the map always reflects reality. Even without barcodes, enforce a strict recording process: someone should still note each movement in the system immediately. This discipline keeps the map updated. You might also configure alerts or custom fields for critical parts (for example, a checkbox for “freeze piece if quantity < 5”).
- Run initial cycle counts. Before going live, perform a physical count of all items in each mapped zone and reconcile with the digital records. This audit catches any import errors or misplacements. Adjust the system counts to match the actual quantities. From now on, cycle counting becomes part of regular operations to maintain accuracy.
- Train and assign responsibilities. Make sure every user understands the mapping interface and their role. Warehouse personnel should know how to move items on the map and update quantities. Foremen should know how to look up parts and scan them out. Encourage use of the map as the first source of truth for any inventory question. Assign a coordinator (site engineer or inventory clerk) to oversee updates and troubleshoot issues so that data stays clean.
- Monitor and refine continuously. Use the map to track usage patterns as the project progresses. As a phase wraps up, shrink or clear its zone and reassign or reorder items for upcoming phases. If a location on the map shows unexpectedly high or low stock, investigate – there may be a logging mistake or a delivery discrepancy. Regularly update the map if site layout changes (e.g. new shipping container brought in, or racking moved). Over time, these adjustments will make the map an increasingly powerful tool for coordination.
CyberStockroom: A Visual Inventory Platform for Teams
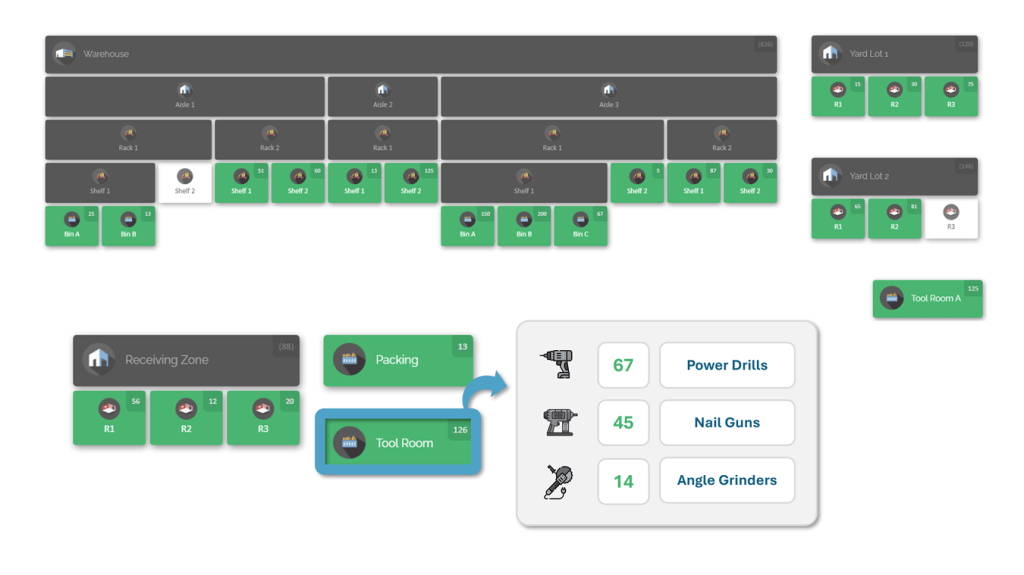
To bring these ideas to life, tools like CyberStockroom offer specialized features tailored for multi-department inventory visibility. CyberStockroom is a cloud-based mapping platform that turns inventory data into an interactive site map. Each user can log in and see the same up-to-date map and stock levels in real time. Here’s how such a platform supports the staging process:
- Centralised, cloud-based system. All inventory data – counts, locations, part details – are stored in the cloud. This means warehouse staff, site supervisors and even remote offices all access the same master record. When one team scans an item in or out, the entire organisation instantly sees the change. Centralisation removes data silos between departments.
- Interactive digital map interface. CyberStockroom lets you draw your facility layout: warehouses, buildings, floors, vehicles or yard zones. You can define each room, rack, bin or storage area on the map and give it a custom name. On this map, every location is a clickable hotspot. Clicking a location displays exactly which parts are there and in what quantities. The visual layout matches the physical world, so it feels intuitive. For instance, you might click “Phase 1 Rack A” and see that 50 structural steel beams are stored there.

- Drag & drop transfers. Moving stock is as simple as dragging an item icon from one zone to another on the map. If the ground crew moves a pallet from the laydown yard to a crane pad, a supervisor can simulate that move on-screen with a few clicks. This instantly updates both source and destination counts. Such drag-and-drop transfers make inventory adjustments quick and reduce paperwork: there’s no need to fill out forms when the system updates automatically.
- Barcode scanning for parts and locations. The platform supports barcode scanning for all transactions. Users can print labels and affix them to bins, shelves or pallets. At receiving, scanning a pallet and its destination location updates the system in one step. During staging, crews scan items and bins as they move stock. There’s even a “Quick Scan” mode in the software for batch operations: a user can rapidly scan dozens of items and locations in sequence to check multiple items in or out. By tying the physical label scans to the digital map, every movement is tracked precisely with minimal manual entry.
- Real-time inventory visibility (the “X-ray view”). Any user can select a specific part (for example, a critical valve or a type of fastener) and instantly see an overview of where that item is stocked across all locations. The map will highlight every location containing that part and show quantities. This “distribution view” acts like X-ray vision, answering questions such as “In which laydown yards do we have the concrete anchors?” without searching through reports. It’s a powerful way to find misplaced parts or assess if there’s surplus in one area that can be reallocated.
- Batch importing and customisation. To get started, existing inventory lists can be uploaded in bulk. If a project already uses spreadsheets, those data can be imported to populate the map quickly. Custom fields (such as “phase required” or “trade category”) and images of parts can also be added, so each item record is rich with information. This helps in construction settings because parts often come with diagrams or specs; attaching an image to an item makes identification easier.

In practice, using CyberStockroom (or a similar map-driven system) means that all the best practices come together in one interface. The warehouse manager sets up the site map, adds locations and products, and defines labels. Crews then use scanners to keep the digital map in sync with the physical world. Since every department uses the same platform, communication improves: the procurement team sees exactly what materials remain after each stage, and the project manager can review inventory by phase at a glance. Over time, this leads to stronger alignment. For example, one company found that after creating a mapped staging system, trade foremen stopped making off-system supply runs – the shared visibility showed them the nearest source of each item on site.
Conclusion
Managing construction materials by project phase requires both careful planning and clear visibility. By organising a staging area into logical zones, implementing disciplined tracking, and using an interactive inventory map, construction teams can ensure the right parts are always available where and when they are needed. Such an approach turns staging from guesswork into a visual workflow: early-phase items are stored up-front, later-phase items stored behind; labels and scans guarantee accuracy; and cross-department software keeps everyone on the same page. This not only cuts waste and delays but also boosts operational efficiency and inventory accuracy.
Inventory mapping tools like CyberStockroom translate these practices into an easy-to-use system. They let teams build a digital layout of the entire operation and then manage stock within that map. As a result, crews spend less time hunting for supplies and more time building. Over the life of a project, this leads to fewer rush orders, less surplus material, and projects delivered on schedule. For inventory professionals and site managers alike, adopting a map-based staging strategy is a practical step toward full parts visibility and smoother construction workflows.









Leave a comment