
Industrial facilities face rising costs for new warehouse space. The expense of construction, real estate, or even temporary lease options makes expansion a difficult choice. Fortunately, most warehouses are not actually at capacity. Instead, they often underuse the vertical dimension of the building. Every time inventory is stored on the ground without considering height, that wasted space becomes an opportunity for improvement.
However, merely piling items higher can create problems. If parts are stored on 6th or 7th shelves, workers must use lifts to reach them; frequently needed items can become inconveniently hard to pick. Worse, stock records may not reflect the new locations accurately. A maintenance technician might be told a replacement part is “in stock”, but the exact spot could be unclear if inventory was moved upward without updating the system. Production may see a total count of components, yet half of them might be sitting on high racks that are reserved for seasonal reserves or secondary stock. In short, vertical space is only valuable if the stored inventory remains visible and accessible in the warehouse system.
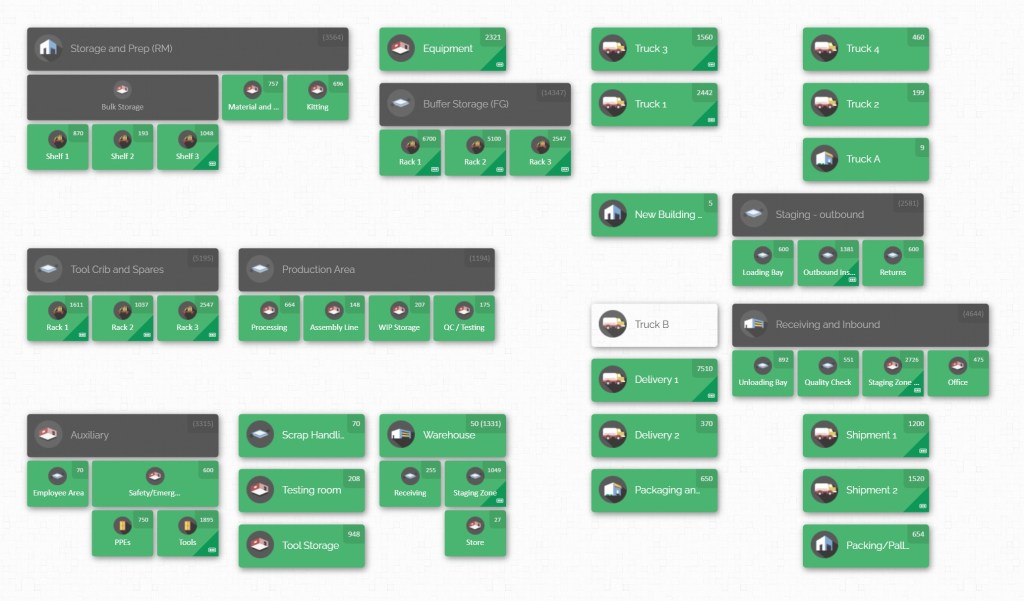
Achieving both increased density and clear visibility requires a thoughtful approach. A warehouse can physically hold far more inventory by installing taller pallet racks, high shelving, mezzanines, or stackable systems, but it also needs processes and tools to manage that extra capacity. Warehouse teams must create a precise location structure, assign inventory to those specific spots, and ensure every movement updates the inventory record. Workers should know that when they see Rack B4, Level 3 on a pick ticket or maintenance order, they can find the item on the corresponding shelf without guesswork.
For operations spanning multiple departments, vertical organization becomes even more critical. In a manufacturing plant, the warehouse may serve production lines, maintenance engineers, facilities managers, and procurement. Each group uses warehouse space differently. Production may have large bulk raw materials; maintenance may store small spare parts; operations may keep emergency supplies; procurement needs visibility of all these inventories. Without a unified view, one department’s storage gains could become another’s problem. For example, raising pallets to second-level racks might open up floor area for staging, but if maintenance isn’t aware of the new locations, they may misplace items or place duplicate orders.
A combination of clear physical layout and strong inventory mapping is required. Warehouses should be thought of as three-dimensional systems, not just floor plans. Every rack bay, shelf level, and bin can be given an identity. When the inventory system incorporates this three-dimensional structure, teams across the organization gain a clearer picture of where stock is. The result is improved efficiency (workers spend less time searching), better accuracy (fewer misplaced items), and stronger cross-team alignment (everyone references the same inventory map).
What Is Vertical Space Utilization in an Industrial Warehouse?

Vertical space utilization is the practice of using the height of your warehouse – not just the floor – for storage. Think of the warehouse as a three-dimensional box. The footprint (square metres of floor) is just one dimension of that box. The others are length and, importantly, height.
In many older or growing warehouses, the height of the building far exceeds the height of current storage. Perhaps ceiling beams are 10 metres above the floor, but the racks only go up 3-4 metres. Or maybe inventory is stacked on the floor in bulk only a metre high, even though forklifts could place additional layers. When an operations manager observes that valuable ceiling clearance is going unused, that’s an indicator of poor vertical space utilization.
Common methods of adding vertical capacity include:
- Pallet racking systems that rise many metres (often 6m or higher), allowing multiple pallet loads one above another.
- Tall shelving units for smaller parts, where several levels of shelves sit atop each other.
- Mezzanine floors or catwalks that create intermediate floors within the building, effectively doubling usable floor area in a section.
- Bin or drawer systems stacked high for small components.
- Stackable containers and cages that can be safely stacked under supervision.
- Overhead storage areas (such as under mezzanines or above offices) for infrequently accessed inventory.
Each of these solutions uses vertical height to expand capacity. However, each also requires careful planning about how items will be placed and retrieved. If a pallet rack goes 8 metres up, you need clear floor markings or lift equipment to reach those upper pallets. If a shelving rack has 5 shelf levels, each level should be labelled and recorded.
Effective vertical utilization isn’t simply a matter of installing a taller piece of equipment. It’s a coordinated process:
- Inventory mapping: Each vertical location (e.g., a specific shelf level) must have a defined place in the inventory system.
- Accessibility considerations: Items stored high must either be infrequent-use or suited for mechanical retrieval (e.g. forklift, lift table).
- Safety and regulations: There must be proper clearance for fire suppression, safe lift operation, and fall protection where required.
- Weight and size matching: Heavier or oversized items should stay lower; lighter or smaller items can be stored higher up.
- Replenishment planning: Reserve stocks placed up high should have an established method to move replacements down when needed.
- Cross-department needs: Each department’s inventory types and usage patterns will influence which vertical spaces they use.
By definition, vertical space utilization in an industrial warehouse is about using the available airspace for storing inventory. But the real purpose of doing so is to increase effective storage while maintaining order and access. Simply stacking every empty crate to the ceiling might raise capacity on paper, but if it buries parts or confuses where stock is, the warehouse becomes less efficient overall. The key is a balanced approach: more capacity, but with an intact and precise location structure. That way, every box or bin on a high shelf can still be easily found in the system and safely retrieved when needed.
Why Industrial Warehouses Often Underuse Vertical Space
It may seem counterintuitive, but many warehouses end up under-using the height of their buildings. A variety of practical factors contribute to this:
- Historical Layout and Incremental Changes. Most warehouses evolve over time rather than being perfectly planned from the start. Initially, a facility might have simple low shelving or even bulk floor stacks. As inventory grows, managers often add whatever racks or bins they have space for on the floor. Temporary floor areas become long-term storage by necessity. Without a comprehensive redesign, the warehouse ends up as a patchwork. The ceilings stay high, but shelves may never be upgraded to match that height. In many cases, adding more vertical storage equipment simply wasn’t on the radar when older shelving was installed.
- Focus on Floor-Level Solutions First. When space gets tight, the knee-jerk solution is to find more floor area. This could mean narrowing aisles, repurposing staging zones, or even storing pallets on the floor temporarily. These fixes are easy to see and implement quickly, so they tend to be attempted first. However, they crowd the working area and lead to congestion. Meanwhile, the open height above existing racks or unused bay spaces often remains unexamined. Over time, the warehouse might feel “full” because the floor is packed, even though most racks aren’t fully stacked up.
- Inadequate Inventory Location Structure. Some warehouses track stock only at a broad location level (e.g. “Warehouse A” or “Bin Room”). Without a detailed hierarchy, adding vertical positions doesn’t help visibility. For example, if an inventory system only knows that 100 bolts are in “Zone 3,” workers might already have several shelves in Zone 3. Stacking them upward just increases search effort. The new levels become an undocumented mystery. A rigorous location hierarchy (up to shelf and bin level) is needed before adding height, or else those positions effectively disappear from the digital record.
- Lack of Organizational Coordination. When different departments independently store items, they may each grab whatever space they can. If maintenance, production, and operations all use the same storeroom without a unified plan, some vertical areas might be avoided because of ownership issues. If no one takes responsibility for mapping and optimising vertical spaces, those spaces lie dormant by default.
- Safety and Equipment Concerns. Raising inventory above floor level often requires forklifts, pallet jacks, ladder usage, or lift tables. If a warehouse doesn’t have easy access equipment or if staff aren’t trained and comfortable using it, the tendency is to leave items on the ground. Fire codes, lighting, and sprinkler requirements can also complicate how high racks can go. These practical issues can discourage vertical expansion without a proper plan.
- Fear of Losing Accessibility. Some managers worry that storing items higher will make picking slower or more error-prone. They may be right if done poorly. Instead of addressing this with better processes, they simply opt to keep items low. But the result is more floor congestion and less capacity.
In short, until leadership sees that unused vertical space is a problem, and that proper planning can turn it into capacity, warehouses will underuse it. Recognizing this issue is the first step. Once underutilization is identified, the next step is to ensure that vertical storage and inventory visibility grow together.
Effective vertical utilization requires a culture and system that value both capacity and clarity. If only capacity is improved, inventory chaos will follow: searching for items in a tall rack without clear labels leads to delays and mistakes. If only visibility is cared for, wasted space remains. The solution is to address both: add racks and shelves, and simultaneously refine the inventory location structure and processes.
Setting Goals for Vertical Utilization and Inventory Visibility

Before jumping into new shelving or mezzanines, it’s important to clarify the objective. The goal is not just to cram more inventory in; it’s to make better use of space without sacrificing efficiency or accuracy. In other words:
- Maximise cubic utilization: Increase the storage density of the warehouse, making use of overhead space and full rack heights.
- Maintain or improve location clarity: Ensure that each item’s location is clearly defined and recorded, even after moving inventory to higher positions.
- Enhance cross-department visibility: Allow all teams (warehouse, maintenance, production, procurement, etc.) to see exactly where stock is physically stored, so nobody is left wondering “We have it, but where is it?”
Balancing these aims means treating vertical space planning as a project with both physical and data components. On the physical side, you might rearrange racks, install new storage systems, and relabel shelves. On the data side, you must update and possibly expand the location schema in your inventory system to account for every new rack level or mezzanine zone.
In practice, this looks like a cycle of improvement:
- Audit existing inventory and locations. Find out exactly what you have and where, and identify underused volume.
- Design a vertical storage plan. Decide where new racks or shelves go, and how items will be distributed (by weight, size, frequency, etc.).
- Define or refine location naming. For every new rack or shelf, create a corresponding location in the system.
- Reorganize inventory in phases. Move materials systematically, updating locations as you go.
- Review and train. Ensure all departments know how to use the new layout and systems to find stock.
With this approach, growth in capacity and growth in inventory visibility happen hand-in-hand. The warehouse will gain more space, and simultaneously the “digital twin” of the warehouse (the inventory map) will be expanded to cover that space.
Assessing Your Warehouse’s Vertical Potential
The first practical step is to measure what you have and what you could have. This involves:
- Mapping the three-dimensional space. Start with any existing floor plan, and note the clear ceiling height in each area. Record structural features (columns, pipes, lighting) that may limit rack placement. Identify any mezzanines, overhead cranes, or obstructions. Knowing the full height in different zones tells you the maximum possible shelf height.
- Inventory location audit. List all current storage locations in your system (warehouses, zones, racks, shelves, bins). For each location, note how tall its contents are stacked. For example, Rack 05 might be 4m tall but only 2m of it is used. Pallets might be left two high when the rack could handle four. Or a bulk pallet might be on the ground under empty upper rack bays.
- Identify clear vs obstructed areas. Some parts of the warehouse may already have tall structures (mezzanines, cages) where little growth is possible, while others may have fully open height. Mark where new storage could be inserted (for instance, replacing low shelves with taller units).
- Catalogue inventory types and volumes. Determine which items are small (shelving/bin level) vs large (pallet level). Also note how often each item is used. This will guide how much of the remaining height is appropriate to use. For instance, a zone used for daily production picks might only partially use height so that most inventory is at waist or shoulder height. A zone used for reserve stock or bulk storage can use every available inch.
- Check equipment capability. If you plan to use high racks, make sure you have forklifts or lifts that can safely operate at that height. Also verify floor load ratings (especially if adding mezzanines), sprinkler clearance requirements, and any relevant regulations.
This assessment phase often reveals surprising opportunities: maybe a short shelving row can be replaced with taller racking, or a narrow aisle can be expanded upward since a lift could navigate it. The output should be a rough plan: “Warehouse Section A: install 6m rack along east wall; Section B: raise shelves to 5 levels.”
Importantly, while doing this, involve the key stakeholders (warehouse lead, maintenance manager, production supervisor, safety officer). Each may have insight: maintenance might say “store filters here near plumbing”, production might need certain aisles clear for forklifts, etc. Coordination at this stage prevents conflicts later.
Building a Clear Warehouse Location Hierarchy
A cornerstone of vertical organization is a logical naming and hierarchy for locations. A “location” in the inventory system might be a building, a room, an aisle, a rack, a shelf, or a bin. The structure should mirror how people navigate the facility. For example:
- Warehouse Layout: Warehouse A
- Zone/Area: Main Aisle / Maintenance Storeroom / Spare Parts Cage
- Aisle or Rack: Aisle 5, Rack 20 (or Rack 5B)
- Shelf or Level: Level 1, Level 2, etc (sometimes called Tier or Level)
- Bin or Position: Bin 5, Position C
- Shelf or Level: Level 1, Level 2, etc (sometimes called Tier or Level)
- Aisle or Rack: Aisle 5, Rack 20 (or Rack 5B)
- Zone/Area: Main Aisle / Maintenance Storeroom / Spare Parts Cage
In a manufacturing plant, you might see: Plant 1 > Building 3 > Parts Room > Rack R12 > Shelf 04 > Bin D
Key principles for a hierarchy:
- Granularity vs Simplicity: Include as many levels as needed to uniquely identify positions, but not so many that it becomes unwieldy. For pallet racks, “Rack 12, Level 2” may be enough. For small parts in cabinets, you may need “Cabinet 3, Drawer A” too.
- Consistency: Use the same naming logic for similar structures. If one rack is Rack 10, other racks should use the same prefix. If one aisle is called Zone A, use Zone A, B, C etc for others.
- Clarity: Prefer names that match on-site labeling. If the floor label says “R10” on a beam, the system should have “Rack 10”, not “R10 (Bin 5)”. Avoid internal codes that don’t make sense physically.
- Departments and Functions: You can incorporate function into the structure. For instance, separate “Maintenance Storeroom” from “Production Materials” as separate zones or buildings. That way, a location not only tells you “what shelf” but also the purpose area.
A clear example location might read: Plant A – Zone 2 – Rack 15 – Level 3 – Bin B. When written or on a pick list, workers instantly know exactly where to go: Plant A’s Zone 2, rack 15, third level, bin B. There should be no ambiguity of whether that refers to a shelf in one building or the floor position in another.
Having a detailed structure is the foundation of vertical utilization. If every bin and shelf is an entry in your system, you can move inventory upwards confidently because each new height is documented. Without it, higher shelf positions exist in reality but not in the system, and become “ghost spots” that nobody really looks into.
Dividing Warehouse Space into Functional Zones

A best practice in inventory organization – and particularly for vertical storage – is to divide the warehouse into functional zones. Instead of one monolithic “everything goes here” area, group storage by department or use-case, and then optimise each zone for its needs.
Examples of functional zones:
- Maintenance Parts Zone: Items used by maintenance teams (bearings, belts, motors, filters, etc.). This zone might prioritize many small bins and cabinets because there could be thousands of part numbers. It might also have clearly categorized shelves for electrical parts vs mechanical parts. Often maintenance spares zones benefit greatly from visual location mapping because specific failure parts need to be found quickly.
- Production Materials Zone: Raw materials or components used on production lines. These could be large pallet racking for bulk stock, or standardized shelving by production line. Accessibility is key here, since production needs can be urgent.
- Receiving and Staging Zone: A temporary area near the receiving bay. This should not become permanent storage; it should remain open enough for incoming goods. However, it’s a kind of zone where temporary vertical racks or carts may be used. Clear signage is needed to prevent mix-up with storage zones.
- Consolidation/Overstock Zone: An area (perhaps on the mezzanine) for slow-moving or overstock items. This zone can be higher and less accessible since usage is occasional. For example, last season’s products, non-urgent spares, or bulk supplies might live here, on higher shelves or racks.
- Project/Kit Zone: If your operation builds kits (for maintenance jobs or production runs), a zone with shelving or carts dedicated to kitting can be useful. This may be located near assembly or production lines.
- Consumables/Tooling Zone: Consumables like safety gear, office supplies, or small tools might have their own zone, possibly with cabinets or smaller shelf systems.
Within each zone, vertical storage solutions can differ. A maintenance parts zone might use tall shelving units with labeled drawers, since many items are small; a raw material zone might use heavy-duty pallet racking; a consumables zone might use mobile bins on shelves. By segregating zones, you ensure that each type of inventory is stored in the most efficient way vertically.
Also, cross-team clarity improves. If a production planner needs to check an item, they go to the Production Materials zone on the map. If maintenance needs a bearing, they know to look in the Maintenance Parts zone. The inventory system’s location hierarchy can reflect these zones, making reports and searches easier. For example, when a maintenance request triggers a part pull, the warehouse staff will see “go to Maintenance Spares – Shelf 4” instead of searching through all racks.
Creating these zones starts at the physical level (deciding which aisles or racks belong where) and is enforced by the inventory system (tagging locations as part of a zone). Over time, if certain items get misallocated (say a motor stored in the consumables zone by mistake), cycle counts or audits should catch that error.
Matching Storage Height to Inventory Movement
Not all inventory should be treated the same when it comes to height. A key principle is: Store the most frequently used items on the most accessible levels, and place infrequently used (or lighter) items higher up.
This practice ensures that vertical space enhances efficiency rather than impeding it. Here are guidelines for matching storage height with item usage:
- High-turnover items at waist/eye level. Items picked daily or multiple times per shift should be easy to reach. Put them on the lower shelves of racks. If forklifts or ladders are needed to get them, picking speed slows dramatically. For example, standard fast-moving production components or common maintenance spares (like O-rings, common fasteners, filters) should ideally be on shelving or rack levels 1–2 (depending on rack height).
- Moderate-use items in mid-range. Items used weekly or bi-weekly might go to middle levels. If your shelving has 5 levels, the middle ones (3–4) are good candidates. These are still reachable with some effort or short tool but not needed constantly.
- Slow-moving or reserve stock on top levels. Bulk overstock, seasonal inventory, backup parts, or items that are rarely needed can be stored on the highest rack levels or on mezzanines. Because these are not needed every day, it’s acceptable that they require a lift or extra time to retrieve. The tradeoff is worthwhile because you free up the lower space for items in active use.
- Heavy items near floor. No matter how often an item is used, if it’s very heavy (heavy mechanical parts, large drums, etc.), it should remain on the ground or low rack levels. The risk and effort of lifting heavy loads high outweigh the space saved. Place heavy pallets on the floor at the base of racks or in a designated ground-level zone. Use rack levels only for weight within safe limits.
- Matching handling equipment. If a warehouse has a forklift with a particular reach (say 6m), anything above that height effectively becomes inaccessible. Store items accordingly. For example, if a rack has a 5m working height and forklifts can reach 4m, use only the top 1m for stable reserve loads rather than something needed daily.
- Consider shape and safety. Oversized or odd-shaped inventory may not stack well. Flat, uniform crates or boxes stack nicely; irregular shapes may need custom supports or to stay lower for stability.
Applying these rules often involves doing an ABC or XYZ analysis of inventory (A = high usage, C = low usage, etc.) and then aligning A items to low positions, C to high positions. Modern inventory systems might help by allowing you to tag an item’s typical pick frequency or weight class. Then use that to drive your location assignment automatically or during audits.
Standardizing Rack, Shelf, and Level Naming
As vertical storage grows, inconsistency in naming becomes a serious headache. You can’t let some team members call a shelf “top left box” while others say “Bin 3A”. Unified naming is critical. Best practices include:
- Define naming conventions. Decide on a format early. For instance, every rack in a zone might be numbered sequentially (Rack 01, Rack 02, …). Within a rack, levels might be “Level 1” (bottom) through “Level N” (top), or “Shelf 01, Shelf 02” if you prefer. Some systems use “bottom-up” numbering (Level 1 is bottom). Whatever you choose, use the same approach for all similar racks.
- Add position identifiers if needed. If a shelf level has multiple compartments or bins, give those clear codes too (e.g., “Rack 05 > L2 > Bin B”). Keep it hierarchical: each location code builds on the previous (like folder paths).
- Use physical signage to match. Label shelves, beams, and floor spots with the exact codes you use in the inventory system. If a system says “Rack 5” on Zone A, ensure the rack’s posted label also says “Rack 5”. For multi-level racks, label each level on the rack face (e.g. “Lvl 1” through “Lvl 5”).
- Document the scheme. Provide a reference guide or map for staff so new and existing employees see the logic. For example, a poster “How Our Location Codes Work” can reinforce that Rack 05 Level 3 is always Rack-05 > L-3 in the system.
- Align with departments. If maintenance uses Rack numbers 20-30 for their zone, production might start at 1-10 in another zone. Avoid overlapping numbers in different contexts (or differentiate by zone name). For clarity, it’s often helpful to prefix with zone or aisle (e.g., Zone A Rack 05 vs Zone B Rack 05) or include that context in the code.
A robust naming system dramatically reduces picking and counting errors. When a pick ticket says “Move 10 bearings from Rack 3, Level 2,” the worker goes straight there. Without it, the worker might have to search multiple racks or ask, wasting time and creating data lag.
Using Visible Labels and Signage

Closely related to naming is labelling. Every defined location should be clearly labeled in the warehouse. This includes:
- Rack identifiers. Each rack or row should have a visible sign (both in the inventory system and on the rack end). If the rack spans an aisle, label both ends and maybe the top as well.
- Level markings. On high racks or mezzanines, place level numbers at eye-level on each column or beam so they are readable from the aisle. Some warehouses paint floor markings or stencil numbers on columns to indicate rack numbers.
- Bin and shelf labels. If a shelf is subdivided into bins or drawers, label each bin with its code. This can be done with adhesive labels, engraved tags, or inserts. Barcodes or RFID tags on these labels can also speed scanning.
- Color coding (optional). Sometimes zones or usage categories are color-coded (e.g., maintenance parts have blue labels, production has green). This can add an extra visual cue, but use it consistently.
- Safety and compliance labels. If certain aisles require special attention (e.g., forklift height limits, weight ratings), put those near the top levels so those working on lifts are aware.
The key is: a worker shouldn’t have to guess where “Rack 12, Level 3” is. The label should tell them. This reduces reliance on “tribal knowledge” or guesswork. It also makes training faster – new staff can learn by navigating labels and checking the inventory map to confirm.
Effective labels also support auditing. When cycle counting or full inventory checks happen, workers can tick off entire locations systematically. For example, one count might be “Zone B, Rack 7, all levels.” They know exactly which shelves are included.
Evaluate Existing Inventory Before Adding More Racking
Sometimes a warehouse “feels full” not because it lacks racks, but because inventory is spread out or misallocated. Before investing in new racks or shelving, do a thorough clean-up:
- Identify obsolete or surplus stock. Remove parts that are expired, obsolete, or no longer needed. These may be scraps, discontinued items, returns, etc. Decide if they should be sold off, scrapped, or moved offsite. Clearing obsolete items frees rack space.
- Consolidate partly-used locations. Often, stock gets scattered in small quantities. If one shelf level has 5 units and another level has 3 of the same item, consider consolidating them. This frees up a whole bin or shelf. Consolidation is an inventory housekeeping task that many operations skip, but it can delay the need for new racks.
- Fill partially empty shelves. Sometimes shelves look full because each level has a little space. But if upper shelves have wide empty gaps (say an unused pallet spot), reconfiguration could release space. For instance, if shelves are adjustable, set them to match common box sizes so no vertical space is wasted.
- Clear out floor clutter. Temporary floor stacks or overflow boxes can become semi-permanent if not checked. Reclaim floor spots by moving those items into proper racking (possibly taller racks). This also makes safety inspections easier (no tripping or obstruction).
- Check inventory accuracy. If records are wrong, buying more racks only masks a data problem. Do a quick audit: is what’s on the map actually where it’s supposed to be? Fixing “lost” inventory might reveal that you actually have spare capacity.
A pre-optimization audit often finds that a surprising amount of space is recoverable with better organization. Only after making use of existing capacity should the team plan new vertical expansions.
Avoid Using Floor Space as Default Overflow
A common trap is treating the floor as the “overflow zone” when shelves fill up. This typically means pallets, boxes, or containers are placed on the floor aisle until someone moves them to a rack. If this becomes habitual, floor space is wasted and the “map” in the system never stays up to date.
Best practice is to define where overflow or bulk should go and treat it as a formal location:
- Use a designated shelving or stacking area (maybe on empty rack bays or a corner, labelled “Bulk Storage”).
- If the floor must be used temporarily, immediately create a temporary location in the system (e.g. “Zone X – Floor Spot Y”) and label the floor spot. Update the item’s location to that code.
- Schedule routine reviews to clear floor overflow. Items on the floor longer than a week (for example) should be moved into proper storage or flagged.
- Avoid ad-hoc placement. Instead of “put this pallet here for now,” try to find the nearest appropriate rack spot, even if it means shifting something else around. In other words, don’t default to the floor without checking all other options first.
Allowing unmanaged floor storage undermines vertical space efforts. New racks won’t help if old pallets are still on the ground. Keeping floor clear preserves the pathways and staging areas needed for safe operations, while encouraging the use of racks as intended.
Separate Active Picking Stock from Reserve Inventory
A productive warehouse often distinguishes between active stock (the inventory currently being picked for orders or production) and reserve stock (additional quantities on hand, stored to replenish the active stock when it runs low). Vertical storage works well with this concept:
- Active stock zones at lower levels. Keep enough of each part in the easiest-to-reach locations for day-to-day use. This might be a specific level on a rack or the first few bins of a shelf. Workers will pick from these positions first.
- Reserve stock on higher levels or remote zones. Excess quantities can be stored on upper rack levels or in less convenient areas. These are not picked from directly. Instead, when a pick location empties or falls below a threshold, someone pulls from the reserve location and moves it down. This way, the system knows there are X in reserve and Y in active.
- Clear labelling of reserve vs. active. In the inventory system, you might still record a single total quantity for the item, but keep a note of how much is in reserve locations. Or, treat reserve stock as a separate bin or location for the same SKU. Either way, it should be visible to operations and procurement. That prevents situations where the database says 10 are on hand, but someone might think none are available because the easily accessible bin was empty.
- Replenishment process. Establish a rule like: “When active shelf falls below 50% of full, replenish from the upper reserve.” This ensures that active picking spots are always filled during normal shifts. Include location updates in the process: when you move items from reserve (upper shelves) to active (lower shelves), adjust the inventory record accordingly.
This active/reserve split is a simple form of zoning by use. It uses vertical capacity without taking away low-level space needed for picks. A key tip: do not confuse “reserve” with dumping ground. Reserve locations should still follow organization rules (part type, weight, etc.). And only items that genuinely do not require instant access should live up high.
Establish Clear Putaway Rules

When the warehouse introduces new vertical capacity, everyone must know where incoming inventory belongs. Without a system, different employees might put the same type of part in different racks, undoing any organization effort. Standard putaway rules are a must:
- Define preferred locations by item category. For example, “Electrical components go to Racks 1–3 in Zone A, with high-usage items on levels 1–2.” Or “Maintenance consumables: use Cabinets C1–C5, bottom drawers first.” Use labels or zone names to guide this (e.g., “Electr.” zones, “Mech.” zones).
- Use document or system guidelines. Many warehouses keep a “location directory” or assign each SKU a preferred location in the inventory software. When new stock arrives, the system can suggest the correct rack and level. If no location is pre-assigned, have a default protocol (e.g. “first aisle with space for that type”).
- Manage overflow intentionally. If the designated locations for an item are full, have clear secondary spots (e.g. “Overflow racks F1-F2”). Don’t just drop it wherever; mark it as overflow and update the system.
- Keep similar items together. If Part A and Part B are often used together or are the same size, put them on the same rack or shelf. This naturally happens if they share categories, but reinforce it as a rule.
- Record putaway location immediately. When receiving inventory, scan it into the system and assign it to the location you choose on the spot. Even if the plan is to reorganize later, mark it now so it doesn’t vanish from the system.
A clear putaway process keeps the map reliable. It also helps new employees or temporary staff. Rather than guessing where to place an item, they consult the rules. Over time, these practices build a habit: “every new inventory goes to its home in the map, not a random shelf.”
Treat Every Inventory Move as a Location Change
No matter how carefully you plan putaway, inventory moves around during picking, assembly, returns, audits, and relocations. The key discipline is: always update the inventory system immediately after moving stock. This ensures the digital map matches the physical reality. Here are some tips:
- Small moves count. Even moving a container from Level 5 to Level 4 is worth recording. Without it, your system will still think it’s in the old location, which can cause confusion and double-counting.
- Use simple tools for updates. Barcoding and scanners make this easy. Each time an item is scanned for picking or receiving, prompt the user to also scan the destination location code. Some systems allow “drag-and-drop” on a map for desktops (see CyberStockroom section), but in high-level terms, the process is the same: end action = update record.
- Make it part of the workflow. The goal is that updating the location happens as part of completing a task. For example, the picker scans the item and the destination bin right before confirming the pick. The warehouse should never have a practice of “we moved everything, we’ll update later” – delays in data entry cause discrepancies that grow quickly.
- Involve maintenance and other teams. If production or maintenance teams ever move items from the warehouse (e.g., taking spare parts up to a machine), require them to log those moves as well. That may mean they notify the warehouse system or add a note in the order. Everyone who touches inventory should understand location updates are as important as the physical transfer.
With vertical space, this is doubly important. A part stored 6 metres up looks the same as one at ground level. A worker won’t spot an error just by walking through the aisle. Rigorous transfer tracking prevents “ghost stock” or misplaced bins.
Improving Visibility for Multiple Departments
Effective vertical space utilization has a ripple effect across the entire organization. Each team interacts with inventory differently, and a well-mapped warehouse helps them all. Here’s how vertical organization and a shared inventory map benefit different roles:
- Warehouse Operations. Warehouse staff are the primary users. They gain faster putaway and picking, because each new storage position is integrated into the system. Instead of guessing where to put that odd-shaped item, they see on-screen which rack and level are available. Putaway routes can minimize travel by grouping new stock into adjacent locations. For picking, workers go directly to the right shelf level. This reduces travel time up ladders or with lifts. Inventory counts also become more structured (e.g. count “Rack 3, Lvl 1–3”).
- Maintenance. Maintenance teams often keep thousands of spare parts. A good vertical organization means maintenance doesn’t just know “we have a spare pump,” but also “it’s on Shelf 4 of Rack 12 in the parts storeroom.” This saves critical downtime in emergencies. For rarely used items that were moved to high shelves, maintenance technicians don’t have to remember where; they check the system and head to the exact bin. This is crucial when many unique parts are involved.
- Production. Production planners and line workers need components and raw materials on schedule. If parts are scattered or on different levels, planning is hard. With vertical storage tied to inventory records, production can see exactly how inventory is distributed. For example, if 100 screws are available, production sees that 60 are in the main pickshelves and 40 in reserve upstairs. If the pickshelves empty, they know to wait for a replenishment. When moving a production order, material handlers can pull from all relevant locations systematically. This reduces line-side stockouts and prevents running to the warehouse at the last minute.
- Procurement. Buyers make purchase decisions based on on-hand stock. If the database says “we have 20 of Item X,” but 15 of them are high on a mezzanine and forgotten, procurement might undervalue that existing inventory. A clear map means procurement can query by location: “how many of X are on-hand vs how many on active shelves?” This distinction can prevent unnecessary orders. Better visibility in the system builds trust: buyers know that what the system reports is actually reachable somewhere in the warehouse.
- Operations Management. Plant managers or operations managers want the big picture. They need to see inventory levels across production, maintenance, and even multiple facilities. A unified location map lets them audit space usage: for instance, is one department hogging more storage than budgeted? Are aisles congested, or is overhead space free? When departments share a mapped structure, operations can identify issues like overstock trends or unused capacity. This informs decisions like whether to outsource some stock, schedule a clear-out, or invest in more racks.
The common theme is cross-team alignment. A single visual map that spans the whole warehouse (and ideally multiple warehouses or stockrooms) gives everyone a shared reference. Instead of each team having its own “mental map” or spreadsheet, there’s one system of record. This reduces wasteful communication (no more calls like “hey, do you know where that part is?”) and aligns goals. When procurement asks for inventory counts, operations has confidence those parts exist where they’re supposed to. When production needs extra time to pick slower-moving items on high shelves, warehouse staff can factor that in.
CyberStockroom: Connecting Vertical Space with Inventory Visibility
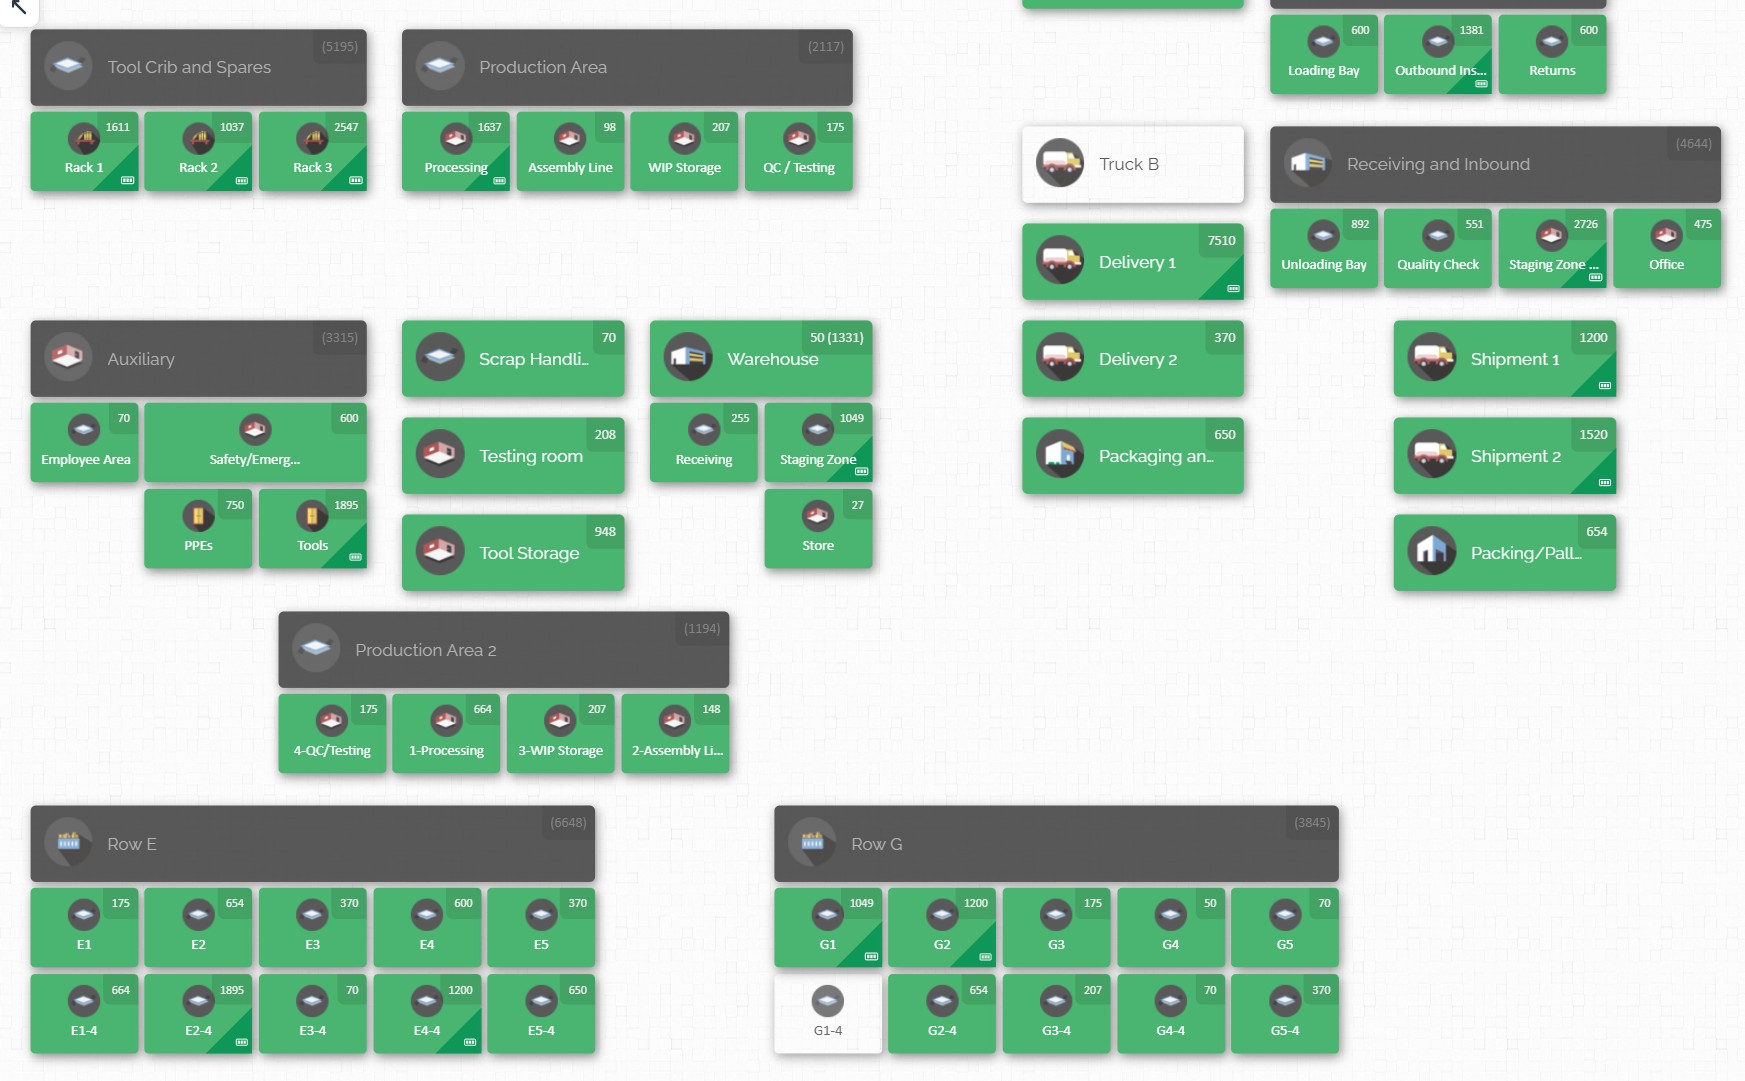
One way to achieve this connected, location-based visibility is through a visual mapping tool for inventory management. CyberStockroom is an example of such a tool that helps implement the above best practices as part of the warehouse’s daily operations. While the strategies in this article do not rely on any single software, CyberStockroom is designed with inventory mapping and multi-department visibility specifically in mind. Here’s how it supports a well-organized, vertically-utilised warehouse:
- Build a detailed digital map of all storage areas. With CyberStockroom, you create a virtual layout of your facility: buildings, zones, racks, shelves, bins, and even vehicles or containers if needed. Once set up, every part in the system is tied to one of these defined locations. Adding a new rack level means just adding it to the map. The system then tracks inventory exactly at that spot.
- Visualize inventory by location. Instead of lists of part numbers, CyberStockroom shows inventory quantities directly on the map. You can see at a glance where items are stored and in what quantities. If some shelf is running low, staff can spot it. This map can be accessed by all departments. Warehouse staff see shelves, maintenance sees spare parts bins, production sees materials on racks – all within one consolidated view.

- Track movements with drag-and-drop or scanning. When inventory moves (for example, from receiving to a rack, or from a reserve shelf down to active stock), the location is updated in real time. CyberStockroom supports transferring items between locations via a simple interface – you can even drag an item icon from one rack on the map to another, and the system records the change. Alternatively, warehouse staff can scan barcodes on items and shelf tags to move stock. This ensures every transfer, even vertical replenishment, is logged immediately.
- Maintain history for accountability. Each inventory move is recorded, so managers can see who moved an item, from which location to which location, and when. This history is valuable for audits or troubleshooting discrepancies. In a busy vertical setup, it’s easy for things to get shifted during a reorganization. With CyberStockroom, any such change is documented.
- Share real-time data across teams. Because CyberStockroom is cloud-based and map-driven, different users (warehouse operatives, maintenance technicians, procurement officers, etc.) all see the same updated inventory map. For instance, when maintenance logs into the system to check if a part is available, they see it in context – “Rack 5, Shelf 1, Bin B”. Production planners can query total on-hand and also note that some is in reserve up high. Everyone works off the same data. This breaks down information silos and puts everyone on the same page.
- Support multiple storage facilities. Many industrial operations have more than one warehouse or storeroom. CyberStockroom can map multiple locations (Warehouses A, B, maintenance storeroom, laydown yard, etc.) and show inventory in each. Cross-location transfers (e.g. moving spares from a main warehouse to a satellite workshop) are handled just like in a single warehouse. Departments responsible for consolidated inventories can see totals and distribution.
- Barcode support for accuracy. CyberStockroom integrates barcoding, so each physical location label can be scanned. This simplifies counting and picking. For example, a worker picks 20 units of an item; they scan the item and then the target location label, and the system knows exactly which stock level to deduct from. This reduces manual entry errors.

In short, CyberStockroom turns the three-dimensional warehouse structure into an interactive, living system. You map the rack and shelf names you already use (or any new naming convention you choose), and then you attach items to those map locations. High-level inventory visibility becomes as easy as looking at a picture of your warehouse. When vertical storage is added, you simply add it to the digital map before moving items, so the inventory system stays accurate.
For example, suppose your team adds two new 10-metre pallet racks. In CyberStockroom you would go to the location hierarchy and add “Level 5” and “Level 6” to the affected racks. Then, as pallets are placed on those new levels, workers use the CyberStockroom interface (or app on a mobile device) to update the part’s location to “Rack 12 Level 6”. Later, if a buyer checks stock levels, they see those units and also know exactly where to find them if needed.
By aligning a visual warehouse map with inventory data, CyberStockroom enforces many of the best practices described here. It promotes accurate putaway (since every item must be assigned a real location), provides real-time stock visibility (so all departments know where to look), and encourages consistent processes (driven by the system rather than memory). In an environment where maximizing vertical space utilization is a goal, having such a shared visibility layer makes the difference between gaining usable storage and creating confusion.
A Practical Step-by-Step Guide to Improving Vertical Utilization
Implementing vertical storage in a real warehouse should be done in manageable phases. Below is a structured approach, along with example timelines, to guide your team through the transition. Adjust as needed for your warehouse size and complexity.
- Document Existing Storage Areas.
- List all current warehouses, rooms, zones, racks, shelving units, cabinets, cages, etc.
- Note which racks have available height. Identify underutilised areas.
- In the inventory system, capture all existing location codes (even if they were broad).
- Review and Clean Inventory.
- Perform a rapid inventory audit to identify obsolete, damaged, or duplicate stock.
- Consolidate partially empty locations. Group common items.
- Remove trash, old packaging, and anything not needed.
- Evaluate Vertical Capacity.
- Measure ceiling heights in each zone. Check forklift reach and safety clearances.
- Determine what storage types can be added (e.g. taller pallet racks, extra shelf levels, mezzanine).
- Decide which zones can use high-density storage vs. which must stay open.
- Define Location Hierarchy and Naming.
- Using the notes on existing areas, create or refine your location structure (Warehouse > Zone > Aisle/Rack > Level > Bin).
- Standardize names (Racks 01–10, Levels L1–L6, etc.).
- Label the physical warehouse to match: apply rack number signs, shelf stickers, bin tags, etc.
- Classify Inventory by Usage and Size.
- Identify which items are high-turnover (daily/weekly picks) and which are slow-moving or reserve.
- Mark heavy or hazardous items and determine if they should stay low.
- Determine if certain departments have special requirements (e.g. maintenance spares vs. production run).
- Assign Storage Positions.
- For each inventory category, decide where in the warehouse it should go. Example: critical fasteners on Shelf 1–2 of Racks 10–12; backup components on Level 4–5 of Racks 8–9.
- Use any new vertical positions for appropriate items (e.g. move reserve boxes up top).
- Update the inventory system with the intended destination location for each item category.
- Label All Locations.
- Before moving anything, put up or verify all labels on racks, shelves, and floor zones.
- Make sure labels match the codes in your system exactly.
- If using a digital map tool, input or sync these names first.
- Map the Storage Structure (Optional Visual).
- If using a tool like CyberStockroom, build the actual map of your warehouse zones, racks, and levels in the system.
- Otherwise, create a floor plan diagram with inventory zones marked and share it with the team.
- Ensure everyone knows the “map” of the new layout.
- Move Inventory in Phases.
- Reorganize one zone or group of racks at a time to minimise confusion.
- For each zone: empty it if necessary, move shelves/racks, then move inventory back in with correct new locations.
- Update location records as you move. Don’t finish moving everything before updating the system – do it in small steps so the database tracks the shifts.
- Verify and Adjust.
- After each phase, perform a mini-cycle-count of that zone. Confirm that quantities in the system match the new physical locations.
- Address any discrepancies immediately (e.g. fix mis-labeled shelf or correct a wrong item placement).
- Establish Replenishment Rules.
- Make it clear which items will be replenished from reserve to active, who does it, and at what trigger (quantity or schedule).
- For example: “When any active shelf level of bolts drops below 20% full, night shift pulls from the top shelf of that rack to refill.” Record these as standard procedures.
- Train and Roll Out.
- Train staff on the new location scheme, map, and tools (barcode scanners, software interface, etc.).
- Explain the reasoning (why certain items moved up/down, how to interpret the map).
- Launch during a period of lower activity if possible, to reduce pressure.
- Monitor and Maintain.
- After completion, keep the cycle going: schedule regular cycle counts per zone (especially new high-level shelves).
- Review the layout periodically as inventory changes (e.g. new product lines, seasonality).
- Update the map/system for any new racks or zones in the future.
Checklist: Key Considerations for Vertical Storage
Use this checklist as a quick reference when planning or auditing your vertical storage strategy:
- Have you measured ceiling heights and equipment reach to know true vertical capacity?
- Does each level of your racks or shelving have a unique location code in the system?
- Are labels and signs posted so workers can easily identify rack numbers and levels?
- Are fast-moving items placed on the lowest, most accessible shelves?
- Are heavy or bulky items on lower levels (or ground) to avoid unsafe lifting?
- Are all temporary floor storage areas controlled (with system locations) or cleared?
- Is there a clear “reserve” vs. “active” stock plan, with reserve items on upper or less accessible shelves?
- Do all staff know the defined storage zones and putaway rules by item category?
- Are incoming parts assigned locations and entered into inventory immediately upon receiving?
- Do you perform regular cycle counts by aisle/rack/level to verify quantity and location accuracy?
- Are departments aligned on where items should be stored (maintenance parts go in Maintenance zone, etc.)?
- Is inventory data centralized or shared so everyone sees the same stock quantities and locations?
- Have you trained staff on any inventory management software or mapping tool being used?
- Have emergency and receiving zones been left clear of permanent storage?
- Are you monitoring how well the new layout is working (looking at order lead times, search times, etc.)?
Comparing Vertical Storage Options
Not all vertical storage solutions are equal. The right choice depends on your inventory types, budget, and access needs. The following table compares four common options:
| Storage Type | Pros | Cons | Best For |
| Pallet Racking (Selective or Drive-In) | Very high capacity; suited for heavy pallets; access by forklift; scalable height. | Requires forklift/stacker; less flexibility for small items; initial cost of racking; requires solid floor. | Heavy/bulky items (pallets of raw materials, bulk items); warehouses with forklift operations. |
| Shelving Units (Industrial Shelves) | Flexible and adjustable; can be quite tall for small parts; easy to pick by hand; cheaper than racking. | Lower overall weight capacity; limited to smaller, lighter items; less dense than pallet racks; still need ladders/lifts for very high shelves. | Small-to-medium parts (maintenance items, hand tools, small boxes); pick zones or storerooms; environments with mostly manual picking. |
| Mezzanine Flooring | Doubles usable square footage; can create office or storage area above; customisable layouts; ideal for heavy static loads. | High construction and engineering cost; requires planning permission; takes time to install; reduces ceiling clearance above. | Extremely dense storage of small to medium items; creating a separate storage floor (e.g. administrative offices above, storage below). |
| Bins and Cabinets | Excellent organization for very small parts; often integrated into shelves; improves picking efficiency and accountability. | Lower capacity per volume; more time organizing/labeling; can require many bins for lots of SKUs; some wasted space in bins. | Lots of small SKUs (fasteners, electrical components, medical supplies); environments where picking accuracy and count (like spare parts storerooms) is critical. |
The table is a guide. For example, a mixed warehouse might use heavy pallet racks for raw materials, shelving for maintenance spares, a mezzanine for overflow inventory, and bins for small items—all at once. The important part is matching storage type to inventory characteristics (size, weight, turnover) and then integrating each type into the overall location map.
Measuring Success

After optimising vertical storage and inventory mapping, you should see measurable improvements. Track metrics such as:
- Inventory accuracy rate. Has the percentage of items found in the correct location increased? Ideally cycle counts should show fewer discrepancies.
- Picking/travel time. Are pickers spending less time finding items or traveling? If search time drops, your location mapping is paying off.
- Space utilisation. Is more cubic capacity being used (perhaps measured by how many pallets or shelves are filled)? At the same time, floor congestion (stacked items on the ground) should decrease.
- Stock turnover/stock-outs. With better visibility, critical items should be replenished before stockouts occur. You may see fewer emergency orders because planners trust the system.
- Cross-team feedback. Survey maintenance, production, and procurement: do they feel they have better access to needed parts? More confidence in stock information?
- Purchase orders against on-hand stock. Over time, you should have fewer instances where an item is in stock but not located (causing unnecessary purchasing).
If these metrics do not improve, investigate the cause. Often, persistent problems indicate gaps in process (e.g. people not updating moves) or labeling (signs unreadable, misnamed locations). Continuous improvement is key: treat the location system as a living document.
Avoiding Common Mistakes
Even with the best plan, mistakes can happen. Watch out for these pitfalls:
- Adding capacity without documentation. Never add racks or bins without updating the inventory location system first. Otherwise, items placed there “disappear” from the map.
- Forgetting updates during moves. Post-move data entry often falls through the cracks. Emphasize real-time updates as part of the job.
- Inconsistent names. If some shelves are labeled “Loc 12” and others “Rack 12”, confusion reigns. Standardize and enforce it.
- Overfilling key zones. Don’t cram every shelf level with stock just because there’s space. Leave buffer room for incoming goods and temporary staging.
- Using all open space. Allow aisles, receiving areas, and emergency routes to remain open. Vertical expansion should not encroach on safety or workflow areas.
- Neglecting training. New layouts and systems require training and reinforcement. Without buy-in, staff revert to old habits.
- Isolating the warehouse solution. If only the warehouse team uses the new map, others may ignore it. Share access and encourage its use organization-wide.
By staying vigilant about these issues, the warehouse can maintain an organised, visible inventory system even as vertical complexity grows.
Conclusion
Vertical space utilization in an industrial warehouse offers a significant opportunity to increase storage capacity and efficiency. By carefully integrating tall racks, shelving, mezzanines, and other overhead storage with rigorous location tracking, inventory accuracy can be maintained or even improved. The key is to treat the warehouse volume as an organised structure rather than a jumble of items.
The strategies in this guide – from zoning and shelving hierarchy to naming conventions and transfer discipline – ensure that adding height to your warehouse also adds to its productivity. Crucially, these practices tie in all departments: maintenance knows where its spares are, production has confidence in component locations, procurement avoids needless buys, and operations manages space strategically.
A tool like CyberStockroom can serve as the connective tissue for this approach. By creating a shared, visual map of the warehouse, it helps the whole team move, find, and count inventory with clarity. Every vertical bay and shelf becomes a defined point in the system. Inventory truly lives on a map that everyone can access.
In summary, using more of your warehouse’s airspace is not just about installing taller structures; it’s about establishing processes and visibility that treat those structures as part of the operational system. When every rack level has a name and a purpose, and every item has a documented location, the warehouse can expand upward without losing its way.
With careful planning, consistent execution, and the right visibility tools, every foot of your warehouse – including every foot in the air – can work as effectively as possible.








Leave a Reply