
The High Stakes of Poor Equipment Tracking
Failing to manage rented equipment properly can wreak havoc on a construction project’s budget and schedule. Lost or misplaced equipment is more than just a minor annoyance – it’s a direct hit to productivity. Studies have found that an average construction worker spends around 10 minutes each day searching for missing tools or equipment, adding up to nearly a full work week of lost time over a year. Multiply that by an entire crew, and the cost of disorganization becomes staggering.
There’s also the financial risk: construction site theft and loss are rampant. In the U.S. alone, over $1 billion in equipment is stolen from job sites each year. Every missing rented drill or vanished skid-steer isn’t just an insurance claim – it’s a project delay and an unexpected expense (rental contracts often require you to pay for lost equipment). And consider the hidden costs: paying rental fees on idle machinery that’s sitting forgotten in a corner of the site, or incurring late-return penalties because no one realized the due date passed. These issues can quietly drain thousands of dollars from a project.
Rented equipment mismanagement impacts everyone. Site managers scramble when a needed machine isn’t available. Crew members stand idle waiting for a replacement to arrive. Accounting gets hit with unplanned charges. Worst of all, clients see deadlines slipping and budgets ballooning. In short, poor tracking of rented inventory can lead to project delays, cost overruns, safety risks, and strained business relationships.
The good news? With some proactive strategies, you can avoid these pitfalls. The construction industry runs on tight schedules and margins, so implementing effective inventory management for your rented equipment is not just helpful – it’s essential. Let’s dive into practical best practices that will bring order to the chaos and ensure your rented tools and machines are accounted for at all times.
1. Keep a Centralized Inventory of All Rented Equipment
The first step to staying on top of your rented equipment is to know exactly what you have and where it is. That might sound obvious, but it’s surprisingly easy for things to slip through the cracks when multiple job sites, rental vendors, and teams are involved. Create a centralized inventory record that lists every piece of rented equipment in your operation.
What should this inventory include? At minimum, record each item’s details: equipment type, make/model, unique ID or serial number, the rental company it came from, the date it arrived on site, and its expected return date. Also note which project or site it’s assigned to, and who is responsible for it (e.g. the site manager or foreman). Essentially, this becomes your master checklist of all rented assets.
By maintaining a single source of truth for rented equipment, everyone in your organization can stay on the same page. The office team can see, for instance, that you have two scissor lifts rented for Site A and one for Site B, all logged in one system. The project managers can quickly check what’s on rent across all active projects. This centralized approach prevents the classic scenario of one site unknowingly re-renting an item that another site already has available. It also reduces confusion and duplicate data – no more juggling separate spreadsheets or handwritten logs for each project.
On a practical level, a centralized inventory could be as simple as a shared spreadsheet or as robust as a dedicated software platform . The key is that everyone accesses and updates the same list. When a new rental arrives, it gets added to the master inventory immediately. When something is off-rented and sent back, it’s marked as returned in that system right away. This real-time updating ensures your records are accurate at all times.
A complete inventory list also helps you track the status and condition of rentals. For example, you might include notes like “Boom lift – returned 5/10, noted hydraulic leak – needs repair” or “Generator – on rent, scheduled return 6/1”. Having this information centralized means you can pull reports on what’s currently on rent, what’s due for return, and any issues to address. In short, you can’t manage what you don’t measure – so start by getting a thorough, centralized list of all your rented equipment as the foundation of good tracking.
2. Tag and Label Equipment for Easy Identification
Ever spent precious time walking around a site trying to figure out which piece of equipment is the one you rented (versus a similar machine the subcontractor brought, for instance)? Or have you had crew members mix up one drill or generator for another? These mix-ups are common on busy construction sites. The solution is to clearly tag and label every rented asset so it’s instantly identifiable.
Labeling might involve affixing an ID tag or sticker to each item with a unique number or code. Many rental companies already attach their own barcode or ID plate – make sure you note those IDs in your inventory records. If not, you can attach your own temporary tags. For smaller tools or handheld equipment, consider using durable labels or even color-coded tape to mark them as rentals and indicate which project they belong to.
For modern and scalable tracking, barcodes or QR codes are incredibly useful. By tagging each piece of equipment with a scannable code, you or your team can use a scanner (or smartphone app) to quickly pull up that item’s info: when it was rented, from where, and who has it. Scanning a QR code on a rented compressor, for example, could instantly show it’s “Compressor #3, rented from ABC Rentals, due back in 5 days, currently assigned to Project X”. This speeds up audits and reduces human error in identifying equipment.
Some companies also utilize RFID tags for equipment tracking or GPS units on large machinery. RFID tags allow you to scan items without direct line-of-sight (helpful for a bunch of tools in a gang box), and GPS trackers can pinpoint the location of high-value assets like skid steers or loaders. However, even without fancy tech, the goal is the same: make sure each item has a clear identity and can be distinguished from everything else on site.
By tagging and labeling, you not only make it easier to find and verify equipment, but you also send a message to your team: this item is being tracked and accounted for. That alone encourages more care in handling. When a crew member knows a generator has an asset tag and is logged in the system, they’re less likely to leave it in the wrong place or let it “walk away”. In summary, a little effort up front to label equipment can save hours of hunting and prevent costly losses down the line.
3. Plan Your Rental Needs and Schedules Proactively
One of the best ways to manage rented equipment is to avoid last-minute chaos by planning ahead. Construction projects often involve changing needs, but a bit of foresight can ensure you have the right equipment at the right time – and avoid paying for rentals you don’t actually need. Effective planning happens in two parts: before the rental and during the rental period.
Before you rent: Take the time to assess your project requirements in detail. What equipment will you need, for which tasks, and when? Map out your project schedule and identify the windows when certain rentals are required. For example, you might schedule a telescopic boom lift for weeks 3–4 of the project when exterior work at height is happening, and a portable lighting tower for week 5 during overnight work. Planning in advance helps you stagger rentals so you’re not, say, renting three different machines all for the exact same week if they could be sequenced instead. It also gives you lead time to shop around with rental providers, secure availability, and even negotiate better rates for longer-term rentals or package deals.
During the rental: Once equipment is on site, proactive scheduling means keeping track of how long you actually need it and being ready to adjust. Construction is fluid – maybe the crew finishes with the concrete mixer two days early, or perhaps bad weather pushes back the use of that rented forklift. A best practice is to align your rental periods with your project timeline as closely as possible, and update as you go. If you realize you’re done with a machine ahead of schedule, call the rental company and off-rent it immediately rather than letting it sit idle (and incurring unnecessary daily charges). Conversely, if you need an extension, inform the rental company in advance to avoid surprise late fees and so they don’t promise it to another customer right away.
A common budget killer is equipment that sits idle because of poor coordination. Imagine a scenario: the crew finished the trenching work early, but the rented excavator remains on site (and on the rental bill) for an extra week simply because no one arranged its pickup. On multi-site operations, this happens often – one site’s delay or another site finishing early can lead to machines lounging around unused while the rental clock keeps ticking. Avoid this by syncing rental schedules with project management. Regularly ask: “Do we still need this piece of equipment on Site X, or can we send it back (or use it elsewhere)?”
Planning also involves logistics: coordinate delivery and pickup carefully. Schedule equipment to arrive a day before it’s actually needed (so it’s ready to go, without causing a delay if delivery runs late), but not so far in advance that it sits idle for days. Similarly, plan the off-rent/pickup the day after you finish with it, if possible, to avoid paying extra days. Little timing tweaks like avoiding weekend pickups (which could roll into a Monday charge) can save money. Essentially, treat rental equipment scheduling like an integral part of your project plan, not an afterthought. By doing so, you’ll minimize downtime, prevent overlapping or double rentals, and ensure you’re only paying for equipment when it’s actively adding value to your project.
4. Implement Clear Check-In and Check-Out Procedures
Tracking inventory isn’t just about knowing what you have – it’s about knowing when and with whom each item is at any given time. This is where a solid check-in/check-out system becomes vital. Think of this as the sign-out sheet at a library, but for your construction gear: any time a rented item changes hands or moves to a new location, it gets recorded.
Why is this so important? Without a clear check-in/check-out process, equipment has a way of “wandering off.” A crew member might grab a rented power drill in the morning and forget it in their truck, or a generator might be moved to a different area of the site without anyone notifying the site supervisor. If nobody notes these movements, by day’s end you could be scratching your head wondering, “Where did that go?” A simple process fixes this: whenever someone takes a piece of rented equipment, they log it (even informally) and when it’s returned or relocated, that gets logged too.
Here’s how you can put this into practice:
- Designate a responsible person. It could be the site equipment manager, a foreman, or any team member you trust. Part of their job is to oversee the check-in/check-out of tools and machinery. This doesn’t have to be onerous – even a quick text message to that person saying “John checked out the rented laser level at 9 AM for the second floor work” can suffice, as long as it’s captured.
- Use a sign-out sheet or digital log. Keep a clipboard in the job trailer or use a simple mobile form that workers fill when they take or return an item. For larger equipment, when something arrives on site, mark it “checked in” (received) with date/time and who accepted delivery. When it leaves the site (either going back to the rental company or moving to another site), mark it “checked out” with when and by whom.
- Conduct daily or weekly sweeps. At the end of the day (or week), the responsible person cross-checks the log against what’s physically on site. For example: “We should have 5 rented items here according to our log; let’s verify they’re all present or accounted for.” This way, if something wasn’t returned to the tool crib or if an item is missing, you catch it immediately, not weeks later.
A clear check-in/out system creates accountability. Team members know that if they sign something out, it’s officially noted, and they are expected to bring it back. It also provides a traceable history: you’ll know that Alice was the last to use the rented jackhammer, or that Site B received the rented generator after Site A sent it over. In case of damage or loss, having that chain of custody makes it much easier to determine what happened (and who might be responsible).
Moreover, this process helps with maintenance tracking – if during check-in someone notes “returned with a broken taillight” on a rented skid steer, you can immediately inform the rental provider or address it, rather than discovering damage at the end of the rental (which could risk deposit forfeiture or damage fees). Bottom line: a disciplined check-in/check-out routine keeps your rented equipment from slipping into a black hole and ensures you always know who has what, and when.
5. Leverage Technology with Inventory Tracking Software
In today’s digital age, one of the smartest moves you can make is to use inventory management software to track your construction equipment – especially rentals – in real time. Spreadsheets and paper logs can only get you so far, particularly when juggling multiple sites and dozens (or hundreds) of assets. This is where a tool like CyberStockroom comes into play and can revolutionize how you manage rented equipment inventory.
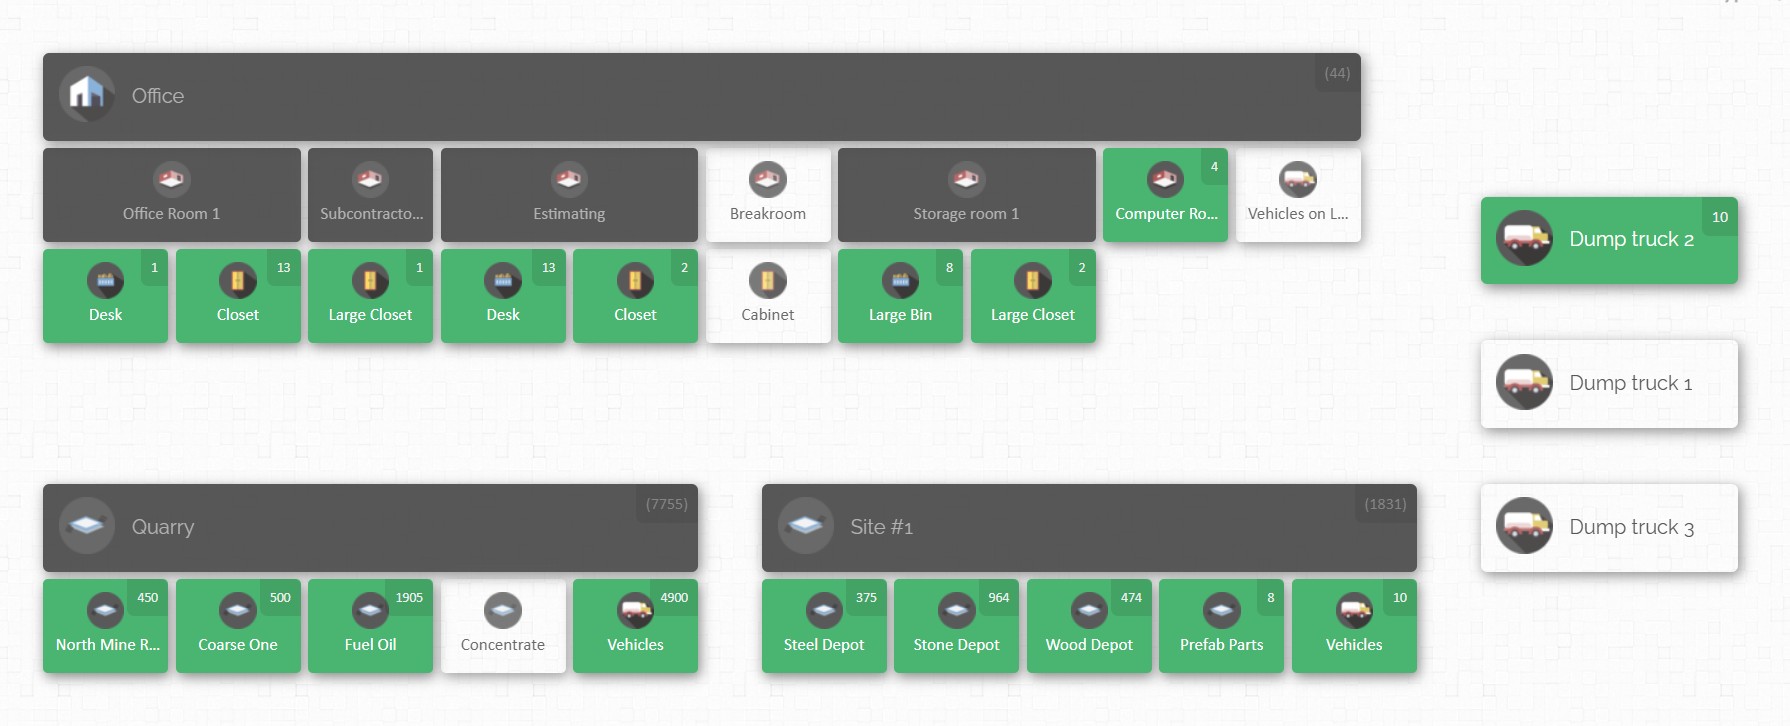
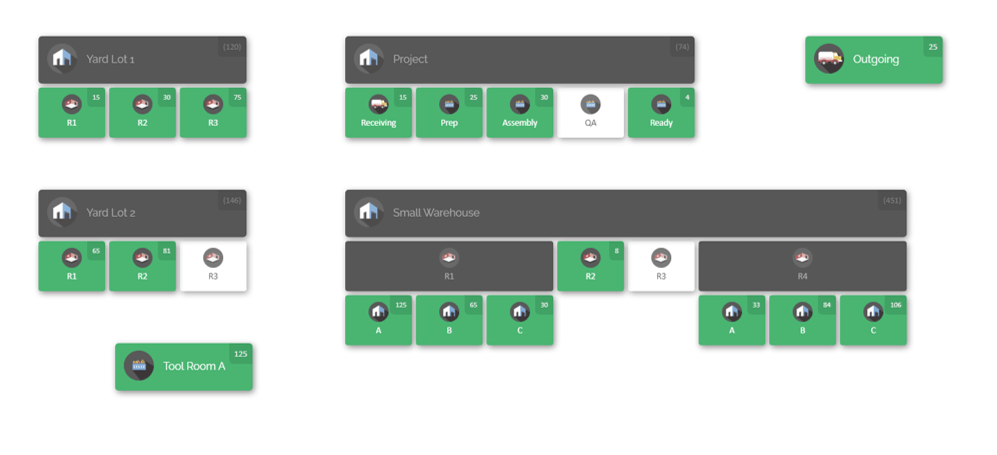
What is CyberStockroom? It’s a cloud-based inventory management platform with a unique twist: it uses a visual map-based interface to help you track items across various locations. Imagine seeing a digital map of your construction site (or multiple sites), with markers or zones showing where each piece of equipment is located. CyberStockroom allows you to create a virtual layout of your job site, storage yard, warehouse, or any other locations you use, and then “place” your inventory items on that map. At a glance, you get a bird’s-eye view of everything – for example, you could see that at Site #1, in the northwest storage area, you have 2 rented concrete mixers and a generator, while Site #2’s map shows the rented backhoe is currently near the foundation trench.
The benefits of this visual, real-time approach are huge for construction teams:
- Immediate Visibility: You can locate any rented asset in seconds on the map. No more combing through lists or calling around to find out where the light tower went – just look at the dashboard and see its last recorded location.
- Multi-Location Coordination: If your company has multiple projects running, CyberStockroom lets you view all sites at once or drill down into one. This makes it far easier to reallocate equipment. Suppose Site A’s work is done and they still have a rented compressor, while Site B suddenly needs one – the software can show what’s available internally so you might transfer that compressor instead of renting a new one. This kind of optimization can save rental costs by maximizing utilization of what you already have on hand.
- Real-Time Updates: Because it’s cloud-based, team members both in the field and at the office see updates instantly. When a tool is checked out or moved on the map, everyone else with access knows about it right away. This real-time inventory tracking means your data is always current – critical in the fast-changing construction environment.
- Accountability and Loss Prevention: CyberStockroom can log who moved or used an item and when (by user input). Every time a piece of equipment is “moved” on the digital map or marked as checked out to someone, it creates a digital paper trail. Workers know that if they relocate the rented pump, they should update it on the map (or inform someone who will), so nothing gets lost. This tends to discourage those “casual disappearances” of tools because an item that isn’t where it’s supposed to be will be noticed quickly. If something does go missing, you have a last known location and user to start investigating.
- Ease of Use: The map-based dashboard is intuitive – it feels like you’re managing a game layout rather than filling out forms. You can drag and drop items from one location to another on the screen when transferring equipment, which makes record-keeping almost effortless. Plus, CyberStockroom supports barcoding; you can scan equipment in and out, and the system will update the item’s location on the map. It essentially combines the best of physical tracking (scanning, tagging) with a visual digital twin of your inventory.

For construction site managers who are often juggling many tasks, having an inventory system that’s both powerful and easy to use is a game-changer. Instead of flipping through clipboards or calling three people to find one tool, you could pull out a tablet or laptop, open your CyberStockroom map, and immediately answer “Where is that rented air compressor right now?” or “How many jackhammers do we have on rent across all sites?”
In summary, leveraging a dedicated inventory tracking software like CyberStockroom brings a level of control and insight that manual methods just can’t match. It’s about working smarter, not harder. With a visual, real-time system in the middle of your operation, managing rented equipment inventory becomes less of a headache and more of a streamlined process. You’ll spend less time chasing down equipment and more time keeping your projects on schedule and within budget.

6. Monitor Equipment Utilization and Rental Costs
Do you know which of your rented machines are actually being put to good use and which ones might be sitting idle? Keeping an eye on utilization can unlock significant savings. In the rush of a project, it’s easy to adopt an “out of sight, out of mind” approach – if the excavator’s on site, we assume it’s needed. But tracking utilization metrics helps you verify that assumption and optimize your rentals.
Start by defining what utilization means for each type of equipment. For a large piece of equipment like an excavator or bulldozer, utilization could be measured in hours of operation per day. For something like a rented concrete mixer, it could be days used per week. Many modern equipment pieces have hour meters; you could log those hours weekly. But even a simple observation like “used on 3 out of 5 workdays this week” gives a sense of utilization.
Why does this matter? Because rental fees are ticking regardless of usage. If a piece of equipment is only being used half as much as anticipated, you might be better off adjusting the rental duration or finding ways to share it between tasks or sites. Conversely, if an item is constantly in use and your project has occasional downtime waiting for it, that signals you might need an additional unit or a different strategy to avoid bottlenecks.
Monitoring utilization ties closely with cost tracking. Keep a log of rental costs per day/week for each item (which your centralized inventory or software can help with). Then compare the cost against the work it’s accomplishing. For instance, if you’re paying $500 a day for a lift that’s only being used 2 hours each day, ask why. Is it a scheduling issue where tasks could be reorganized to use the lift more intensively over a shorter period (and thus rent it for fewer days)? Or was it overkill to have that particular equipment on site for the whole duration?
Another important aspect is avoiding idle time and late off-rents, as we touched on earlier. Make it a routine to review your rented equipment list at least weekly and ask:
- “Is this item still actively contributing, or has its primary task finished?”
- “If it’s currently idle, do we have another use for it on a different part of the project (or a different project)? If not, can we send it back early?”
Construction rentals often have flexible terms – if you finish early, you can off-rent and stop the charges. Even a few days saved can mean a lot of money, especially if you have many rentals. On the flip side, if something is constantly utilized and critical, you might plan to extend the rental or have a backup ready to avoid downtime.
Also track utilization over the long term to inform your business decisions. If you notice you’re repeatedly renting a particular type of equipment for every project and using it heavily, it might be worth considering purchasing one in the future to save costs. For example, if you rent a skid steer 200 days a year across various jobs, owning one could be more economical. Utilization data arms you with the info needed to make such calls with confidence.
In summary, treat utilization tracking as part of your inventory management practice. By closely monitoring how each rented asset is used, you can spot inefficiencies – like that light tower that’s on site but not really needed this week – and act on them. This ensures you’re getting your money’s worth from every rental and not throwing cash away on equipment that’s collecting dust. It also helps in budgeting and forecasting for projects: you’ll get better at estimating how much rental time you truly need for a given task, avoiding over-renting or under-renting in the future.
7. Conduct Regular Audits and Inspections
Even with great systems in place, it’s crucial to periodically verify your inventory on the ground. Regular audits and inspections act as a safety net to catch any discrepancies or issues with your rented equipment. Think of it as doing a health check on your inventory management: you’re making sure that the reality on site matches what your records (or software) say.
Inventory audits for rented equipment should be done frequently – far more often than, say, a yearly audit for a warehouse. Construction sites are dynamic, and rentals come and go rapidly. A good practice is to do a quick audit weekly, with a more thorough audit monthly. For a weekly audit, you might walk the site with your inventory list in hand (or on a tablet) every Friday: check each rented item off the list, confirm it’s present or note if it left early. Make sure the quantities match (if you rented 10 concrete forms, are all 10 accounted for?), and ensure nothing extra has snuck in without being recorded.

What if something doesn’t line up? Suppose your log says you should have three rented water pumps on site, but you only find two. That’s a red flag to immediately investigate. It could be that one was returned early and someone forgot to update the record – or it could mean a pump has gone missing. The sooner you catch it, the better your chances of resolving it (tracing its last known location or asking the team if it was moved). If you wait until the end of the project to discover a missing pump, it might be impossible to figure out where it went or who had it last, and you’ll likely be stuck paying the rental company for a lost item.
Audits also include checking the condition of equipment. When you inspect a rented machine, look for any damage or maintenance issues. Document any new dents, scratches, or performance problems. Why? Because if you find damage early, you can address it with the rental provider before it worsens (or before you get blamed for it upon return). For instance, if a rented generator isn’t working properly, an inspection might catch that it needs a filter change or has a wiring issue. You can then get a replacement or repair from the rental company, avoiding a scenario where the generator fails when you desperately need it.
Maintenance inspections are sometimes handled by the rental company (especially for long-term rentals, they may do scheduled service). But as the user, you should still perform basic inspections: check fluid levels on machines, look at tire or track conditions, ensure safety features are intact (like backup alarms, lights, etc.). Not only does this keep everyone safe, it also ensures you’re not hit with damage fees for something that could have been fixed during the rental period.
When conducting audits, involve your team. Make it a routine that at a set time (e.g. Monday morning toolbox talk or Friday wrap-up), you quickly run through the inventory status. It doesn’t have to be purely an “audit” vibe; it can be framed as “equipment roundup” where crew can voice if they noticed an issue with any tool or if something needs to be swapped out.
Document the results of each audit. Even a short note like “Week 3 audit: all 5 rented items present, no issues” or “Month-end audit: missing one drill – reported lost, replacement ordered” is valuable. These notes could be vital if disputes arise (like if a rental company’s record doesn’t match yours, your audit log is evidence).
In summary, regular audits and inspections are your quality control for equipment tracking. They help catch mistakes (a forgotten entry, an item stored in the wrong place) and prevent small problems from snowballing (unnoticed damage or loss). By staying vigilant with routine checks, you maintain confidence that your records are accurate and your rented gear is in good shape – and you greatly reduce the chances of an ugly surprise when it’s time to return everything.
8. Train Your Team and Assign Responsibility
All the processes and tools in the world won’t help if the people using them aren’t on board. Successful construction inventory management – especially for rentals – is truly a team effort. It’s crucial to train your crew and staff on the procedures, and assign clear responsibilities so that nothing falls through the cracks.
Start with a simple principle: everyone who touches the equipment should know the basic rules of tracking it. This means conducting short training sessions or including instructions in team meetings about how your company handles rented equipment. Topics to cover might include:
- Check-in/check-out protocol: Ensure everyone understands that whenever they take or return a tool, it needs to be recorded (and how to do that recording – whether it’s signing a sheet or notifying a manager or using an app like CyberStockroom).
- Handling and reporting issues: Train workers to immediately report if something is damaged, malfunctioning, or if they suspect an item is missing. For example, if a crew member finishes using a rented nail gun and notices a part is broken, they should know to inform the site manager right away rather than hiding it. Similarly, if they can’t find a tool, they should speak up sooner rather than later.
- Label and ID awareness: Make sure the team knows that all those tags and labels we discussed in Best Practice #2 are there for a reason. If someone sees a tag is falling off or illegible, they should fix it or tell the inventory manager. If they come across a piece of equipment that isn’t labeled, they should mention it – it might be something that slipped into the site without proper logging.
Next, assign specific roles for inventory control. While everyone plays a part, it’s wise to have one or more point people who oversee the big picture. For a larger site, you might designate an “Equipment Coordinator” whose daily duty includes managing the rented equipment list, performing the check-in/out log, and liaising with rental vendors for deliveries or pickups. On smaller projects, it could simply be the site supervisor or foreman doubling in this role. The idea is that there is clear ownership of the process – someone who will take action if an item isn’t accounted for, someone who keeps the inventory software updated, someone who will champion these best practices onsite.
Training should be ongoing, not just a one-time thing. Incorporate refreshers into safety meetings or project kick-off meetings. Each time a new piece of equipment arrives, take a moment with the crew to say, “This is a rental, here’s how we’re tracking it, and here’s who’s responsible for it.” New employees especially should be briefed on your inventory procedures as part of their onboarding.
Importantly, build a culture of accountability and care. Help your team understand why you’re emphasizing equipment tracking – not just to be nitpicky, but because it prevents delays (so they’re not stuck waiting around for a missing tool), it keeps everyone safer (knowing the condition of tools), and it saves money (which ultimately benefits the company and can flow back into things like better equipment or even worker incentives). When people see the practical benefits, they’re more likely to take it seriously.
Finally, recognize and encourage good practices. If a crew consistently follows the check-out system or someone proactively reports an issue that saves the day, call that out and thank them. Positive reinforcement goes a long way.
In essence, technology and processes need human buy-in to work. By training your team and assigning responsibility, you create a workforce that is informed and vigilant. When everyone knows their role in managing rented equipment – and understands that they’re each a steward of these costly assets – your inventory management becomes much stronger and smoother.
9. Communicate and Coordinate Across Sites and Vendors
Construction is a team sport, not only among your crew but also involving outside parties like rental companies. To truly excel at managing rented equipment, it’s vital to keep lines of communication open – both internally (between your project sites and the main office) and externally (with your rental providers).
Internal communication: If your company runs multiple projects or has equipment moving between sites, establish a system to share inventory information across those projects. This might be achieved through the centralized inventory system or software we discussed, but it also involves human communication. For example, project managers or site supervisors should have periodic check-ins with each other or with a central equipment manager. In these talks, they can discuss upcoming needs or surplus equipment. “We’re finishing with the rented mini-excavator early next week on my site; do you need it on yours or should I schedule a pickup?” – a quick conversation like that can save a ton of money by reallocating a resource or at least returning it promptly instead of letting it sit unused.
When one site is short on a tool and another has extras, an internal alert can solve the problem without new rentals. Perhaps Site B is considering renting an extra generator; a quick call reveals Site A has one on rent that’s idle and could be transferred over. These kinds of coordination wins are only possible if your team communicates and shares the awareness of inventory. Encouraging a culture where supervisors reach out to each other (or through a central manager) before ordering new rentals will greatly reduce redundant rentals and under-utilization.
External communication with vendors: Building a good relationship with your equipment rental providers can pay off in multiple ways. Always keep the rental company in the loop regarding your needs and any issues:
- If a project scope changes and you’ll need the equipment longer than expected, let them know as soon as possible. This not only is courteous, but also they may be able to extend at a better rate or ensure availability (and it prevents the equipment from being promised to someone else right when you unexpectedly still need it).
- If you finish early, communicate that too. Many rental agreements require you to call to off-rent; don’t delay that call. By giving them notice, you might even get pickup earlier and stop charges sooner.
- Be upfront about any problems with the equipment. Rental companies prefer to know if a machine is acting up or got dinged – they might swap it out or repair it, and it shows honesty on your part (which can be important if there’s any damage, better they hear it from you immediately than discover later).
- Coordinate on logistics: confirm delivery times, pickup instructions (like where on site the equipment will be, who to contact upon arrival, etc.). Miscommunications here can lead to equipment not being picked up (and you getting charged extra days), or deliveries being missed.
Another tip: many rental vendors have multiple branches or a central account manager. If you’re managing many rentals, having a single point of contact at the rental company to talk to can simplify things. They might help you consolidate invoices or alert you if they see you have something on rent that hasn’t been used in a while (a good vendor will sometimes check in, “Hey, that forklift has been on rent 60 days – still using it?”).
Additionally, keep an eye on the paperwork. Rentals come with contracts, and those contracts detail how billing works (daily/weekly rates, thresholds for weekly to monthly conversions, etc.), as well as any fees (cleaning, fuel, damage, overtime). Good communication includes internally making sure the accounting department reviews rental invoices carefully. Mistakes happen – a double charge here, a missed off-rent date there – and if you communicate internally (project manager to accounting: “we sent the loader back on the 12th, make sure we’re not billed past that”) you can catch extra costs and dispute them promptly with the vendor.
Finally, tie communication back to our central theme: inventory awareness. When everyone from the field crew to the front office to the rental supplier is exchanging information freely about equipment status, needs, and movements, there’s far less chance of something falling off the radar. You create an environment where it would be really hard for a piece of equipment to just languish forgotten, or to disappear without someone noticing.
In summary, coordination is the glue that holds all these best practices together. Your internal team coordination prevents inefficiencies and duplicate rentals, while good communication with vendors ensures you get the service and clarity you need. Together, these communications mean your rented equipment inventory is always under control and surprises are kept to a minimum.
Conclusion: Take Control of Your Rented Equipment
Managing rented equipment inventory on construction sites may seem like a daunting juggling act, but with the right approach it becomes a manageable (even smooth) part of your project workflow. We’ve covered a lot of ground – from establishing a centralized inventory and labeling everything, to leveraging cutting-edge tools like CyberStockroom’s map-based tracking and fostering a culture of accountability in your team. These best practices work in concert: planning ahead and scheduling smartly reduces idle time, diligent check-in/check-out and audits keep you aware of every item’s status, and technology ties it all together with real-time visibility.
The difference between a disorganized job site and an efficient one often comes down to how well you track and manage your resources. When you implement these strategies, you’ll find that equipment-related headaches start to diminish. Crews spend more time working and less time searching. You’ll avoid nasty surprises on your rental bills because nothing is slipping through unnoticed – no more paying for a machine that sat unused or scrambling to replace a lost tool at the last minute. Instead, you’re proactively moving the pieces on the board, making informed decisions backed by accurate data.
For construction businesses, this level of control doesn’t just save money – it can improve safety (ensuring equipment is in good shape and available when needed), boost team morale (less frustration from missing gear), and enhance your reputation with clients (projects stay on schedule and budget). In a competitive industry, those are significant advantages.
Remember, treat your rented equipment as if it were your own. Just because you don’t own that excavator or generator doesn’t mean its management is “someone else’s problem.” By taking ownership of the tracking process, you protect your project and your bottom line. And rental companies will love working with you because you return equipment on time and in good condition, with clear communication throughout – it’s a win-win.
In the end, effective construction rented equipment tracking comes down to being organized, using the tools at your disposal, and keeping your team engaged in the process. Start with the steps outlined in this guide. Customize them to fit your company’s needs and scale. It might require a bit of effort to set up new systems or train staff initially, but once in place, you’ll wonder how you ever operated without them.
With these best practices, you can confidently say that no matter how many forklifts, loaders, drills, or generators you have buzzing around your job sites, you know where they are, what they’re doing, and what’s next for each of them. And that peace of mind is worth its weight in gold (or at least, worth its weight in saved rental fees and avoided crises!). Here’s to smoother projects and a well-orchestrated construction site where every piece of rented equipment is accounted for and pulling its weight. Happy building!


Leave a comment