
Modern manufacturing teams rely on a vast array of tools, equipment, and materials to keep operations running. Yet, too often these critical assets are managed ad-hoc or not tracked with the same rigor as production inventory. The result? Missing tools, duplicated purchases, downtime, and avoidable costs. To run a truly efficient operation, inventory management must extend to all assets – not just saleable stock, but also the tools and equipment that make work possible.

Why Track All Tools and Equipment?
For many companies, “inventory management” focuses on raw materials, finished goods, or spare parts – basically the items that directly go into production or sales. Tools and equipment often fall outside of this tracking, viewed as general company property or MRO supplies. However, neglecting to track tools and equipment can have serious impacts on efficiency and cost. Here’s why extending inventory management to these assets matters:
- Lost Productivity: When a worker can’t find a needed tool, they can waste significant time searching for it or waiting for a replacement. In fact, studies in industrial settings have found that employees might lose over an hour per day looking for misplaced tools. That’s an hour not spent on productive work, which can push back schedules and deadlines. Multiply that across an entire team or multiple shifts, and the lost time becomes enormous.
- Increased Costs: Missing tools eventually have to be replaced. Buying a new drill or torque wrench every time one “disappears” adds up fast. A few unplanned purchases a month can turn into thousands of dollars in extra spending on equipment per year. Even relatively cheap hand tools, when frequently lost, will erode your budget over time. Moreover, lack of tracking often leads to ordering duplicates of items you already have because no one is sure where they are. This ties up capital in unnecessary inventory.
- Project Delays and Downtime: A single missing tool can hold up an entire process. For example, if a specific calibration instrument or a specialty tool is required for a task but cannot be located, that task might be put on hold. In manufacturing, this could mean an assembly line stands idle until the tool is found or replaced. In construction, a crew might delay work waiting for a replacement to arrive. Such delays can cascade – one holdup affects the next step and so on – ultimately impacting delivery times and commitments to customers.
- Shrinkage and Theft: Unfortunately, tools and portable equipment are prime targets for theft – both external and internal. Smaller high-value tools can be pocketed, and larger equipment might “walk away” if not monitored. Without a tracking system, theft can go unnoticed for days or weeks. By the time you realize an expensive tool is missing, recovery is unlikely. (Industry estimates indicate that heavy equipment theft results in about $300 million in losses annually across the construction sector, and recovery rates are dismally low.) While manufacturing plants may be more controlled environments than open job sites, they are not immune to theft or misplacement by staff or contractors. A lack of accountability or visibility makes it easier for these losses to occur undetected.
- Safety and Compliance Risks: Some equipment is safety-critical or must be regularly maintained and calibrated. If those items aren’t tracked, you might not know if a safety harness has gone missing or if a torque wrench is past due for calibration. Missing safety tools can force workers to improvise (which is dangerous), and using uncalibrated or faulty equipment can lead to quality issues or accidents. Tracking tools and machinery, along with their maintenance schedules, ensures that required equipment is available and in proper condition when needed – an important aspect of workplace safety and compliance.
- Lower Morale and Hoarding Behavior: Imagine frequently finding the tool crib empty of the tool you need – it’s frustrating. Over time, employees who struggle to locate tools may become disengaged or start developing workarounds, like hoarding tools at their workstation “just in case.” This behavior, while understandable, creates imbalances (one station has a surplus of wrenches while another has none) and defeats the purpose of central inventory. A transparent tracking system signals to employees that the company is organized and that they can trust tools will be available when needed. This fosters accountability and discourages the “hide a spare tool” mentality.
In short, tools and equipment may not be part of your sold goods, but they directly affect your bottom line and operational efficiency. Every lost or idle tool is money wasted – either through replacement cost, lost labor hours, or delayed output. Extending inventory management to cover these assets is about protecting your business from these hidden drains.
Challenges in Tracking Tools and Equipment
If managing tools were easy, every organization would have a perfect record. In reality, several challenges make tool and equipment tracking difficult. Understanding these pain points is the first step to addressing them. Common challenges include:
- Multiple Locations and Silos: In many companies – especially in manufacturing with multiple production lines or in construction with multiple sites – tools migrate between locations. Without a centralized system, a drill press moved from Plant A to Plant B might “vanish” from Plant A’s perspective. Different departments or sites may each have their own mini-inventories with little communication. Tools get scattered, and tracking them becomes a nightmare when there’s no single source of truth.
- Lack of Visibility (Manual Methods): A surprising number of teams still rely on informal or manual methods to keep track of tools. This might be a paper sign-out sheet, a whiteboard, or simply word-of-mouth “Bob has the laser cutter today.” These methods provide no real-time visibility into who has what or where an item currently is. Handwritten logs often go missing or aren’t updated promptly. Spreadsheets, while a step up, tend to fall behind unless someone dedicates time every day to updates. In a fast-moving environment, a tool might be used by three different people in one day – a static sheet won’t capture that. The result is that items “walk away” without accountability when no digital trail exists.
- Frequent Misplacement: It’s human nature – tools get set down in the wrong place or forgotten in a toolbox. On a busy shop floor or job site, a tool might be left inside a machine, on a shelf, or in someone’s work area. By day’s end, no one remembers where that tool ended up. Using tools for a task they weren’t meant for (misuse) can also lead to them being damaged and effectively lost from inventory. Without a system to quickly find or flag missing items, these misplaced tools may as well be gone.
- Theft and Unauthorized Use: Where valuable equipment exists, theft is always a risk. In a manufacturing facility, this could be as straightforward as a high-value power tool “growing legs” and disappearing. It can be external (outsiders or contractors walking off with a tool) or internal (employees taking something home). Additionally, tools or machines might get borrowed for side projects or used off-hours without permission. When inventory management is chaotic, theft or unauthorized use is hard to detect – a missing drill might not be noticed until someone needs it days later, giving a thief a head start. A culture of “nobody’s watching” can unfortunately invite this behavior.
- Overstocking and Duplication: The flip side of missing tools is overstocking. When teams can’t find what they need, they might assume it’s not available and procure another. Alternatively, individuals or departments might squirrel away extra tools (“just in case we need it and none are available later”). Over time this leads to duplicate purchases and excess inventory of tools. Not only is this a direct cost, but those extra tools can clutter storage space and even expire or degrade (in the case of certain supplies or materials). Essentially, money that could be used elsewhere is tied up in unnecessary duplicates.
- Poor Record-Keeping and Data Lag: Even companies that attempt to log tool usage face the challenge of keeping data current. If the process isn’t extremely easy, people skip it. Perhaps a technician returns a borrowed meter but forgets to sign it back in, so the system still shows it out. Or someone updates a spreadsheet at day’s end from memory, inevitably forgetting some transactions. These gaps mean your inventory records are always trying to catch up with reality. Inaccurate data can be worse than no data – if you rely on it, you might make bad decisions (like buying a replacement for a tool that’s actually just sitting in an unlogged location).
All these factors contribute to an environment where tools and equipment are perpetually at risk of being lost or underutilized. The good news is that these problems are entirely solvable with a combination of better processes and modern technology. Next, we’ll outline exactly how to implement those processes and technologies to take control of your tools.
Audit and Catalog Your Tools and Equipment

The first step to better tool management is knowing exactly what you have. Start with a thorough audit of all tools, equipment, and assets in your operation. This means going through workshops, maintenance rooms, tool cribs, storage closets, vehicles – anywhere a company asset might reside – and making an inventory list. Treat this just as you would a inventory count for products. Key actions in this step include:
- Compile a Master List: Record each item’s name, type, and quantity. Note details like make/model or serial number for equipment, which can help distinguish similar items. For example, if you have five identical cordless drills, assign each a unique identifier (like an asset ID or serial) so you can track them individually.
- Categorize and Group: Organize the list in a way that makes sense for your business. You might group items by department, by usage (e.g. hand tools, power tools, heavy machinery, safety equipment, IT equipment, etc.), or by location. Categorizing now will make it easier to assign storage locations and responsibilities later. It also highlights the scope of assets you’re dealing with – you may be surprised how many “little” tools are floating around.
- Assess the Condition and Needs: While auditing, take note of any tools that are damaged, due for maintenance, or nearing end-of-life. This is a good time to flag equipment that might need calibration or replacement. You’re not just counting – you’re also evaluating the state of each asset. If some tools are found that obviously belong in another area or with another team, note that misplacement (it’s a clue to process issues to fix later).
- Involve the Team: Consider involving department leads or the people who use the tools daily in the audit. They often know where things “truly” are and can ensure nothing is overlooked. Plus, engaging them at this stage sets the tone that a new system is coming and their cooperation matters.
Performing this comprehensive audit might be time-consuming, but it lays the foundation for everything else. You can’t track what you haven’t identified. Once this master list is compiled, you have a clear baseline to work from. Many companies discover during this process that they own duplicates they didn’t realize, or they find tools that went “missing” long ago. It can be an eye-opening exercise that immediately justifies the need for better tracking.
After cataloging, keep this inventory list handy – ideally in a digital format from the start, as you will be importing it into whatever tracking system you choose. This leads us to the next step: labeling and identification.
Tag and Label Your Tools for Easy Identification

Now that you know what assets you have, the next step is to label each tool and piece of equipment with a unique identifier. This is a critical best practice for tracking: if an item isn’t labeled, it’s very hard to reliably log its movements or usage. Labeling creates a one-to-one link between the physical object and its record in your system. Here’s how to go about it:
- Choose a Labeling Method: The most common methods are barcodes or QR codes affixed to each item. These can be printed as stickers or tags and correspond to the item’s ID in your database. Scanning the code will bring up that item’s information instantly. Barcodes/QR codes are popular because they are inexpensive, easy to generate, and quick to scan with widely available devices (smartphones or handheld scanners). Some companies opt for RFID tags for certain equipment – RFID can be scanned without direct line-of-sight and multiple tags can be read quickly – but RFID is more expensive and may be overkill unless you have a very large number of assets or need automated scanning. For most, barcodes or QR labels strike the right balance of cost and benefit.
- Create Durable Labels: Shop floors and field environments can be harsh – labels may face oil, heat, dust, or rough handling. Invest in good quality labels or tags that are durable (waterproof, fade-resistant, and stick firmly). If a label falls off or becomes illegible, that tool effectively “loses” its identity in the system. Some companies use metal tags for very heavy-duty equipment or plastic laminated barcode tags for tools that live outdoors or in machining areas.
- Standardize the Information: Each label should carry a code (barcode/QR) that links to the item’s record, but it can also include human-readable info for quick identification. For example, your label might print the item name or an asset number and perhaps your company name (which helps if it ever wanders off-site). Color-coding labels by category is another idea (maybe blue labels for IT equipment, yellow for calibration tools, etc.) if that helps your team. The key is consistency – make a labelling scheme and apply it uniformly.
- Label Everything (Within Reason): Focus on items that are non-consumable and valuable enough to track. Every power tool, handheld instrument, machine, or specialized tool should get a label. You might not label trivial consumables (like boxes of screws or glue bottles) unless those are critical supplies you want to manage – though many organizations do track consumables too. As a rule, if losing track of an item would cause a cost or delay, label it. Don’t forget infrequently used equipment or things in storage; those are often the ones that get “lost” due to infrequent visibility.
Once labeling is done, you’ve effectively given every asset a “passport” into your inventory system. Scanning that label will be how you log the item in and out, move it, or check its details. At this stage, you have a list of everything and each item has an ID – the groundwork is laid for implementing a tool tracking system.
Use a Centralized Tool Tracking System (Digital Solution)
With your assets identified and tagged, the next major step is to choose a system to actually track all this information. While you can attempt to manage tool inventory with spreadsheets or manual logs, the reality is that software is almost essential for real-time, accurate tracking once you have more than a handful of items. A centralized, digital tool tracking system will serve as the backbone of your new process.
Key considerations for selecting a system:
- Centralized Database: The system should act as a single source of truth for all tools and equipment. Everyone should be looking at the same live inventory data, whether they’re in the main office or out on the factory floor. A cloud-based inventory management platform is ideal here, as it allows multiple users to access and update the data simultaneously. When something changes (a tool is moved or checked out), everyone sees the update in real time.
- Real-Time Updates (No Data Lag): Look for a system that supports real-time tracking of assets. This usually means it has barcode/QR code scanning integration so that when a tool is taken or relocated, a quick scan updates its status immediately. Real-time tracking eliminates the delays of batch data entry. It ensures that if you go to look for an item, the system’s location info is current. Modern systems achieve this by having mobile apps or mobile-friendly interfaces for scanning on the spot, or even using dedicated scanners. The goal is no paperwork to file later – the moment a tool moves, it’s logged.
- Multi-Location and Mapping: Since tools can be distributed across various locations (different rooms, buildings, sites, vehicles, etc.), the system should gracefully handle multi-location inventory. The best systems allow you to create a hierarchy of locations (e.g., Building > Room > Cabinet, or Region > Site > Department) and then assign items to those locations. This way, you can drill down or roll up to see where your assets are. Some advanced solutions even provide a visual map interface (more on that soon) to make this easier.
- User Access and Permissions: A good tool tracking platform will let you create user accounts with appropriate permissions. For instance, a storekeeper or tool crib manager might have rights to check tools in/out for anyone, add new items, or adjust records, whereas a line worker might only have the ability to check out tools to themselves and view what’s available. User logins also help record who performed an action (providing accountability). Ensure the system can handle multiple users and ideally keeps an audit log of user activities.
- Ease of Use: This is big. If the software is cumbersome or requires excessive steps to do simple things, people might resist using it – defeating the purpose. Look for an intuitive interface, ideally one that field workers find easy. Mobile-friendliness is important if you expect people to use phones or tablets on the go. Features like scanning a barcode to instantly bring up an item, or simple buttons for “transfer” or “check out” make a huge difference. The more intuitive the system, the more readily your team will adopt it.
- Reporting and Analytics: Beyond just tracking where items are, consider what data the system can give you. Does it show utilization (how often each tool is used, or idle time)? Can you run reports on missing items or items due for maintenance? Insightful analytics can help you optimize – for example, identifying a tool that’s rarely used (maybe you can redeploy or sell it) or spotting that one department constantly loses certain tools (indicating a training issue). Even basic reports like “current inventory by location” or “tools checked out by person” are very useful for managing operations.
There are various software options out there, ranging from simple inventory apps to specialized asset management systems. Some are generic, others tailored to industries (construction, manufacturing, etc.). The key is that it fits your needs and is not overly complex for your scale. For small operations, even a tool tracking module in a broader maintenance management system might suffice. For larger or multi-site operations, a dedicated tool tracking software is often worth it.
One example of a tool tracking platform that many field and manufacturing teams use is CyberStockroom, which we’ll discuss in the next section. It offers many of the features described above, with a unique visual approach. Let’s explore how a solution like that can anchor your tool and equipment inventory management.
CyberStockroom: A Unified Inventory Map for All Assets
When it comes to modern tool and equipment tracking, CyberStockroom is a standout example of how technology can simplify inventory management. CyberStockroom is an inventory management software platform designed to tackle tool and equipment tracking challenges head-on, especially for businesses that operate across multiple locations or departments. It provides a cloud-based, real-time inventory system with a unique twist: a visual map interface. Instead of dealing with boring spreadsheets or text-only lists, CyberStockroom lets you see your facilities and storage areas on a digital map and quickly view what items are in each location.
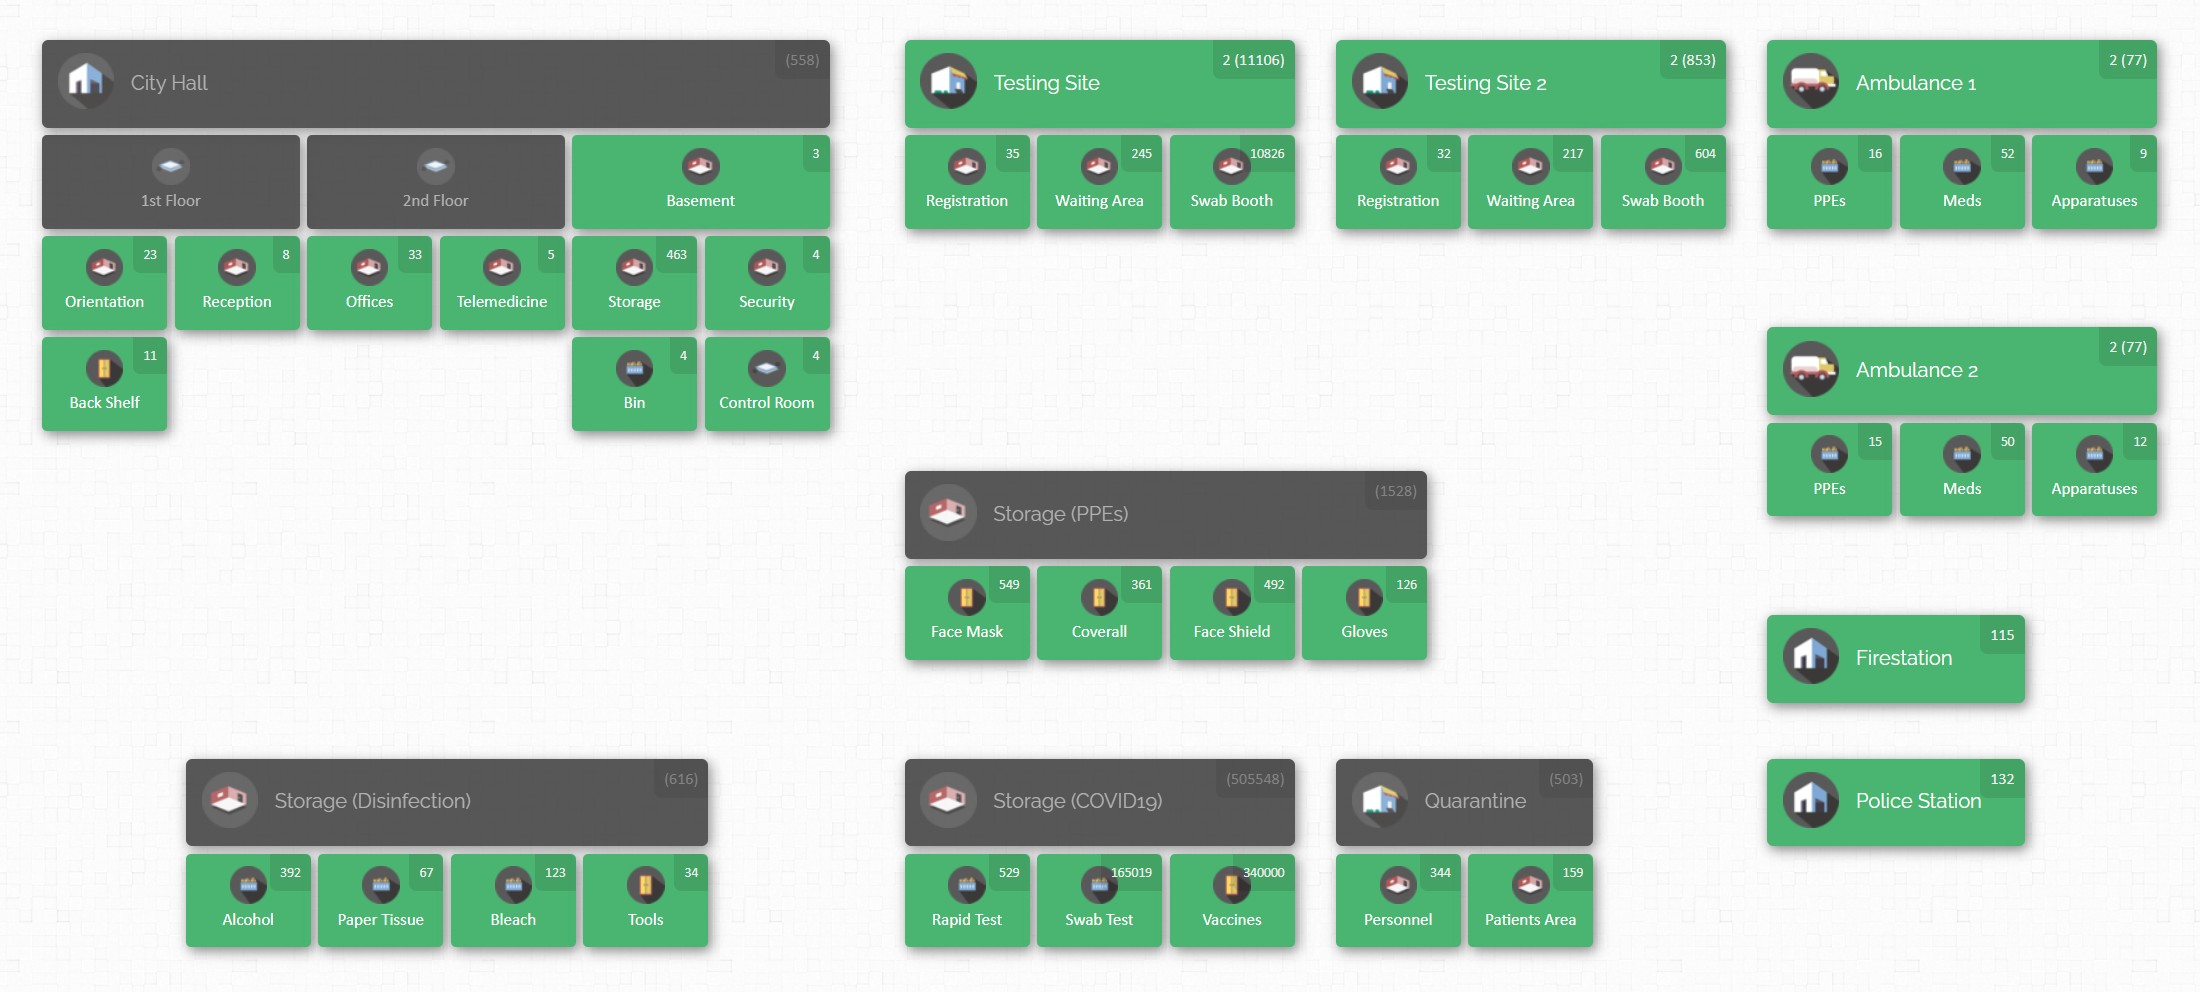
How does this help you? Imagine opening the software and seeing a floor plan of your factory or a layout of your tool room. Each area on the map can be clicked to reveal the items (and quantities) stored there. This visual approach makes it immediately clear where things are – much like the demo map image we mentioned earlier. It’s an intuitive way to manage inventory, as if you have a “virtual twin” of your physical workspace.
Let’s look at some key features of CyberStockroom (and similar advanced systems) that directly support tool and equipment tracking:
Visual Inventory Map
CyberStockroom’s signature feature is its interactive inventory map. You can recreate your real-world layout – warehouses, production areas, maintenance rooms, job sites, even vehicles – as sections on the map. Items are placed in these locations virtually. This gives unparalleled inventory visibility: at a glance, you can tell which tools are in the main workshop, which are in the service van, and which are in off-site storage. The map is drag-and-drop, so moving a tool from one location to another is as simple as dragging its icon, which immediately updates its recorded location. This spatial approach is incredibly useful for teams that are visual by nature (which includes most of us!). It answers the crucial question “Where is it right now?” instantly.
Real-Time Barcode Scanning
CyberStockroom supports barcodes and QR codes on items, enabling real-time tracking of movements. Every item in the system can be tagged with a barcode that links to its record. When you scan a tool’s code (using any barcode scanner or even a smartphone camera), you can update its status or location immediately. For example, scanning a drill and marking it “checked out” to a user will reflect instantly in the system. This means no more batch updates or end-of-day data entry – the system stays up-to-date automatically. Real-time scanning provides a live feed of inventory activity, so nothing slips through the cracks. You’ll always know exactly where each tool is and who last used it, which both deters casual theft and saves time spent searching.
Cloud-Based Access Anywhere
As a cloud platform, CyberStockroom is accessible from any device with an internet connection. Whether you’re on a computer at the office or using a tablet on the factory floor, you can log in and get the same information. There’s no need for special installations on every machine; just open a web browser. In practice, this means the entire team stays connected and informed. A manager can check stock levels from home or while traveling; a technician on site can verify if a needed tool is available without returning to the tool crib. Everyone sees one unified inventory in real time.
Tool Assignment & Accountability
CyberStockroom allows you to assign tools to specific employees, teams, or jobs within the system. This creates clear responsibility for each asset. For instance, you can check out a set of tools to “John Doe (Maintenance Dept)” or to “Line 3 – Shift B”. The system logs who has what and when it’s due back or supposed to be used. This feature is invaluable for accountability – if something goes missing or gets damaged, you have a record of who last had it. It effectively creates a check-out/check-in process digitally. Workers tend to be much more careful with equipment when they know their name is attached to it in the system. And at any moment, you can pull up a list of all tools checked out and see who is holding them.
Comprehensive Item Records (Custom Fields & Files)
Each asset in CyberStockroom has a detailed profile. You’re not limited to just a name and quantity. You can add custom fields for any data you need to track – for example, “Condition”, “Last Maintenance Date”, “Calibration Due Date”, “Purchase Price”, etc. You can also attach files like user manuals, inspection certificates, or photos of the item. This means all relevant information about a tool is in one place. Say an operator needs to see the manual for a machine – they can pull up the item in CyberStockroom and open the attached PDF. Or if you want to check when a forklift’s last servicing was, it’s right in the log. By enriching item records, the software becomes not just a tracker but a knowledge base for your assets.
History Logs and Audit Trail
The platform maintains a history log for every item, recording all movements and changes. You can easily review an item’s timeline – when it was received, when it moved locations, who checked it out last Tuesday, when it was returned, etc.. These audit trails are like a fingerprint for each tool’s journey. In case of an issue (loss or damage), you can trace back through the history to investigate.

During audits, these logs help verify counts and identify discrepancies. The system essentially provides an automatic paper trail, saving you the headache of manual record-keeping. This level of traceability is a strong deterrent to internal theft as well – knowing that every action is logged makes people more accountable.
All of these features work in concert to provide full visibility and control over your tools and equipment. CyberStockroom basically acts as a live digital twin of your physical inventory: what’s happening on the shop floor is reflected in the software. Instead of reacting after a tool goes missing, you’re proactively monitoring everything.

For manufacturing teams, a solution like CyberStockroom can be transformational. It’s built with the realities of tool management in mind – the constant movement of items, the need for speed and simplicity, and the importance of visualizing complex operations. By implementing such a system, companies often see immediate improvements: missing tool incidents drop, people spend less time hunting for equipment, and redundant purchases decrease. In the context of our how-to guide, CyberStockroom provides the technology backbone that supports the best practices we’re discussing.
Organize and Map Out Your Storage Locations
Once you have a digital system in place , it’s time to set it up to mirror your actual operations. Organizing and mapping your storage locations in the system is a crucial step that will make tracking intuitive and accurate.
- Recreate Your Real-World Layout: Start by inputting all the locations where tools and equipment reside. This could be as high-level as “Main Warehouse” or as granular as specific shelves or bins, depending on your needs. Good practice is to have a hierarchy: for example, Building A > Tool Crib > Shelf 1. In CyberStockroom, you would create these as locations and sub-locations on the inventory map. Take some time to get this digital layout right – consider all places tools might go, including off-site locations or vehicles (e.g., service trucks, job trailers). The goal is that any physical area where a tool could be found is represented in your system.
- Use Visual Mapping if Available: If your software offers a visual map interface (like CyberStockroom’s drag-and-drop map), leverage it fully. You can design a map with zones for each area: e.g., different rooms in a facility, or different departments. It doesn’t have to be a perfect architectural schematic; it just needs to visually separate the spaces in a way that your team will recognize. For instance, you might have an icon for the maintenance workshop, another for the assembly line area, one for the outdoor storage shed, and so on. This map will become the dashboard for your tool inventory. As mentioned, you can move items on the map with drag-and-drop simplicity to update locations. Setting this up might sound like extra work, but it pays off every time someone needs to find something quickly.
- Assign Each Item to a Home Location: In the system, make sure every tool is logged into an initial location (from your audit data). Think of this as setting a “home” for each item – where it normally resides when not in use. For example, Hammer Drill #3 -> Building A > Tool Crib > Power Tools Cabinet. This establishes a default location so if later it’s not there, the system shows it as checked out or moved. By populating all items into their spots on the map or location tree, you create a baseline inventory view.
- Enable Easy Transfers: Ensure that transferring an item from one location to another in the system is straightforward. This could be done by scanning (scan item, then scan new location tag or select from a list) or via drag-and-drop on the map. You want the process of updating location to be so simple that staff will actually do it. If it requires 10 clicks, they might skip it; if it’s one swipe or scan, they’ll comply. CyberStockroom and similar systems often let you perform transfers with minimal effort – e.g., a couple of clicks or a quick scan sequence updates an item’s location record. During your training (next section), emphasize how to do this and why it’s important.
- Identify Critical Zones: As you map out locations, identify any areas that are high-risk for loss or confusion. For instance, a “mobile” zone like a contractor’s truck or a temporary project site might be where things often go missing. In your digital layout, treat these carefully – you might want to have a clear process for items entering or leaving such zones (like always scanning items in/out of the company van). The idea is to not have black holes in your inventory map. Every transition should be captured.

By organizing your locations in the system, you’re building a structure that reflects reality. This structure is what allows you to generate useful views like “What’s in this room right now?” or “Show me all equipment on Truck #5”. It also underpins automated alerts (for instance, if you want to flag when an item leaves the building and goes to a field location, etc.). A well-thought-out mapping of locations ensures your inventory data stays organized and coherent, no matter how complex your operations get.
Establish Check-Out Procedures and Accountability

With tools labeled and a system ready to track them, the next piece of the puzzle is managing how tools are issued and returned in day-to-day operations. This is where processes and software meet. Establishing a clear check-out/check-in procedure (and enforcing it) will drive accountability among staff and greatly reduce lost equipment.
- Define the Workflow: Decide how a tool gets checked out. Does an employee go to a tool crib manager who scans it out to them? Or do they themselves scan it with a mobile device when taking it? Different setups work for different organizations. In a smaller team, you might allow self-service checkout – workers scan the tool’s code and their own ID to sign it out. In larger operations, a dedicated inventory clerk might handle check-outs at a central location. Whichever you choose, make sure everyone understands the process. It should be as simple as “If you take a tool, it must be recorded in the system with your name or job assignment.”
- Use the Software for Check-Out/Check-In: Leverage your tracking system to facilitate this. In CyberStockroom, for example, you can assign items to people or projects, which essentially is a check-out. As described earlier, scanning a tool and selecting a user will mark it as “assigned to John Doe” until John (or a manager) checks it back in. The system will log time and user stamps for these actions. Encourage the habit that the first thing you do when taking a tool is to scan it, and similarly, when returning it, scan it back to its home. This might take a bit of training and culture shift, but once ingrained, it becomes second nature – much like checking a book out of a library.
- Set Borrowing Rules: It helps to establish some rules, like how long a tool can be checked out or what to do if it’s needed longer. For instance, you might say tools should be checked back in by end of shift or end of day, unless the job spans multiple days. Or require that if someone takes a tool home (maybe a laptop or specialty instrument), they need explicit permission logged. The system can show you at any time who has what checked out, so a quick review at closing time can catch if anything is still out. Some teams even implement automated reminders – e.g., if a tool hasn’t been checked in after 24 hours, the system emails the person responsible as a nudge.
- Accountability and Consequences: Be clear that checking out a tool makes someone accountable for it. It doesn’t mean they own it, but they are responsible for its care while in their possession. Culturally, this tends to reduce careless handling. If Bob knows that the expensive thermal camera is checked out under his name, he’s likely to guard it more closely. Management should back this up: if something breaks or goes missing repeatedly under one person’s watch, there should be an appropriate follow-up (not necessarily punitive, but at least investigative). On the flip side, avoid a blame-game culture – the goal is to encourage accountability, not scare employees. Emphasize that the system is there to protect everyone’s workflow, not to micromanage or punish honest mistakes.
- Temporary Assignments and Kits: In some cases, you might issue a set of tools as a “kit” for a project or a shift. For example, a technician starting a maintenance round might check out a toolbox containing 10 tools. In your system, you could either check out each tool individually or have a grouped ID for the kit. The benefit of individual tracking is you’ll know if only 9 out of 10 came back, but it’s more effort to scan all 10. Decide what level of granularity makes sense. At minimum, track the kit; for high-value tools, track each. CyberStockroom allows creating collections or grouping assets under a location (like “Toolbox #3”) which can streamline this process while retaining individual item data.
- Special Cases – Reservations and Service: Some advanced workflows: If multiple people often need the same piece of equipment, you can use the system to “reserve” it ahead of time. Additionally, when a tool goes out for calibration or repair (off-site service), it should be checked out to a special location or status (like “Under Maintenance”) so it doesn’t appear available. Having a defined way to handle these cases in the system prevents confusion (“Where is that hydraulic tester? Oh, it’s out for calibration as per the system”).
By instituting a check-out procedure and using your software to enforce it, you create a culture of accountability. Every tool movement is transparent. Over time, this dramatically cuts down on lost items. Workers know that if they had the tool last, it’s recorded – so they make sure to return it. It also gives supervisors an easy way to audit usage: you can see if tools are sitting unused with someone or if one team is hoarding equipment.
Remember, the technology supports the process, but management and team buy-in are key. Lead by example – if a manager takes a tool without logging it, others will follow suit. So everyone, at all levels, should adhere to the new process so it becomes truly ingrained.
Train Your Team and Standardize Processes
No tool tracking initiative will succeed without the people using it correctly. Training your team on the new system and establishing standard operating procedures (SOPs) are critical steps to ensure longevity and consistency of your inventory management.
- Develop Clear SOPs: Write out simple, step-by-step procedures for common tasks: how to check out a tool, how to return it, what to do if you find an untagged item, how to request a new tool, etc. Having these procedures documented ensures that there’s no ambiguity in what employees are supposed to do. As Tom Hughes (co-founder of GembaDocs) defined it, an SOP is “the simplest way to do something – the current best known way”. Use plain language and keep them concise. For example, an SOP might be: “To borrow a tool: 1) Scan your ID card; 2) Scan the tool’s barcode; 3) Verify on screen that it’s assigned to you; 4) Proceed with your work; 5) At end of use, scan the tool back to its storage location.” Post these SOPs near tool cribs or entry points as reminders.
- Comprehensive Training Sessions: Don’t just send an email and expect everyone to get it. Conduct hands-on training sessions. Gather the team (in manageable groups if large) and demonstrate the new system. Show them how to look up a tool, how to perform a check-out, how the inventory map works, etc. Then let them try it out – maybe simulate a scenario where each person has to find and check out a specific tool. Training should cover not just how but why: explain the pain points (lost tools, downtime) and how this process helps everyone. When people understand the benefits (like “I can find tools faster” or “I won’t get blamed for losses I’m not responsible for because it’s tracked”), they’re more likely to embrace it.
- Address Concerns: Some team members might initially feel that tracking tools is about “spying” or mistrust. It’s important to communicate that the goal is to make their jobs easier, not to accuse anyone. Emphasize productivity and fairness – e.g., “We’re doing this so you don’t waste half your morning looking for a missing wrench that someone else forgot to return, and so we’re not constantly short on equipment you need.” Make it clear that the system is there to support them and improve safety (nobody wants to be caught without a needed safety tool).
- Assign Roles and Responsibilities: Clarify who is responsible for maintaining the system. Do you have an inventory manager or tool crib supervisor who will oversee data accuracy and perform audits? Who will tag new tools that are purchased in the future? If an employee notices a damaged label, what should they do? Defining these responsibilities prevents gaps. For instance, you might designate that “Warehouse supervisor will add any new equipment into the system and generate labels upon receipt” or “Team leads will ensure end-of-shift tool check-ins are done in their respective departments”. When everyone knows their part, the whole machine runs smoothly.
- Continuous Reinforcement: Training isn’t one-and-done. Incorporate inventory control into onboarding for new hires. Have refreshers or brief toolbox talks periodically, especially if you notice compliance slipping. Sometimes software updates or process tweaks happen – keep the team informed. You can also share wins: “Since we implemented tool tracking, lost tool incidents have dropped by X%” or “We saved $Y last quarter by avoiding duplicate tool purchases.” This reinforces the value of sticking with the process and gives the team pride in the improvement.
- User Feedback: Encourage the team to give feedback on the system and processes. The people using tools daily might spot issues or have suggestions. Maybe a particular scanning step is cumbersome or a certain location in the map is mislabeled – fix those quickly. By involving users in fine-tuning, you also get better buy-in. They feel heard and part of the solution. For example, if maintenance techs suggest adding a custom field for “Next Calibration Date” for gauges, that’s a great enhancement to implement. It gets them more invested in using the system, because it now serves their needs even better.
Training and SOPs turn the technology into a sustainable practice. The goal is to embed tool tracking into the company culture so it’s just “how we do things here.” Over time, scanning a tool in and out should feel as routine as buckling your seatbelt in a car – a quick, non-negotiable step. With a well-trained team and standardized processes, your tool and equipment tracking system will run like clockwork, and the problems of the past (missing tools, unknown whereabouts, endless searches) will be greatly diminished.
Perform Regular Audits and Maintenance Checks

You’ve set up a great system and everyone’s using it – fantastic! The final piece to keep it all running optimally is regular auditing and maintenance of your data and assets. Think of this as the periodic health check for your tool inventory.
- Schedule Routine Inventory Audits: Even with real-time tracking, it’s wise to verify the physical inventory against the system periodically. Set a schedule that makes sense – for example, a quick monthly audit of high-value or frequently used tools, and a comprehensive audit of all tools annually or biannually. During an audit, you might generate a list from the system of all items in a location and then go verify each is present (scanning as you go). Modern systems like can assist by providing an audit mode or checklist, where you scan everything in an area and it tells you if something is missing or extra. Regular audits will catch discrepancies early. If the system says there are 5 voltage testers in Cabinet A but you only find 4, you can investigate right away – maybe one wasn’t checked in properly or is misplaced. It’s much easier to resolve a discrepancy that arose last week than one from six months ago. Audits also reinforce to the team that accuracy matters, which keeps everyone diligent.
- Review Usage and Update Records: Use the reporting features of your system to periodically review how tools are being used. For instance, identify tools that haven’t moved in a year – are they obsolete or could they be redistributed to another location that needs them? Spot tools that are constantly being transferred or checked out – maybe you need more of those, or they need to be centralized. Look at patterns like frequent check-outs by the same person; maybe that tool should be permanently assigned or that person needs their own unit. These insights help optimize your tool inventory – ensuring you have the right quantity in the right places. It can also feed into budgeting (knowing when equipment is nearing end-of-life or heavily used).
- Maintain the Equipment: Tracking tools isn’t just about location; it also can help with maintenance management. Leverage the data to keep tools in good shape. For example, if your system allows, log the last service date or usage hours of equipment. Many companies tie their tool tracking with maintenance schedules: e.g., a generator that should be serviced every 100 hours of use or a caliper that needs calibration annually. With custom fields or alerts, you can flag these. Then, as part of your audit routine, also check which tools are due for maintenance or inspection. Taking tools out of circulation briefly for upkeep will extend their life and reliability. And when a tool is under maintenance, update its status/location in the system (so everyone knows it’s temporarily unavailable).
- Clean Up Data and Labels: Over time, you may need to do a little housekeeping. Replace any barcode labels that have worn out or fallen off during use. Merge or correct duplicate entries in the system (perhaps someone added a “Cordless Drill” as new when it was already listed, etc.). Ensure new tools that were purchased have been properly added and tagged. If tools were decommissioned or disposed of, mark them as such in the system so they don’t appear active. Essentially, keep the digital twin reflective of reality. This is often a task for the inventory manager or whoever oversees the system, but it can be part of audit activities too.
- Continuously Improve: After a few cycles of audits and a few months of using the system, gather the team and discuss how it’s going. Are there still bottlenecks or losses? Maybe you find that weekends are a blind spot – tools taken home on Friday and returned Monday might bypass the system. That could lead you to adjust procedures for end-of-week check-ins. Or if audits show certain tools frequently unaccounted for, investigate why – is the process not being followed in a specific area, or is there a theft issue to address? Use these findings to refine your SOPs and training. Tool tracking, like any process, benefits from continuous improvement.
Performing these regular audits and maintenance checks ensures that your tool tracking system remains accurate and effective in the long run. It’s like aligning the wheels on a car – a periodic tune-up prevents the system from gradually veering off course. When done consistently, audits won’t be a dreaded big task; they’ll be a manageable part of the workflow that ultimately saves time (because you catch issues early). Plus, by keeping data clean and tools maintained, you extract the maximum value from your assets and the tracking system itself.
Embrace Full Asset Visibility
Extending inventory management to all your tools and equipment might feel like a big undertaking, but the payoff is enormous. By treating your tools and assets with the same attention as your products, you create a work environment where everything is accounted for and easily accessible when needed. Manufacturing teams, construction crews, maintenance departments – all can benefit from the reduced chaos and improved efficiency that comprehensive tool tracking brings.
Let’s recap the journey to full asset visibility:
- Start with a solid foundation by auditing what you have and labeling every asset. This gives you control from the ground up.
- Leverage technology with a centralized system to capture real-time movements and status of each item. Spreadsheets and clipboards can’t keep up with the pace of modern operations, but a dedicated tool tracking inventory software can.
- Implement best practices and processes: check-outs, assignments, regular audits, and team training. Technology alone doesn’t solve problems – it’s technology + process + people that does the magic.
- Foster a culture of accountability where everyone takes ownership of the tools they use. When the workforce is on board, tool management stops being a chore and becomes second nature.
- Use insights from your tracking system to make smarter decisions – whether it’s optimizing inventory levels, scheduling maintenance proactively, or reallocating underused equipment.
By following the how-to steps outlined in this guide, you’ll transform a disorganized, frustrating aspect of operations into a well-oiled part of your business. The days of hunting for missing tools, rebuying equipment you’re sure you had, or halting work due to a misplaced item will become a thing of the past. Instead, you’ll have confidence and clarity: knowing exactly what you have, where it is, and that it’s in the right hands.
Finally, embracing full asset visibility with the help of modern solutions (like the CyberStockroom platform we highlighted) means you’re harnessing the best of both worlds – robust inventory control and practical ease of use. Your tool and equipment inventory becomes an asset in itself: a source of data and insight, not a black hole of uncertainty.
In a competitive and fast-paced environment, this approach gives you an edge. You’ll prevent losses and waste, save money, improve safety, and empower your team to work more productively. It’s all about extending good inventory hygiene to every corner of your operation. So gear up and get tracking – your tools and equipment will thank you, and so will your bottom line!


Leave a comment