
Industrial and construction job sites can be chaotic environments with countless moving parts – and unfortunately, tools and equipment sometimes “move” in unintended ways. Tool loss and inventory shrinkage are persistent challenges that cost businesses time, money, and headaches. Whether it’s a misplaced drill or a costly piece of equipment that mysteriously disappears, every missing tool can delay projects and drain resources.
In this blog, we’ll explore why tool loss happens and share best practices for preventing tool loss (and the resulting shrinkage) on job sites.
The High Cost of Tool Loss and Shrinkage
Losing tools is more than just an inconvenience – it’s a direct hit to your project’s bottom line. Industry studies estimate that construction site theft and loss cost over $1 billion annually in the U.S. alone, once you factor in stolen tools, equipment, and materials. For example, one county in Florida reported $2.4 million in power tools stolen in a single year. These staggering numbers underscore how common (and costly) tool loss has become.

What do these losses mean for the business? A missing tool can have ripple effects such as:
- Project Delays: If a specialized tool or piece of equipment “walks off” the site, work might grind to a halt until a replacement is found or bought. Deadlines get pushed out, and productivity suffers as crews stand idle waiting for tools. In fact, an industry survey found that 1 in 3 projects are delayed due to theft or missing equipment – a serious blow when you’re on a tight schedule.
- Higher Costs and Shrinkage: Replacing lost tools isn’t cheap. Frequent losses force procurement teams to repurchase equipment, blowing the budget. This contributes to inventory shrinkage, which is the gap between your recorded inventory and what’s actually on hand. Too much shrinkage – whether from theft, loss, or error – directly cuts into profit margins.
- Increased Insurance Premiums: Repeated theft or loss claims can drive up insurance costs for contractors. Insurers see a pattern of loss and may raise premiums or deductibles. Essentially, you pay more because tools weren’t properly secured or tracked in the first place.
- Safety and Quality Risks: Using improvised methods or the wrong tools (because the right tool went missing) can create safety hazards and affect workmanship. For instance, if a crew lacks the proper equipment, they might take dangerous shortcuts. Missing or damaged tools can also compromise quality control if issues aren’t caught due to lack of proper instruments.
- Reputation Damage: If your job sites are known for poor control (e.g. tools constantly disappearing or jobs delaying because of lost equipment), it can damage trust with clients and workers. Repeated incidents of tool loss might signal to clients that a contractor is disorganized or unreliable. It can also hurt morale among crews – nobody likes working with faulty or missing tools.
In short, tool loss isn’t a trivial “cost of doing business.” It’s a significant drain on efficiency, budget, and trust. Preventing shrinkage and tool loss is therefore essential for protecting your projects and your bottom line. The good news: with a proactive approach and the right strategies, most tool losses are preventable.
Why Tools Go Missing on Job Sites

To solve the problem, it helps to understand why tool loss happens in the first place. On industrial and construction sites, a variety of factors contribute to tools and equipment going AWOL:
- Disorganized Storage & Chaos: Construction sites are busy, ever-changing environments. Without an organized system, tools get left wherever they were last used – under a pile of lumber, in a subcontractor’s van, or on a scaffold. In the daily rush, it’s easy for a tool to be set down “just for a minute” and forgotten. Poor organization and lack of designated storage is one of the biggest reasons things go missing. When tools don’t have a specific home, they can end up anywhere (or with anyone). Over time, those “temporary misplacements” turn permanent.
- No Tracking or Inventory System: Many job sites still rely on the honor system or memory to keep track of tools. If there’s no inventory list or checkout procedure, how do you know if something’s gone? Inadequate inventory tracking means losses might not even be noticed until long after the fact. By then, the tool could be long gone. Without a system to monitor who has what, tools can be “borrowed” and never returned, or mistakenly taken to the next job by someone who thought it was theirs.
- Employee Negligence or Forgetfulness: Sometimes, it’s not malicious – it’s just human error. Crew members might simply forget where they left a tool, or assume someone else will pick it up. Lack of training or care can lead to negligent tool handling. For example, if workers aren’t taught to return tools to a central spot after use, a drill might get left in the rafters or a wrench kicked into a corner. By the time anyone looks for it, it’s missing in action.
- High Workforce Turnover & Outsiders: Construction projects often involve many different people – contractors, subcontractors, temp labor, and vendors – moving in and out. With a constantly rotating cast on site, it can be hard to know exactly who should have access to what. This high turnover can enable insider theft or accidental loss. A subcontractor might walk off with a company-owned tool, intentionally or not, assuming it’s theirs or simply because there was no accountability.
- Theft (Internal and External): Unfortunately, theft is a major cause of tool loss. Opportunistic thieves (including a few bad actors among workers or outsiders who sneak in) target construction sites for valuable tools and equipment that can be easily resold. Unlike a warehouse with solid walls, an open job site – often protected only by a fence and a padlock – is an inviting target. Small power tools, copper materials, even company laptops or surveying gear can vanish if left unsecured. Nighttime break-ins are common on sites without robust security, and even during work hours tools can “grow legs” if left unattended.
- Lack of Security Measures: Many job sites lack formal security. Maybe there’s a fence, but it might have gaps or be easy to cut. Lighting might be poor after dark. There may not be cameras or guards, especially on smaller projects. This creates an environment where thieves (or even curious passersby) can slip in with little risk. If deliveries of materials or tools are left out, they can disappear before anyone notices. Weak perimeter security and storage security mean greater chances that tools will go missing.
- Miscommunication and Movement Between Sites: In companies managing multiple job sites or a central warehouse, tools are constantly moving around. A tool might be sent from the warehouse to Site A, then loaned to Site B, and so on. Without clear communication and records, tools can effectively vanish in transit. One site thinks the other has it, and vice versa – meanwhile the tool is unaccounted for. This kind of inventory confusion leads to shrinkage simply because of poor coordination.
As you can see, some causes of tool loss are logistical, some are human, and some are outright criminal. Preventing tool loss in construction requires tackling all these angles: better organization, clear processes, a culture of accountability, and good security. In the next sections, we’ll dive into best practices to prevent tool loss and shrinkage, covering everything from simple on-site habits to high-tech inventory solutions.
Best Practices for Preventing Tool Loss on Construction Sites

Preventing tool loss and shrinkage isn’t about one magic trick – it’s a combination of smart habits, policies, and tools (both the physical and digital kind). Here are several best practices that construction site managers, warehouse supervisors, and procurement officers can implement to keep tools from wandering off and ensure your inventory counts stay accurate:
1. Establish Organized, Secure Tool Storage
Give every tool a home, and make it secure. One of the foundational principles of preventing loss is proper tool storage. Instead of scattering tools across the site or tossing them in random boxes, set up a structured system for storing and organizing tools and small equipment. For example:
- Centralize Your Tool Crib: Designate one or more secure storage areas (like a tool crib, lockable storage room, or job box) where tools must be kept when not in use. This could be a shipping container outfitted with shelves and bins, a rolling gang box that stays on each floor, or a dedicated tool trailer on larger sites. The key is that tools aren’t left lying around – they go back to an assigned spot.
- Use Shadow Boards and Labels: Inside your tool storage, use visual organization aids. Shadow boards (pegboards with outlines of each tool) or foam cutouts in drawers make it immediately obvious when a tool is missing from its spot. Labeled hooks, racks, or bins for each tool type help workers find what they need and, importantly, see where to return it. For example, a silhouette of a hammer on the wall peg means when that hammer’s not there, everyone notices it’s out.
- Lock It Up (Even During Work): Storage only helps if it’s secure. Provide lockable tool chests or cabinets and ensure they stay locked whenever possible – not just overnight. During work hours, encourage crews to return tools to the lockup during breaks or any extended downtime. If a toolbox is left open and unattended, that’s an easy opportunity for theft. Consider padlocks, combination locks, or even keypad-entry cabinets for high-value items.
- Minimize Clutter on Site: Adopt a “clean as you go” approach. At the end of each day (or even midday), have a quick cleanup where tools are gathered and stored properly. The less gear left scattered around, the fewer chances for loss. Also, try to limit how many tools are on site to only what’s needed. Excess equipment that isn’t immediately required should be stored back at the warehouse or in a secured container. This reduces the targets for thieves and the chance of misplacement.
- Environmental Protection: A side benefit – organized storage protects tools from damage by weather or accidents. A ruined tool is essentially a lost tool in terms of function. Storing tools correctly (in cases, racks, etc.) keeps them in good working order, which saves money on replacements.
By standardizing tool storage, you create an environment where any missing tool is noticeable right away. Workers can’t shrug off a lost drill if its outline on the shadow board is clearly empty. Organized storage not only deters casual misplacement but also sends a message: “We know where our stuff is.” This alone can dissuade would-be thieves (internal or external), because a well-organized site suggests that management is paying attention. Secure, tidy storage is step one in stopping tool loss before it happens.
2. Enforce a Tool Check-In/Check-Out Process+

Even with great storage, tools don’t just sit on shelves all day – they’re meant to be used! The moment a tool leaves the crib or container, you need a way to track who has it and where it’s going. That’s where a check-in/check-out system comes in. Implement a sign-out procedure so that every time a tool is taken or returned, it’s recorded. This creates accountability and a chain of custody for your equipment.
Here are key elements to an effective check-in/check-out process:
- Sign-Out Logs: Keep a logbook or digital system at the tool crib where workers must record what they’re taking, the date/time, and their name (or crew). This can be as simple as a clipboard with a sheet or as advanced as scanning a barcode with a smartphone app – the critical part is that there’s a written record. For example, if John from Crew A checks out a rotary laser level at 8:00 AM, he notes it down. When he returns it at 3:30 PM, he checks it back in. If 3:30 PM comes and that laser isn’t returned, you know exactly who to ask.
- One Person in Charge: It often helps to designate a tool custodian or inventory manager on the site – someone (or a small team) responsible for overseeing tool distribution. This could be the warehouse supervisor or a foreman tasked with tools. They ensure everyone follows the procedure and can keep the log organized. On smaller sites, it might be the site manager themselves. The presence of a responsible gatekeeper makes a big difference.
- Daily or Shift-Based Tool Checks: Integrate tool check-in/check-out into the daily routine. For instance, each morning a worker checks out the tools they’ll need, and each evening those tools must be returned and checked off. If a tool isn’t returned by end of day, it immediately raises a flag to follow up. This daily reset means missing items are noticed within hours, not weeks later. It also discourages people from stashing company tools in their truck “just to have handy,” since they know it’s being tracked.
- Use Technology to Simplify: If manual logs are too cumbersome or prone to error (“Oops, I forgot to sign the drill back in!”), consider using barcode scanners or QR code tags on tools and an electronic inventory system. Workers can scan a tool’s tag with a mobile device when taking or returning it, automatically logging the transaction. This speeds up the process and improves accuracy. Even a simple spreadsheet on a tablet can work if it’s regularly updated. The easier you make the checkout process, the more likely crews will comply.
- Communicate the Policy Clearly: Make sure every crew member and subcontractor knows the rules: no tool leaves the storage without sign-out, period. Post signs if needed and include the procedure in project onboarding or daily huddles. Consistency is key – if you let it slide for “quick jobs,” the system loses effectiveness.
A check-in/check-out policy does wonders for accountability. When workers know that missing tools will be traced back to the last person who signed them out, they tend to be much more careful with those tools. It also helps trace issues: if a tool breaks or goes missing, you have a timeline and person to start investigating. Over time, this practice dramatically reduces the “I have no idea where that went” problem, because there’s always a name attached to a tool’s absence. It turns tool management from a free-for-all into a responsible borrowing system – and your inventory will be much more complete because of it.
3. Conduct Regular Inventory Audits and Inspections
No one likes the word “audit,” but when it comes to tools, regular inventory audits are your best friend for preventing shrinkage. An inventory audit simply means doing a thorough count of tools and equipment on hand and reconciling it with your records. By scheduling routine audits (and spot-check inspections), you can catch discrepancies early and correct course before losses add up.
Here’s how to put audits and inspections into practice:
- Set a Schedule: Decide how frequently to audit your tools, and stick to it. For many construction companies, a weekly or monthly audit of small tools is effective. On large projects, you might do a quick count every Friday to ensure nothing wandered off during the week. For smaller tool collections, a monthly inventory might suffice. The idea is to never go too long without verifying your inventory. Some companies also do a big audit at project completion to ensure all tools are accounted for before moving to the next job.
- Compare to Records: During an audit, use your tool list or tracking system and verify each item. If you’re using a digital inventory, generate a report of all items that should be on site and physically locate each one. Mark off everything you find, and note any that are missing or any extras that aren’t on the list (surprises happen). For example, you might discover you have only 9 of the 10 company radios that should be there – time to investigate number 10.
- Investigate Discrepancies Promptly: When something doesn’t add up in an audit, don’t wait – follow up right away. If a hammer drill is missing, check the last check-out log entry for it (maybe it never got returned yesterday). Ask the team if anyone knows its whereabouts. Sometimes an audit simply reveals an item was moved to a different approved location but not noted, and you can update the records. Other times, it uncovers an actual loss. The sooner you address it, the better your chance of recovering the item or understanding what went wrong. Quick action also sends a message that management notices and cares when things are missing.
- Random Spot-Checks: In addition to scheduled audits, consider doing unannounced spot-checks on occasion. For example, randomly pick a gang box or a crew’s tool list mid-week and make sure everything that should be there is present. These spot inspections help catch issues between formal audits and keep everyone on their toes. If people know that any day their toolbox might be inspected, they’re less likely to “forget” to return an item.
- Use Audit Tools: Make the audit process easier with tools like barcode scanners or inventory software that can generate count sheets and instantly flag missing items. If you have a digital system (more on that soon), it can maintain an activity history – essentially a log of every movement – which is invaluable if an audit finds something missing. You can quickly see who last had it or which location it was last recorded in.
- Audit Your Storage Conditions Too: While counting, also inspect tool condition and storage arrangements. A bent or broken tool might as well be lost until it’s repaired. Check that locks are functioning, shadow boards are intact, and nothing is hiding where it shouldn’t be.
Regular audits create a culture of accountability and accuracy. From a procurement officer’s perspective, this is crucial: you can’t make good purchasing decisions if your data is full of holes. By keeping the inventory records clean, you ensure that shrinkage is kept to a minimum and any emerging problems (like a pattern of missing drill bits or a particular tool that keeps vanishing) are brought to light. Audits basically force small problems into the open before they become big, expensive ones.
4. Train Your Crew and Foster Accountability

Even the best processes and policies won’t stick if the people on your job site don’t buy in. Human behavior is a huge factor in tool management. That’s why investing time in training your team and building a culture of accountability is a best practice you can’t skip. The goal is to make every person on site – from laborer to foreman – understand that preventing tool loss is part of their job, too.
Key steps to foster a responsible tool culture include:
- Educate on Costs and Consequences: Start by making sure workers (and subcontractors) understand why tool control matters. Sometimes crew members may not realize how much that missing drill actually costs the company, or how a delayed tool replacement slows down the entire project. Share some of the stats and impacts: e.g., “Guys, if we lose that laser level, it’s a $3,000 hit and we might sit idle waiting for a new one. We all lose in that scenario.” When people grasp the real-world costs – higher project costs, potential overtime to catch up, safety risks – they’re more likely to take it seriously.
- Onboard with Tool Management Practices: Incorporate tool management into your onboarding or safety trainings. Just like you train workers on safety protocols, train them on inventory protocols. Explain the storage system, the check-out policy, and expectations for returning tools. For example, teach new hires “this is our tool crib, these are the sign-out sheets, and here’s how we handle tools on this site.” Make it clear from day one that this is standard operating procedure.
- Assign Responsibility: Some companies make tool management an explicit part of someone’s role on the crew. For instance, a foreman might be evaluated in part on how well their team manages equipment (did everything come back at day’s end?). Or you could rotate a “tool captain” role among crew members who ensures tools are collected and stored properly each day. When individuals know they are personally accountable, they pay more attention. Even a simple end-of-day checklist for each team (“tools picked up – check!”) can instill a sense of duty.
- Encourage Reporting and Honesty: Create an environment where if a tool is damaged or something goes missing, workers report it immediately without fear of punishment (assuming no foul play). It’s much better to hear “I can’t find the reciprocating saw, I last used it an hour ago” right away, than to have silence and discover it days later. Emphasize that prompt reporting will focus on finding the item, not blaming. Of course, if patterns of negligence or theft emerge, address those appropriately – but for one-off mistakes, treat them as a learning opportunity rather than automatically disciplining. This encourages openness and quick action.
- Recognize Good Practices: Positive reinforcement can go a long way. If a crew consistently has zero lost tools in a month, acknowledge it – maybe a shout-out at the next meeting or a small reward like donuts or coffee on the company. When individuals turn in all their gear properly or catch a potential loss (“I noticed the drill was left behind and brought it back”), thank them. Building pride in a well-organized, loss-free site can turn peer pressure into a positive force – workers will remind each other of the rules because nobody wants to be the one who loses the team’s tools.
- Lead by Example: Management and supervisors should model the behavior. If a site manager casually “forgets” to sign out a tool or doesn’t bother locking the container because it’s inconvenient, the crew will follow that lead. Demonstrate that everyone follows the same protocols, top to bottom. When the team sees that tool management is taken seriously by leadership, they’ll mirror that attitude.
In essence, make tool stewardship part of your job site’s DNA. When crews treat tools as vital assets rather than afterthoughts, losses plunge. A culture of accountability means workers look out for the company’s property as if it were their own. This doesn’t happen overnight, but with consistent messaging and practice, your team will begin to self-police things like putting tools back and noting issues. That’s the point you know you’ve significantly curbed the risk of tool loss – when everyone is on board and watching each other’s backs (and the company’s tools)
5. Adopt a Visual Inventory Management System (CyberStockroom)
While good habits and basic procedures form a strong foundation, technology can take your tool tracking to the next level. One of the most effective modern strategies for preventing tool loss is to use a dedicated inventory management system – especially one that gives you real-time visibility of your assets.
A great example is CyberStockroom, a cloud-based inventory management platform that uses a visual map interface to help you track tools, equipment, and materials across all your locations.
Why consider a tool like CyberStockroom? Here are some ways it can transform your tool management and shrinkage prevention:
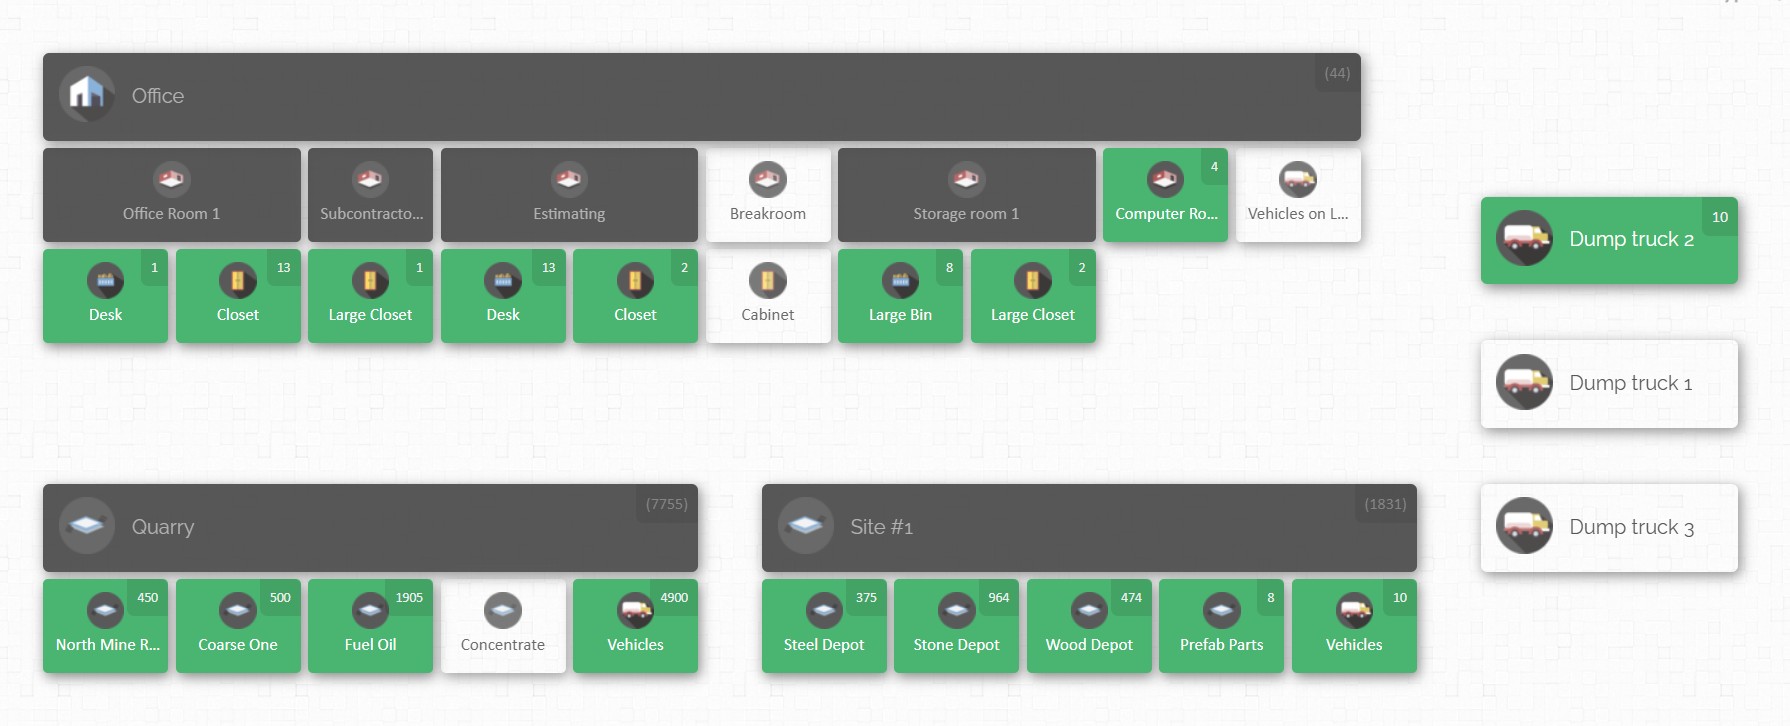
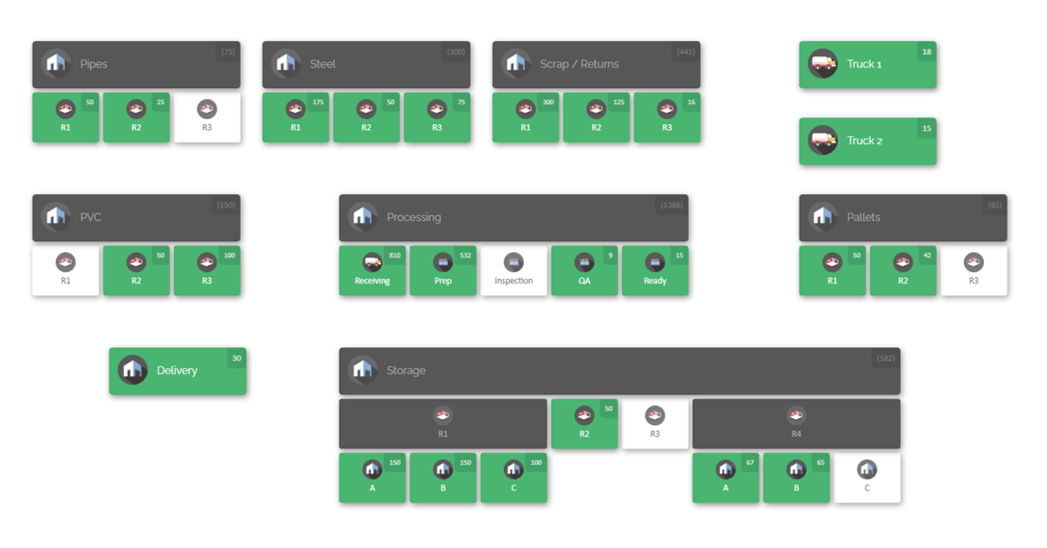
- Visual “Map” of Your Job Sites: CyberStockroom introduces the concept of an Inventory Map – an interactive, drag-and-drop map of your entire operation. You can literally draw out your job site (or multiple sites), including areas like the tool crib, storage containers, various work zones, vehicles, and even assign items to specific crews or individuals. Each location on the map displays what items are there and how many. The result is a bird’s-eye view of your inventory. At a glance, you can see where every tool is supposed to be. For instance, your map might show that in “Building A – 2nd Floor – Electrical Room,” you have 1 generator and 3 toolboxes; in “Truck #5,” you have 25 items checked out (listed by item); in the main “Warehouse,” 10 spare drills are in stock. This visual layout makes it much easier to spot if something is out of place or missing – no more combing through spreadsheets or guessing.
- Real-Time Tracking and Updates: Because CyberStockroom is cloud-based and updated in real time, your inventory data is always current. When a tool is moved from the warehouse to a job site, you update it on the map (for example, drag the tool icon from the warehouse node to the job site node). If a crew member checks out a tool to their truck or personal assignment, it can be reflected on the map by assigning that item to that person or vehicle location. Everyone with access can see the changes immediately – whether you’re the site manager in the field on a tablet or a procurement officer back at the office on a PC. This real-time visibility means you always know what’s where, and nothing slips through the cracks during transfers.
- Easy Check-In/Check-Out and Transfers: CyberStockroom supports intuitive check-in/check-out workflows. You can use barcoding or QR scanning with the system to quickly log when an item goes out or comes in. For example, scanning a tool’s barcode with a phone could automatically mark it as checked out to “John’s Crew at Site X” and move it on the map accordingly. Returning it is just as easy. The platform even allows drag-and-drop transfers on the map – if you want to move 5 power saws from the “Main Warehouse” location to “Jobsite Alpha – Tool Crib,” you can drag them over in the interface, which deducts from one and adds to the other (and of course, in practice you’d physically send them over). This simplicity encourages teams to actually use the system because it mirrors the real-world action with minimal hassle.
- Audit Trails and History Logs: One of the most powerful theft-prevention features of CyberStockroom is the activity history. The software automatically logs every inventory transaction: who moved an item, when, from where to where. This creates a complete audit trail. If a tool goes missing, you can quickly pull up its history and see, for instance, “Tool was checked out by Alice on Sept 1, moved to Truck 3, then transferred to Site B on Sept 3 by Bob.” If after that it’s not checked back in, you know exactly the last recorded steps and can pinpoint accountability. This level of transparency deters would-be thieves – knowing that the system is tracking every move and that you’ll have a record discourages “sticky fingers.” It also helps resolve honest mistakes (“Oh, we thought the auger was still on the truck; let’s check CyberStockroom – it shows it was left at the site office, let’s go get it.”).
- Theft and Loss Alerts: With real-time data and defined locations, you can set up triggers or at least monitor for anomalies. For example, if an expensive tool is supposed to stay on Site Y but CyberStockroom shows it was unexpectedly moved or isn’t where it should be, you can investigate immediately. Over time, you might notice patterns: perhaps a certain type of item keeps “drifting” away – maybe that’s a high-theft-risk item that you’ll now lock down tighter.
- Multi-Location Coordination: For companies juggling tools across several projects and a home warehouse, CyberStockroom is a game-changer. All locations can be managed on one platform. If a project manager wonders, “Do we have an extra laser level in any of our sites or back at the warehouse?” – they can check the inventory map and instantly see if and where that item exists in the system. This prevents unnecessary purchases (if something is just sitting unused elsewhere) and ensures tools aren’t “lost” in transit. You’ll have a clear record if something was supposed to come back to the warehouse from a finished job – if it never showed up, the system will highlight that discrepancy.
- Access Anywhere, Anytime: CyberStockroom is cloud-based, meaning you can access it from any device with internet – your laptop in the office, a tablet on site, or even a smartphone in a pinch. This is crucial for on-the-ground usage. A site supervisor can update the inventory map right from the field as tools are distributed or collected, rather than doing paperwork that gets entered later. Likewise, management can monitor sites remotely. There’s no need for a dedicated “mobile app” – the platform’s web interface is accessible on mobile browsers, making it effectively available wherever you are.
- Ease of Use for Field Teams: Importantly, a system like this is designed to be user-friendly for non-IT folks. The visual map and drag-and-drop concept are intuitive – it feels more like managing a football lineup board than doing data entry. That lowers the barrier for adoption among field crews. If it was a clunky spreadsheet or complex software, crews might resist using it, but a map-based interface with icons and simple controls means even those less tech-savvy can get on board after a quick training session. CyberStockroom’s focus on visualization really helps here – it’s immediately clear and tangible.
- Reporting and Analysis: Beyond day-to-day tracking, CyberStockroom lets you run reports on your inventory data. You can see things like inventory levels (useful for procurement to know when to reorder consumables or if tools are underutilized), usage history per item or per user, and shrinkage reports (e.g. items marked lost or missing over a period). These reports provide insights to make better decisions. For example, a report might show that a particular crew consistently uses (and maybe loses) more tools – maybe they need extra training, or maybe they’re getting the toughest assignments and need more support. Procurement officers can use the data to justify purchases or detect if certain tools keep needing replacement frequently (a red flag for potential theft or quality issues).
In short, CyberStockroom ties together many of the best practices we’ve discussed: it enforces check-in/check-out discipline with ease, it keeps an organized record of tool locations (like a super shadow board on your screen), it facilitates audits with history logs, and it enhances team accountability by making everything transparent. The map-based approach is particularly powerful in construction and industrial settings where location is as important as quantity. Knowing not just what you have but exactly where it is (and who is responsible for it) is the ultimate safeguard against loss.

While we’re highlighting CyberStockroom here as a solution our audience should consider, the broader point stands: leveraging a modern inventory management system can drastically reduce tool loss. It takes the guesswork and manual labor out of tracking tools. When combined with the good practices of your crew, it’s like adding a high-tech safety net – ensuring that even if a tool does go missing, it’s noticed immediately and you have the information needed to address it. For any construction company looking to up their game in tool management, adopting such a system can yield a huge return on investment by preventing losses, improving efficiency, and giving peace of mind that your valuable assets are under control.
6. Strengthen On-Site Security Measures
We’ve talked a lot about processes and systems to keep honest people honest and organized. Now let’s address the more outright security measures to deter and prevent theft – especially from external actors (or anyone attempting to steal). A construction site will never be a fortress, but you can significantly harden the target and reduce opportunities for tools to disappear. Here are some best practices for beefing up job site security:
- Control Access to the Site: Start at the perimeter. Fencing is a must for most sites – invest in quality fencing that’s hard to bypass (e.g., chain-link with locked gates, possibly topped with barbed wire for high-risk areas). Have a limited number of entry points and keep them monitored. During work hours, consider a gate check-in: a security guard or gate attendant who knows who’s coming and going, and can even check vehicles leaving the site randomly to ensure no unauthorized materials are leaving. This might sound extreme, but random spot checks of trucks and toolboxes at the gate can be a strong deterrent against theft (both external thieves and employees attempting to smuggle tools out).
- Lighting and Visibility: Many thefts happen under cover of darkness. Ensure your site is well-lit after hours, especially around storage areas. Motion-activated floodlights can startle intruders and make them visible to neighbors or security cameras. A brightly lit site is far less inviting to a thief than a pitch-black yard where they can move unseen.
- Surveillance Cameras and Alarms: Deploy security cameras if possible, particularly aimed at entrances, equipment yards, and tool storage trailers/containers. Even if you can’t have 24/7 human guards, cameras serve both as a deterrent (a visible camera might make a thief think twice) and as a tool for after-the-fact investigation. Modern construction camera systems can even send alerts for motion after hours. Likewise, alarm systems on storage containers or site perimeters can scare off intruders. For instance, a shipping container holding tools can be outfitted with a battery-powered alarm that goes off if the door is pried or if it senses motion inside during off hours.
- Secure Storage (After Hours and During): We touched on locking up tools in practice (#1), but to reiterate for security: all tools and small equipment should be locked away when not in use, especially overnight. Don’t leave tools scattered around the site at day’s end – that’s just Christmas shopping for thieves. Use steel job boxes, shipping containers, or a locked room on-site to aggregate tools. Then double-secure those storage units: heavy-duty locks (ideally ones that are bolt-cutter resistant), and even secondary barriers (for example, storing the locked tool chests inside a locked container). Some contractors go as far as removing valuable tools from the site entirely overnight (taking them back to a warehouse or storage facility) – an extreme step, but for high-crime areas or long weekends, it’s worth considering.
- Minimize Inventory on Site: This is a strategic point – the less excess you have on site, the less there is to steal. Time deliveries of materials and expensive equipment so they arrive when needed rather than sitting for days. If a phase of work is done, promptly remove any tools or equipment that are no longer needed at that site. Idle items are targets. Thieves often scout sites; if they see a pricey generator that never moves, they know it’s a sitting duck. Don’t give them that opportunity.
- Tool Marking and Inventory Records: Mark your tools in a unique way. Use engravings or permanent paint markers to put an identifier (like your company name or a specific color code) on all tools. Some companies even use RFID stickers or GPS trackers on high-value tools (just be mindful that sophisticated thieves can sometimes locate and remove trackers – hence marking is still useful). Marked tools are harder to pawn off, and easier to identify if recovered. Also keep detailed inventory records with serial numbers of equipment. In case of a theft, having serial numbers and descriptions improves the chance of police recovering it or your insurance reimbursing you. It’s tedious, but it pays off if something goes missing.
- Hire Security or Use Monitoring Services: For larger projects or ones in high-theft areas, consider hiring overnight security personnel. A guard on duty can patrol, respond to alarms, and generally discourage trespassers. If on-site security staff isn’t feasible, there are remote monitoring services where off-site professionals watch your camera feeds after hours and can call authorities if needed. The cost of these measures should be weighed against the potential loss – on a site with millions in equipment and tools, a relatively small investment in security can save a lot.
- Plan Site Layout with Security in Mind: Whenever possible, plan your site so that valuable items are stored in the most secure location – for instance, position storage containers near the center of the site or in view of the main road (thieves prefer not to be seen). If you have multiple containers, arrange them in such a way that their doors face each other or a wall, so one vehicle can’t just pull up and load everything easily. Create choke points: only one way in or out for vehicles, etc. Essentially, make it logistically difficult for a thief to operate quickly.
- During Work Hours Vigilance: Theft isn’t only a nighttime event. Daytime thieves might impersonate workers or delivery personnel. Train crews to challenge unfamiliar people on site (in a polite, safety-oriented way, like “Hi, can I help you? Who are you here with?”). Implement a visitor badging system if possible, so it’s clear who is authorized. Also, never leave tools unattended in an area accessible to the public or other trades. For example, if you’re working in a downtown area, a drill left near the sidewalk while you’re on lunch could vanish. Even on a busy site, if you step away, try to have tools in a less exposed spot or have a buddy keep an eye out.
- Community and Police Partnerships: As a preventative measure, some contractors inform local police about project timelines so patrols can keep an eye on sites during off hours. Neighbors around the site can be enlisted to report suspicious after-hour activity. Basically, raising awareness that “if you see someone loading a truck on our site at midnight, it’s not legit” can help get quicker response.
Theft prevention is about layers of deterrents. The aim is to make your site an unappealing target so would-be thieves move on. By implementing strong security measures alongside your internal tool management practices, you cover all bases – internal shrinkage and external threats. Remember, many thefts are crimes of opportunity; if you eliminate the easy opportunities, you’ve solved most of the problem. And in the unfortunate event something does happen, your other practices (like inventory logs, CyberStockroom records, and serial-number lists) will give authorities and insurers a fighting chance to recover your assets or compensate you.
7. Centralize and Coordinate Inventory Management Across Locations

For companies that operate multiple job sites or maintain warehouses and laydown yards in addition to active projects, tool loss can often occur in the transitions – when tools move from one site to another, or from warehouse to field and back. A final best practice is to centralize your inventory management and coordinate across all locations, so nothing falls through the cracks.
What does this look like in practice?
- One Source of Truth: Maintain a single, centralized inventory database for all tools and equipment company-wide. Rather than each site keeping its own separate list (which can lead to siloed information and confusion), have a master inventory that shows every item and its current assigned location. This is where using an inventory management software like CyberStockroom really helps, because it’s inherently multi-location. But even if you start with a spreadsheet, have one tab or file that tracks all company tools, with a column for “location” that gets updated when items move.
- Document Transfers Between Sites: Whenever a tool or batch of tools is sent from the warehouse to a site, or loaned from one project to another, record that transfer explicitly. It could be a simple transfer form or just an entry in the system: e.g., “10x LED work lights moved from Warehouse A to Site B on Oct 10.” Without this step, tools tend to vanish in transit – one manager thought the other took responsibility and vice versa. With documentation, there’s accountability and clarity. The sending party should expect a confirmation from the receiving party, just like signing a delivery slip.
- Assign Ownership or Responsibility: Consider assigning each tool or asset a “home base.” For instance, a particular generator might be officially part of Warehouse inventory, even if it’s currently deployed to Site X. The warehouse manager then is ultimately responsible for tracking it, ensuring it returns, etc. Alternatively, once a tool is delivered to a site and signed over, the site manager becomes responsible until it’s signed back in. Either approach works as long as it’s clear who is accountable at any given time. The key is that responsibility is never ambiguous – every tool should have someone, somewhere keeping an eye on it in the records.
- Regular Reconciliation Between Field and Warehouse: If your warehouse issues tools to sites, treat it like checking out and back in on a larger scale. When a project is completed or equipment is no longer needed on a site, have a process to return it to storage and update the inventory. Warehouse supervisors should periodically reach out to site teams to reconcile what equipment is where, especially for long projects. For example: “According to our records, Site Delta has 2 concrete mixers that belong to the warehouse – please confirm they’re still there and in serviceable condition.” This communication catches discrepancies (like if one got sent for repairs or was moved to another site last minute) and ensures nothing gets left behind when you demobilize a site.
- Plan Ahead with Procurement: A centralized view helps procurement officers plan tool purchases and allocations more efficiently. If you see that next month you’ll have three projects starting and they all will need a certain tool, you can allocate existing ones or purchase additional in advance. More importantly, if tools are tracked centrally, procurement can quickly see if a request for a new tool is truly needed or if another site has one idle. This prevents buying duplicates unnecessarily. It also helps in budgeting – you can forecast tool usage and losses across the whole company rather than on a per-site silo, which gives a big-picture shrinkage rate to improve on.
- Consistent Policies Everywhere: Ensure that the best practices we’ve outlined (storage, check-out, audits, security, etc.) are enforced not just on active job sites but also at warehouses, laydown yards, and fab shops. A warehouse can lose tools to theft or error just like a job site. Often, small tools in a central warehouse might “grow legs” if contractors or employees come in to borrow something without proper sign-out. So treat your warehouse with the same discipline: secure storage, logs for check-outs to field, audits of the shelves, etc. Consistency means any time a tool moves, it’s going from one well-managed environment to another, rather than falling into a black hole.
By coordinating inventory management across your entire operation, you reduce the chances that tools disappear in the hand-off. Everyone is working off the same playbook and the same data, which brings transparency. From the perspective of a procurement officer or operations manager, this company-wide approach is crucial – it provides the visibility needed to manage assets efficiently and nip shrinkage in the bud. Essentially, you’re managing your tools as a unified pool of assets that flow to where they’re needed and return when done, rather than as isolated stashes that might be forgotten.

Conclusion: Protect Your Tools, Protect Your Bottom Line
Tools and equipment are the lifeblood of any industrial or construction project. Preventing tool loss and shrinkage on job sites isn’t just about saving a few hammers – it’s about running a safer, more efficient, and more profitable operation. By implementing the best practices above, you create a robust system of checks and balances: organized storage means missing items stand out, check-out procedures and audits ensure accountability, a culture of care makes everyone a stakeholder, and strong security measures keep the thieves at bay.
Equally, leveraging technology like a visual inventory management system (e.g., CyberStockroom) ties it all together, giving you unparalleled visibility and control over your assets. Instead of constantly reacting to missing tools, you can stay one step ahead with real-time information and proactive management.
Remember, every tool you prevent from being lost or stolen is one less replacement to buy, one less delay to worry about, and one more step toward a smooth, successful project. For site managers, that means peace of mind and the ability to keep jobs on schedule. For warehouse supervisors, it means confidence that what goes out will come back, and for procurement officers, it means accurate data to make cost-effective decisions.In the end, protecting your tools is about protecting your bottom line – and your professional reputation. A well-run site where nothing goes missing demonstrates reliability and competence. Clients notice that, crews appreciate it, and your balance sheet reflects it. So take action now: assess your current tool management practices and shore up any weak spots using the tips from this guide. Your future self – and your budget – will thank you when your projects run smoothly with every tool in its rightful place. Here’s to “no tools left behind” on your job sites!


Leave a comment