
Barcode tracking is one of the simplest and most cost-effective ways for manufacturers to upgrade their inventory management. Despite being a decades-old technology, barcodes remain a powerful tool for streamlining operations.
In a manufacturing setting, implementing a barcode system can truly transform how you track parts and products through production.
The Inventory Tracking Challenge in Manufacturing
Manufacturing companies face unique inventory challenges. Unlike retail businesses that handle only finished goods, manufacturers must juggle multiple types of inventory – raw materials, components, work-in-progress (WIP), sub-assemblies, finished products, spare parts, and more. Keeping tabs on all these moving pieces across various departments and storage areas can feel overwhelming.
Traditional inventory methods (think spreadsheets, paper logs, or basic stock cards) often fall short. They might tell you how many of an item you should have, but not where it currently is. This lack of real-time visibility leads to common pain points:
- Lost or Misplaced Items: Without a clear system, parts can “disappear” on the shop floor or sit forgotten on a shelf, leading to frantic searches and delayed production.
- Inaccurate Stock Levels: Manual tracking is prone to error. It’s easy for recorded counts to drift from reality, resulting in unexpected stockouts (running out of needed parts) or overstock (excess materials piling up).
- Workflow Bottlenecks: If materials aren’t where they’re needed when they’re needed, production can grind to a halt. For example, a machine might sit idle because a required component is stored on the other side of the facility—or wasn’t replenished at all.
- Higher Costs: Lack of visibility forces you to carry “just in case” inventory, tying up capital and space. At the same time, emergencies like overnight shipping or line stoppages due to missing parts drive up operating costs. Inefficiency ultimately hurts the bottom line.
In short, poor inventory tracking creates delays, wastes labor, and adds cost. This is where barcodes come in. A barcode inventory tracking system addresses these challenges by automating identification and record-keeping for every item, so you always know what you have and where it is. It’s a low-cost technology upgrade that can have a high impact on accuracy and efficiency.
How Barcode Inventory Tracking Works (and Why It’s So Effective)
At its core, a barcode inventory system works by assigning a machine-readable code (the barcode) to each item or batch in your inventory. When you scan that barcode with a reader, it instantly pulls up or updates information about the item in a database or inventory software. In practice, this means every part, material, or product can be tagged with a barcode and tracked through every stage of production and storage. Scanning a barcode takes only a fraction of a second – much faster and more reliable than writing data down or typing it in.

Here’s why barcode tracking is such a game-changer for manufacturing inventory management:
- Speed and Efficiency: Scanning barcodes accelerates everyday tasks. Receiving a shipment of materials? Instead of scribbling numbers on a clipboard, just beep the barcode on each box and it’s logged in. Moving items into production or conducting stock counts becomes a swift scan-and-go process. For example, checking in a pallet of components can be as simple as beep, beep, beep – each scan records an item into stock within seconds. This efficiency frees up workers to focus on production rather than tedious paperwork.
- Accuracy and Error Reduction: Barcodes drastically reduce human error in inventory records. When workers manually transcribe part numbers or quantities, mistakes are inevitable – a digit gets flipped or someone’s handwriting is hard to read, and now your count is off. With barcodes, the scanner reads the exact code every time, virtually eliminating data entry errors. In fact, studies show that manual data entry has an error rate around 1 in 300 keystrokes, whereas barcode scanning error rates are often less than 1 in 1,000,000. Many companies see their inventory discrepancies plummet (60%+ fewer errors) after switching to barcodes. Fewer errors means fewer production delays due to missing parts and less time spent investigating or re-counting to find mistakes.
- Real-Time Inventory Visibility: Because each scan updates your inventory records immediately, you gain real-time visibility into stock levels and item locations. Managers can see at a glance exactly how many units of a component are on hand and in which bin or room they’re located. This live data helps prevent nasty surprises like stockouts. For instance, if production uses the last box of a certain screw and scans it out, the system can flag it for reorder before anyone even notices the shelf is empty. Conversely, it can highlight if some stock is sitting untouched for too long. Real-time visibility means no more relying on outdated spreadsheets or walking the floor to see what’s available – you always have an up-to-the-minute picture.
- Improved Traceability: In manufacturing, tracking materials through each step of the process is crucial for quality control and traceability. Barcodes enable end-to-end traceability by logging each movement or usage of an item. From the moment raw materials arrive and are barcoded, through assembly, all the way to finished goods storage and shipping – every step generates a scan record. If a defect or issue is discovered, you can quickly trace backwards using barcode data to find exactly which batch of material or which production run might be responsible. This is invaluable for pinpointing root causes, isolating problems, or performing targeted recalls. Essentially, barcodes create an audit trail for each part’s journey through your facility.
- Cost Savings: Implementing barcodes is relatively inexpensive, yet it saves money in multiple ways. First, you reduce labor costs and overhead because workers spend far less time doing manual counts or searching for misplaced items – the efficiency gains translate to productivity. Second, avoiding production downtime by always having the right parts in the right place is huge – one prevented line stoppage or emergency part order can justify the whole system. Third, better accuracy means less waste and fewer write-offs; you’re not over-ordering “just in case” or scrapping products because of inventory mix-ups. In fact, a basic barcode setup often pays for itself within months through these efficiency gains. It’s a small upfront investment for significant long-term savings.
- Ease of Training and Use: Barcode systems are straightforward to learn and use. Scanning a code is intuitive – most people find it easier (and even a bit fun) compared to filling out forms or updating spreadsheets. Training your staff to use handheld scanners and the software usually only takes a few hours. And because the process is simpler and faster, employees are more likely to consistently follow it. This means your inventory data stays accurate over time, unlike complex manual systems that people may bypass when they’re busy. In short, barcoding is an upgrade your team will actually embrace, which is key to sustaining any process improvement.
- Scalability: Whether you have 50 items or 50,000 items to manage, a barcode system can handle it. This technology scales from the smallest shop to the largest factory. As your operation grows, you can simply add more items into the system and deploy additional scanners – the core process remains the same. There’s no massive overhaul needed to expand inventory tracking. This makes barcodes a future-proof solution. A system that worked for 500 SKUs can work for 5,000 or 50,000 with minimal changes. That scalability is important for growing manufacturers – you won’t outgrow it, and it won’t break the bank as you scale up.
- Better Decision-Making: Ultimately, more accurate and timely inventory data leads to better decisions throughout the business. With barcodes, you can easily gather metrics and insights that were nearly impossible to get with manual tracking. For example, you might analyze scan data and discover that a particular part consistently causes delays because it runs out often – prompting you to adjust reordering levels or find a better supplier. Or you might see that finished goods sit in the warehouse for an average of 4 weeks before shipping, suggesting you could streamline production or sales cycles. Barcodes provide a wealth of data to drive continuous improvement in purchasing, production scheduling, warehouse layout, and beyond. In a sense, they give you the “X-ray vision” into your operations that you need to optimize and become more agile.
Barcode tracking takes the guesswork and grunt work out of inventory management. It gives you speed, accuracy, visibility, and control – all with a relatively simple technology that doesn’t cost much to adopt.
Common Types of Barcodes (1D vs. 2D) and What They Mean for You
Not all barcodes look alike. In fact, you’ve probably seen a variety of barcode styles on different products. In manufacturing, the two most common categories are 1D barcodes (one-dimensional) and 2D barcodes (two-dimensional). Understanding the difference will help you choose the right type for your needs:
1D Barcodes (Linear Barcodes)
These are the traditional barcodes made up of a series of parallel black-and-white lines. They’re called one-dimensional because the information is encoded in the widths of the bars and the gaps between them in one direction. A 1D barcode typically represents a sequence of numbers or letters (for example, a simple product ID or SKU).

Common examples of 1D codes include the UPC codes you see on retail product packages, Code 128 and Code 39 (often used for parts and warehouse labels), and ISBN numbers on books. In a manufacturing context, 1D barcodes might be printed on component packaging, on bin labels, or on the tags of finished goods.
Why use 1D barcodes? They are simple, quick to scan, and widely supported. A big advantage is that 1D codes can be read by inexpensive laser scanners very rapidly, even from a moderate distance or when the barcode is moving past (like on a conveyor). This makes them ideal for fast-paced environments – think about a shipping station scanning boxes, or a technician scanning tool tags one after another. The limitation of 1D barcodes is they don’t hold a lot of data – usually just an identifier number. But for most inventory purposes, that’s perfectly fine: the barcode might just be a key that links to details in a database (the computer or software holds all the descriptive info, not the barcode itself). Given their speed and low cost, 1D barcodes are a workhorse solution for labeling shelves, bins, and items on the shop floor.
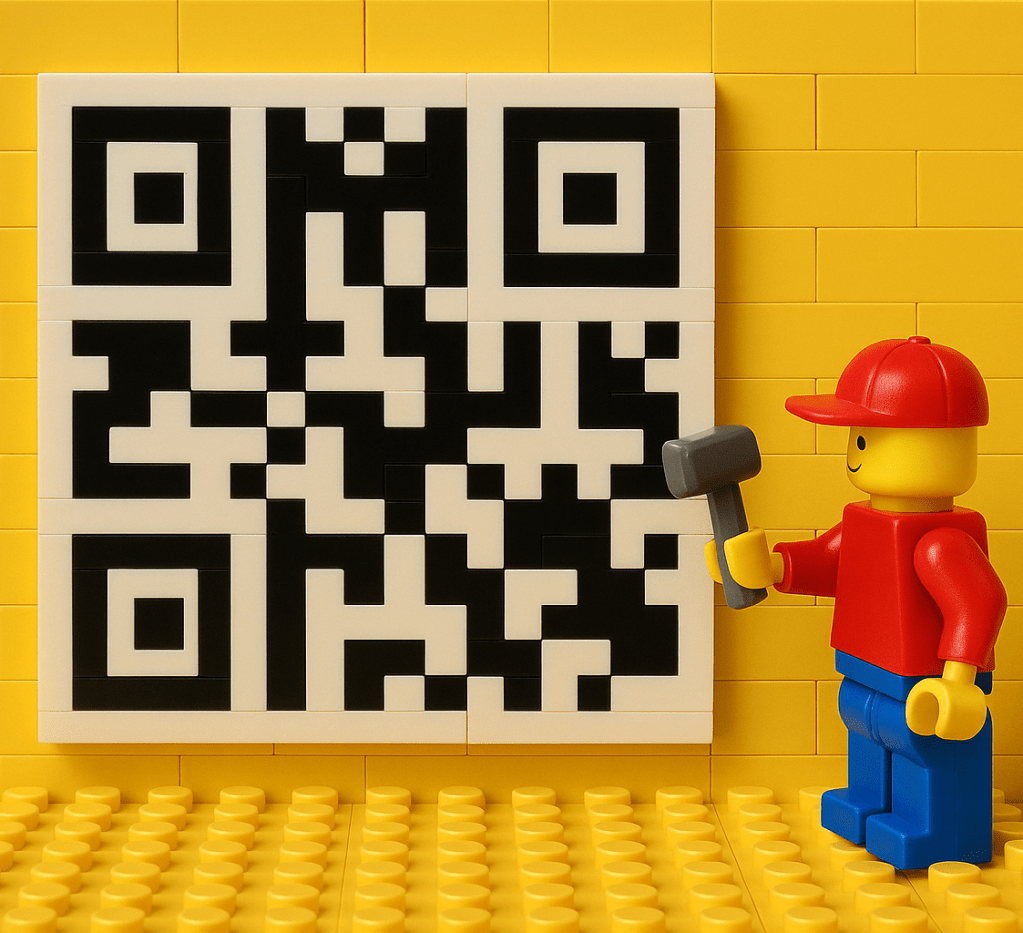
2D Barcodes (Matrix Barcodes)
These barcodes look like squares or rectangles filled with a pattern of smaller dots or squares – essentially a grid of information. Because they utilize two dimensions (both horizontal and vertical patterns), 2D barcodes can encode much more data in the same area compared to 1D codes. QR codes and DataMatrix codes are popular examples of 2D barcodes.
In manufacturing, DataMatrix codes have become common for marking small parts or high-value components, because they can store a lot of info in a tiny space and are readable even if partially damaged. For example, a DataMatrix code etched onto a circuit board could encode the part’s serial number, the batch number, and maybe even a small amount of text data for quality control. QR codes are more often seen in consumer contexts (marketing, brochures, etc.), but they could be used on inventory if you wanted to include something like a URL or more detailed instructions embedded in the code.
Why use 2D barcodes? The big benefit is data capacity and error resilience. You can encode hundreds of characters into a single 2D code if needed, which might eliminate the need for a separate database lookup for some applications. They also have built-in error correction – meaning even if a portion of the code is scratched or obscured, a scanner can often still read it correctly by reconstructing the missing bits. The trade-off is that you need an imaging scanner (essentially a small camera) to read 2D codes; the old-school laser scanners can’t decode the matrix patterns. Imaging scanners have become quite affordable though, and many can handle both 1D and 2D. In manufacturing, you’d consider 2D barcodes if you require very high information density (like tracking lots and serials for traceability directly on the item), or if your items are so small that a regular barcode label won’t fit.
Which should you choose? For most general inventory tracking of materials and products, 1D barcodes are more than sufficient and very cost-effective. They excel at simple identification and speedy scanning. 2D barcodes make sense if you have specific needs to encode more data on the item itself (for instance, in aerospace or medical manufacturing where every part might carry a unique lot and serial and you want that info on the part). Many operations actually use a mix: perhaps 1D barcodes on bins and boxes in the warehouse, but 2D codes on tiny subcomponents or PCB boards. The good news is modern scanning equipment often reads both types, so you aren’t locked into one or the other. You can tailor the barcode format to the use case.
Barcode Scanner and Hardware Options for Manufacturing

Printing and sticking barcodes on everything is only one side of the equation – you also need devices to scan those barcodes and feed data into your system. The hardware side of barcoding comes in many flavors to suit different budgets and workflows. Here are the common types of barcode scanners and related tools used in manufacturing environments:
- Smartphones and Tablets: For a very low-cost setup, you can actually use mobile devices to scan barcodes using their built-in cameras. With a suitable app or software, a phone’s camera can read barcodes by taking a quick image. This approach is slower than using a dedicated scanner and not as ergonomic for heavy use, but it’s a great way to pilot a barcode system or use in a pinch. Some small businesses start by using an iPad or Android tablet at receiving, for example. You can also pair mobile devices with inexpensive Bluetooth scanner attachments to boost performance – basically the phone handles the software, and the handheld Bluetooth scanner handles the fast scanning. This way, teams can try barcode tracking with minimal new equipment.
- Handheld Barcode Scanners: These are the classic point-and-shoot scanners (often pistol-grip style) that connect either via USB cable or wirelessly (Bluetooth or proprietary wireless docks) to your computer or network. In a manufacturing setting, handheld scanners are extremely common at workstations, packing stations, and throughout warehouses. Laser-based 1D scanners are very fast for reading traditional barcodes and can even reach a few feet for scanning high shelves with the right model. Imager-based scanners can read both 1D and 2D codes, even if they’re printed poorly or partially damaged. Rugged cordless models are available that can survive drops and dusty or greasy conditions – ideal for industrial use. Prices for handheld scanners range widely: you can get a basic wired scanner for $50, while an industrial-grade cordless scanner might be a few hundred dollars. For most, a couple of mid-range handheld scanners will do the job and dramatically speed up data capture on the shop floor.
- Mobile Computer Scanners: Think of these as a hybrid between a scanner and a smartphone. They are all-in-one devices – typically a rugged handheld computer with an integrated barcode scanner, running an operating system (like Android) with inventory management apps. You might see these in large warehouse operations where staff carry them to do picking and cycle counts. They allow users to scan and also input data on the touchscreen or keypad, see instructions, etc., all in one device. They are more expensive than a simple scanner, but they shine in workflows like order picking or manufacturing order tracking, where mobility and real-time data access are crucial. Unless you have a large operation or very specific mobile needs, these aren’t required to get started – but they’re an option as you scale up.
- Fixed-Mount and Industrial Scanners: These are scanners that are mounted in one place, often on production lines or conveyor systems, to automatically scan items as they pass by. In a manufacturing context, you might use fixed scanners to track products moving through a conveyor (each product has a barcode and gets scanned at a checkpoint), or in an automated sorting system. They can read at high speed and from various angles, but are usually part of more advanced automation setups. Most small manufacturers won’t need these initially, but it’s good to know they exist for high-volume automation.
- Barcode Label Printers: Alongside scanners, you’ll need a way to create the physical barcode labels. Thermal label printers are the go-to for industrial barcode printing. They produce durable labels quickly and at low cost per label. You’ll connect a label printer to your inventory system to instantly print labels for received goods, new parts, or bin locations. They come in various sizes – desktop models for moderate use, or heavy-duty industrial printers that can churn out thousands of labels a day. If you’re just starting, a mid-level thermal label printer in the $300–$600 range is usually a good investment to produce crisp, scannable barcode stickers on demand.

For most manufacturers beginning with barcoding, starting simple is best: for example, use one or two handheld scanners at key points (receiving and stockroom), and a label printer to generate codes for your items and locations. That setup alone will cover the basics. You can always add more scanners (e.g., one for each assembly station or each shipping dock) as needed. The key is that any scanning device you use will feed data into your inventory management software, which is the brain behind the operation.
Speaking of which – beyond hardware, the software side is critical. Let’s talk about how to implement a barcode system step by step, including choosing the right software platform to manage all this information.
Step-by-Step: Implementing Barcode Tracking in Your Operation

Implementing a barcode inventory system in a manufacturing business might sound technical, but it can be broken down into clear, manageable steps. Here’s a step-by-step guide to help you set up barcode tracking, whether you’re a small job shop or a large plant:
1. Plan Your Inventory Data and SKU Scheme
Before buying anything, start with your inventory data. Make a list (or spreadsheet) of all the items you want to track. This likely includes raw materials, components, subassemblies, finished goods, and possibly even tools or consumables if you want to manage those. Ensure each distinct item has a unique identifier – typically called a SKU (stock-keeping unit) or part number. If you don’t already have a clear SKU system, now’s the time to create one. The goal is to have a clean, organized inventory catalog because barcodes will be tied to these identifiers. Gather key details for each item: name/description, unit of measure, current quantity, maybe supplier info or storage location if you have it. This planning ensures that when you generate barcodes, each one links to a well-defined record in your database. (Tip: If your inventory is already managed in an ERP or spreadsheet, you can often import this data into whatever new barcode software you choose, which saves time.)
2. Choose Inventory Software with Barcode Support
Next, select the software that will serve as the backbone of your barcode system. This could be an inventory management software, a warehouse management system (WMS), or even an ERP module – as long as it supports barcode scanning functionality. When evaluating software, consider your company’s size and complexity. A small manufacturer might opt for a simple cloud-based inventory app or an add-on to accounting software (some accounting systems have basic inventory tracking that can work with barcodes). Larger operations might invest in a dedicated WMS or manufacturing ERP that includes robust barcode features.
Key features to look for include: the ability to store and assign barcode numbers to each item in the system, easy integration with scanners (so that scans are treated as inputs to the software), and label printing capabilities from within the software. In terms of options, there are many out there. You’ll find lightweight tools that are user-friendly for small businesses, up to heavy-duty systems. Pick one that fits your budget and technical comfort level – remember, the goal is to simplify your life, not add complexity. A good inventory system will be intuitive for your team and offer the barcode functionality out of the box.
3. Decide on Barcode Formats and Generate Your Codes
With software in place, determine what type of barcode format you want to use for your labels (if your software hasn’t already defined this). Most inventory systems let you choose from common formats like Code 128 or Code 39 for 1D barcodes, or QR/DataMatrix for 2D. For most internal tracking, a 1D code like Code 128 is a solid choice since it’s widely supported and can encode alphanumeric IDs. If you plan to encode special information or just prefer QR codes, that’s fine too – just ensure your scanners can read the format.
Once you decide, have the system generate a unique barcode for each item in your inventory list. Typically the software will create a barcode image for each SKU based on the identifier. For example, SKU “ABC123” becomes a barcode graphic representing that ID. If your software doesn’t generate barcodes automatically, there are free online tools that can do it – but most modern systems handle this for you.
Also consider barcoding locations in your facility. It’s often extremely useful to assign barcodes to areas like aisles, shelves, or bins. That way, when you’re putting items away or picking them, you can scan the location and then the item, and the software knows “Item X is now in Location Y.” Plan out if you’ll label storage locations with barcodes and have those set up in the system as well.
4. Print Barcode Labels
Now it’s time to physically produce the barcode labels. Using your barcode label printer (or even a standard office printer with adhesive label paper for a very small trial run), print labels for all the items and locations you prepared. Your inventory software will usually have a printing function where you select the items and it prints the corresponding barcode labels, often including human-readable text like the item name or number below the code.
Decide how you will label items: one label per individual unit, or one per batch or bin. For instance, you might not put a barcode sticker on every single bolt in stock (that would be overkill); instead, you put one label on the bin that contains that batch of bolts, and scan it when adding/removing bolts. Conversely, for expensive or serialized items, you might label each item. Print as many copies as needed so that everything is covered.
Pay attention to label durability at this stage. Manufacturing environments can be tough on labels – there might be grease, heat, moisture, or abrasion. If items are stored outdoors or in a hot production area, use label materials that can withstand those conditions (e.g., polyester labels with strong adhesive, laminated labels, or even metal asset tags for extreme cases). If you’re using a thermal transfer printer, choose ribbon and label stock that are rated for the environment (waterproof, UV-resistant, etc., if necessary). Taking a little care now ensures your barcodes remain scannable over time.
5. Affix Labels to Items and Locations
With labels printed, it’s time to put them in place. This can be a labor-intensive step, especially if you have hundreds or thousands of existing items on shelves. It might be wise to tackle it in phases – for example, label one section of the warehouse at a time, or label items as you encounter them for orders, gradually achieving full coverage. Make sure to stick labels on clean, flat, and visible surfaces of the item or container. You want the barcode to be easily accessible to a scanner. On a shelf, the label should go at eye level or a consistent position where a worker knows to scan. On a box or pallet, a label on the side facing outward is ideal. For very small items, you might attach the label to the bag or container holding them.
If possible, as you label each item or location, do an initial scan into the system to verify everything is working. Many inventory systems allow you to scan a new label to link it to the item’s record on the spot. By the end of this labeling process, every physical item and every storage spot in your system should have a barcode associated with it.
6. Integrate Scanning into Your Workflow (Train Your Team)
Now comes the operational change: start using the barcode system in day-to-day processes. This means updating your standard procedures so that whenever inventory is received, moved, or used, the barcode gets scanned. For example:
- When raw materials arrive at the receiving dock, the receiver scans each item’s barcode to instantly record it into inventory (if it didn’t have a barcode, they would apply a label then scan it).
- When issuing parts to the production floor, staff scan the parts out from the stockroom (and optionally scan a work order or job ID, if your system tracks usage per job).
- When a finished product comes off the line, scan its barcode to mark it as completed and moved into finished goods stock.
- When products ship out to a customer, scan them again to mark them as shipped (which could decrement inventory and tie into your sales records).
Essentially, every inventory transaction gets a scan. This might be a big change if previously people just scribbled things on paper (or didn’t track at all), so training and communication are crucial. Explain to the team why the company is implementing barcodes – how it will make everyone’s jobs easier by preventing mistakes and searches. Demonstrate how to use the scanners and the software interface. In our experience, once employees see that scanning an item takes seconds and automatically does what used to take minutes of writing/typing, they appreciate the upgrade. Encourage a culture of “if it moves, scan it” so that the system’s data stays accurate.
It helps to create some quick reference guides or cheat sheets for the new process. For instance, a one-page SOP might outline: “To issue parts to a job: scan the job traveler document, then scan each part leaving the stockroom.” Keep things simple and logical. Start with a small pilot if needed – maybe one production line uses the system for a week to iron out any kinks – then roll out to all departments.
7. Test, Verify, and Refine
After initial implementation, take time to verify that the barcode system is functioning as intended. Conduct a few random cycle counts by scanning items in a section and confirming the quantities match the system’s records. If you find discrepancies, figure out where the process might have broken down (Was someone forgetting to scan? Did a label fall off?). Early on, it’s also wise to run a full physical inventory after a month or two, just to recalibrate and catch any initial issues while people were learning. The good news is that performing that inventory will be much faster with barcodes – you can scan locations and items rather than writing everything.
Pay attention to practical issues: Are the scanners reading the codes easily, or are some labels hard to scan (maybe too small or placed awkwardly)? Adjust label formats or placement if needed. Make sure your scanning equipment is reliable in your environment – e.g., if you find the wireless scanner can’t reach the far corner of the warehouse due to signal, you might need a USB extender or another solution. These refinements in the first few weeks will iron out any kinks.
Before you know it, using barcodes will become second nature in your operation. You’ll start noticing that inventory tasks which used to be a headache are now much smoother. Workers aren’t wandering the aisles looking for stuff as often, and you as a manager aren’t being surprised by missing inventory. That’s when you can confidently say the barcode system is working as intended.
Cost Comparison: Barcodes vs. Manual Inventory Systems

You might be wondering about the actual costs involved in setting up barcode tracking, especially compared to just sticking with a manual approach. After all, manual methods seem “free” since you’re just using pen and paper or a basic spreadsheet. However, it’s important to consider hidden costs of the old way as well as the value that barcodes provide. Here’s a breakdown:
Upfront Setup Costs: Yes, a barcode system has some initial costs. For a small operation, you might spend a few hundred dollars on handheld scanners, a few hundred more on a decent label printer, and perhaps a software subscription or license fee. For example, a basic setup for a small warehouse could be in the ballpark of $1,500 – $3,000 all-in. A larger factory with multiple scanning stations might invest tens of thousands, but rarely are we talking hundreds of thousands unless it’s a huge enterprise deployment. By contrast, a manual system’s upfront cost looks like zero – you already have pens and paper, right? But remember that the upfront cost is typically one-time or infrequent for barcodes (scanners last many years, software might be a monthly fee but you’re paying for continuous improvements and support).
Labor Costs and Efficiency: This is where manual systems quietly drain money. Manual inventory tracking is incredibly labor-intensive. Think about those periodic stock counts where you have to stop operations, send people out to count everything by hand – hours or days of paid labor that produce no value except an updated count (which immediately starts drifting again). Or the daily tasks: every time something is received or issued, someone has to write it on a log or type it in later, which takes significantly more time than a quick scan. All that labor time has a cost. With barcodes, these processes are much faster – often a single person with a scanner can handle what used to require a team doing paperwork. Many businesses find that after implementing barcodes, they can manage a larger inventory with the same or fewer staff, or reassign staff to more productive tasks instead of doing data entry. Over a year, the labor hours saved by barcoding can translate into thousands of dollars saved. In essence, while manual tracking “saves” on buying technology, you end up “spending” a lot more on labor to compensate for the inefficiency.
Error-Related Costs: Inventory errors are not just frustrating – they can be expensive. Shipping the wrong product to a customer means return and reship costs, and maybe an unhappy client. Misplacing a critical part can mean an emergency order or downtime. A production line stopping because a part you thought was in stock isn’t actually there can cost a fortune in lost output. These kinds of errors are much more common with manual systems (because humans make mistakes in data entry and in handling). Barcodes, by virtually eliminating data errors and by improving overall organization, significantly reduce these costly incidents. It’s hard to quantify generally, but imagine avoiding even one serious stockout that stops production – that could justify the barcode system right there. Companies that switch to barcodes often report drastically lower error rates; some specific studies show 80%+ reductions in mis-shipments and inventory count errors. Fewer errors = direct savings and also intangible benefits like better customer trust.
Inventory Carrying Costs: When you don’t have confidence in your inventory accuracy (a common problem with manual systems), you tend to carry extra stock as a buffer. This safety stock cushions against errors but ties up capital and space. Or the opposite happens – you carry too little of something because the system didn’t signal a reorder, leading to stockouts. Both scenarios have costs: overstocking means money sitting on shelves and potentially wasted if the item expires or is unused; stockouts mean lost sales or halted production and scramble costs. Barcoding increases accuracy and visibility, allowing you to optimize inventory levels. You can often reduce the amount of “just in case” inventory you keep because you trust the system to tell you when to reorder. Leaner inventory means lower carrying costs (less money in inventory, and possibly defer needing more storage space). It also means you avoid the high costs of urgent last-minute orders due to unexpectedly running out. Over time, those savings are substantial and directly improve your cash flow and profitability.
Comparing to High-Tech Alternatives: It’s worth noting that barcodes are arguably the most affordable automation step you can take. There are more advanced technologies out there – RFID tags, or full IoT sensor networks that track inventory automatically. Those can offer some advantages (like not requiring line-of-sight scans), but they come at a much higher price point. RFID readers and tags can be an order of magnitude more expensive than barcode gear. IoT solutions might involve expensive sensors on each bin or item. For many small and mid-sized manufacturers, those costs are prohibitive or not justified by the scale of operation. Barcodes, on the other hand, hit a sweet spot: very budget-friendly, yet yielding huge improvements over purely manual methods. It’s often the best first step into modernizing inventory tracking without breaking the bank.
Return on Investment (ROI): Considering all the above, barcode systems usually pay for themselves quickly. A small manufacturing business might recoup its investment in a barcode setup within 6 to 12 months just from the time saved and mistakes avoided. Larger operations, dealing with bigger volumes, might see ROI in just a few months because the improvements scale with volume. After that, the ongoing benefits are essentially profit – you continue to save time and avoid costs every day. In contrast, a manual system never “pays back” – in fact, the longer you stick with manual processes, the more you cumulatively pay in hidden costs like inefficiency, mistakes, and lost opportunities.
In a nutshell, while introducing barcodes does involve some spending up front, it’s dwarfed by the savings and value gained. It’s a classic low-cost, high-impact investment: spend a little now to save a lot later. And importantly, barcoding is accessible even to smaller manufacturers; you don’t need a massive IT budget to implement it and start seeing benefits.
Potential Challenges (and How to Overcome Them)
Implementing barcode tracking in manufacturing is generally straightforward, but like any change, it can come with a few challenges. Knowing these ahead of time will help you plan for them and ensure your barcode initiative is a roaring success. Let’s go over some common challenges and how to handle them:
Initial Setup Effort
One hurdle is the upfront work of labeling everything and entering clean data into the system. If you have thousands of parts, the project of assigning SKUs and slapping barcodes on each item can feel daunting.
Overcome it: Break the task into phases or milestones. You could start by barcoding all new inventory going forward and then gradually work through older stock. Or dedicate a weekend with the team to blitz through labeling one area at a time. Remember, this is largely a one-time effort – once items are labeled and in the system, you’re over the mountain. Consider it an investment of time that will pay off immensely once completed.
Employee Buy-In and Training
Change can be hard for staff who are used to the old ways. You might encounter some resistance or nervousness about using scanners and new software.
Overcome it: Involve the team early, explain the why (less tedious work, fewer mistakes, smoother days), and provide hands-on training. Demonstrate how much faster and easier it is to scan a part versus writing things down. Often, once people try it and see that it actually makes their job easier, they’ll get on board. It can help to designate a couple of “barcode champions” – tech-savvy or enthusiastic employees who can assist others and advocate for the new process. Peer support and positive reinforcement go a long way. Celebrate quick wins (like “zero shipping errors this week thanks to scanning!”) to show the benefits in action.
Technical Glitches (Scanner/Software integration)
It’s possible to hit some technical snags when first setting up – maybe a scanner isn’t transmitting data to the software correctly, or some settings need adjustment.
Overcome it: Do a controlled pilot test as mentioned – set up one computer and one scanner, and run through typical tasks to ensure everything communicates properly before full rollout. Use the vendor’s support resources; if you chose a decent software, they’ll help you troubleshoot any scanner config issues or advise on settings. Often it’s as simple as toggling a software option or scanning a special configuration barcode that comes with the scanner to put it in the right mode. Once configured, these issues rarely recur, so upfront testing is key.
Label Damage or Loss
In an active manufacturing environment, labels can get dirty, scratched, or peeled off over time. If a barcode is unscannable or missing, it can cause hiccups until it’s replaced.
Overcome it: Use appropriate label materials as we discussed (durable labels for harsh environments). Institute a routine to inspect and replace labels periodically – for instance, during cycle counts or equipment maintenance checks, have staff keep an eye out for any faded or damaged labels and reprint them. Also, have a backup plan: if a barcode won’t scan, employees should know they can manually enter the SKU number to record the transaction, and then flag that item for re-labeling. Some companies print two labels for critical items – one on the item and one on the shelf/bin – so that if one is unreadable, the other is available. Redundancy helps keep things running smoothly.
Consistent Usage (Discipline)
The barcode system is only as good as its usage. A common challenge is ensuring that every inventory movement is actually scanned. If people bypass it (“just this once, I’m in a hurry, I’ll scan later”), the data loses accuracy.
Overcome it: Make scanning a non-negotiable part of the process. Management needs to set the expectation and maybe build in some safeguards: for example, require that a work order isn’t considered complete until all components are scanned out, or use signage and reminders (“Did you scan it?” at the stockroom door). In the early days, you might run spot audits – check a few transactions or bins to ensure they match the system, and if not, retrain or remind the responsible persons. Fortunately, when everyone sees the system working – like because they scanned, the system re-ordered parts in time – they gain trust in it and habits form. Usually it only takes a short while for consistent scanning to become second nature, especially if the process truly saves time (which it does!).
Scaling and Performance
If you ramp up to a very large number of scans (say your operation grows 10x), you’ll want to ensure your system and infrastructure can handle it (though this is more of a long-term concern).
Overcome it: Choose reputable software that’s known to scale well. Use quality scanners and maintain them. If you go wireless, ensure your network coverage is good so devices don’t drop offline. Keep an eye on the inventory database performance – archive old transaction data if needed or upgrade your plan as you grow. These are things to consider if you become a high-volume user, but for most, a standard setup can already handle thousands of items and scans per day without trouble.
Integration with Other Systems
You may eventually want your barcode inventory system to communicate with other systems (like your purchasing system, MRP/ERP, or accounting software). Integration challenges can arise if the tools don’t natively connect.
Overcome it: This one depends on your software capabilities. Many modern inventory systems offer integrations or at least data export/import features. For example, you might export inventory usage data and import it into an ERP, or connect QuickBooks to your inventory app for tracking cost of goods. It might require some configuration or even third-party tools if automation is needed. The key is to map out what information needs to flow where. In many cases, starting with the barcode system as a standalone is fine, and integration can be a phase two. Even if fully automated integration isn’t in place, barcodes will still vastly improve the accuracy of the data you manually transfer between systems.
By anticipating these challenges and addressing them proactively, you can ensure a smooth transition to barcode tracking. Countless manufacturers have successfully implemented barcoding, and their experience shows that these hurdles are manageable with a bit of planning and training. Once your system is up and running, you’ll likely wonder how you ever managed without it!
Streamlining Inventory with CyberStockroom’s Barcode System
In the landscape of inventory management solutions, CyberStockroom stands out as a particularly user-friendly platform that helps manufacturers (and other businesses) implement barcode tracking with ease. CyberStockroom is a cloud-based inventory management software tailored for small to mid-sized operations that need better inventory visibility without a huge IT overhead or complex setup. Let’s look at how CyberStockroom can specifically help manufacturers with barcode-based tracking:
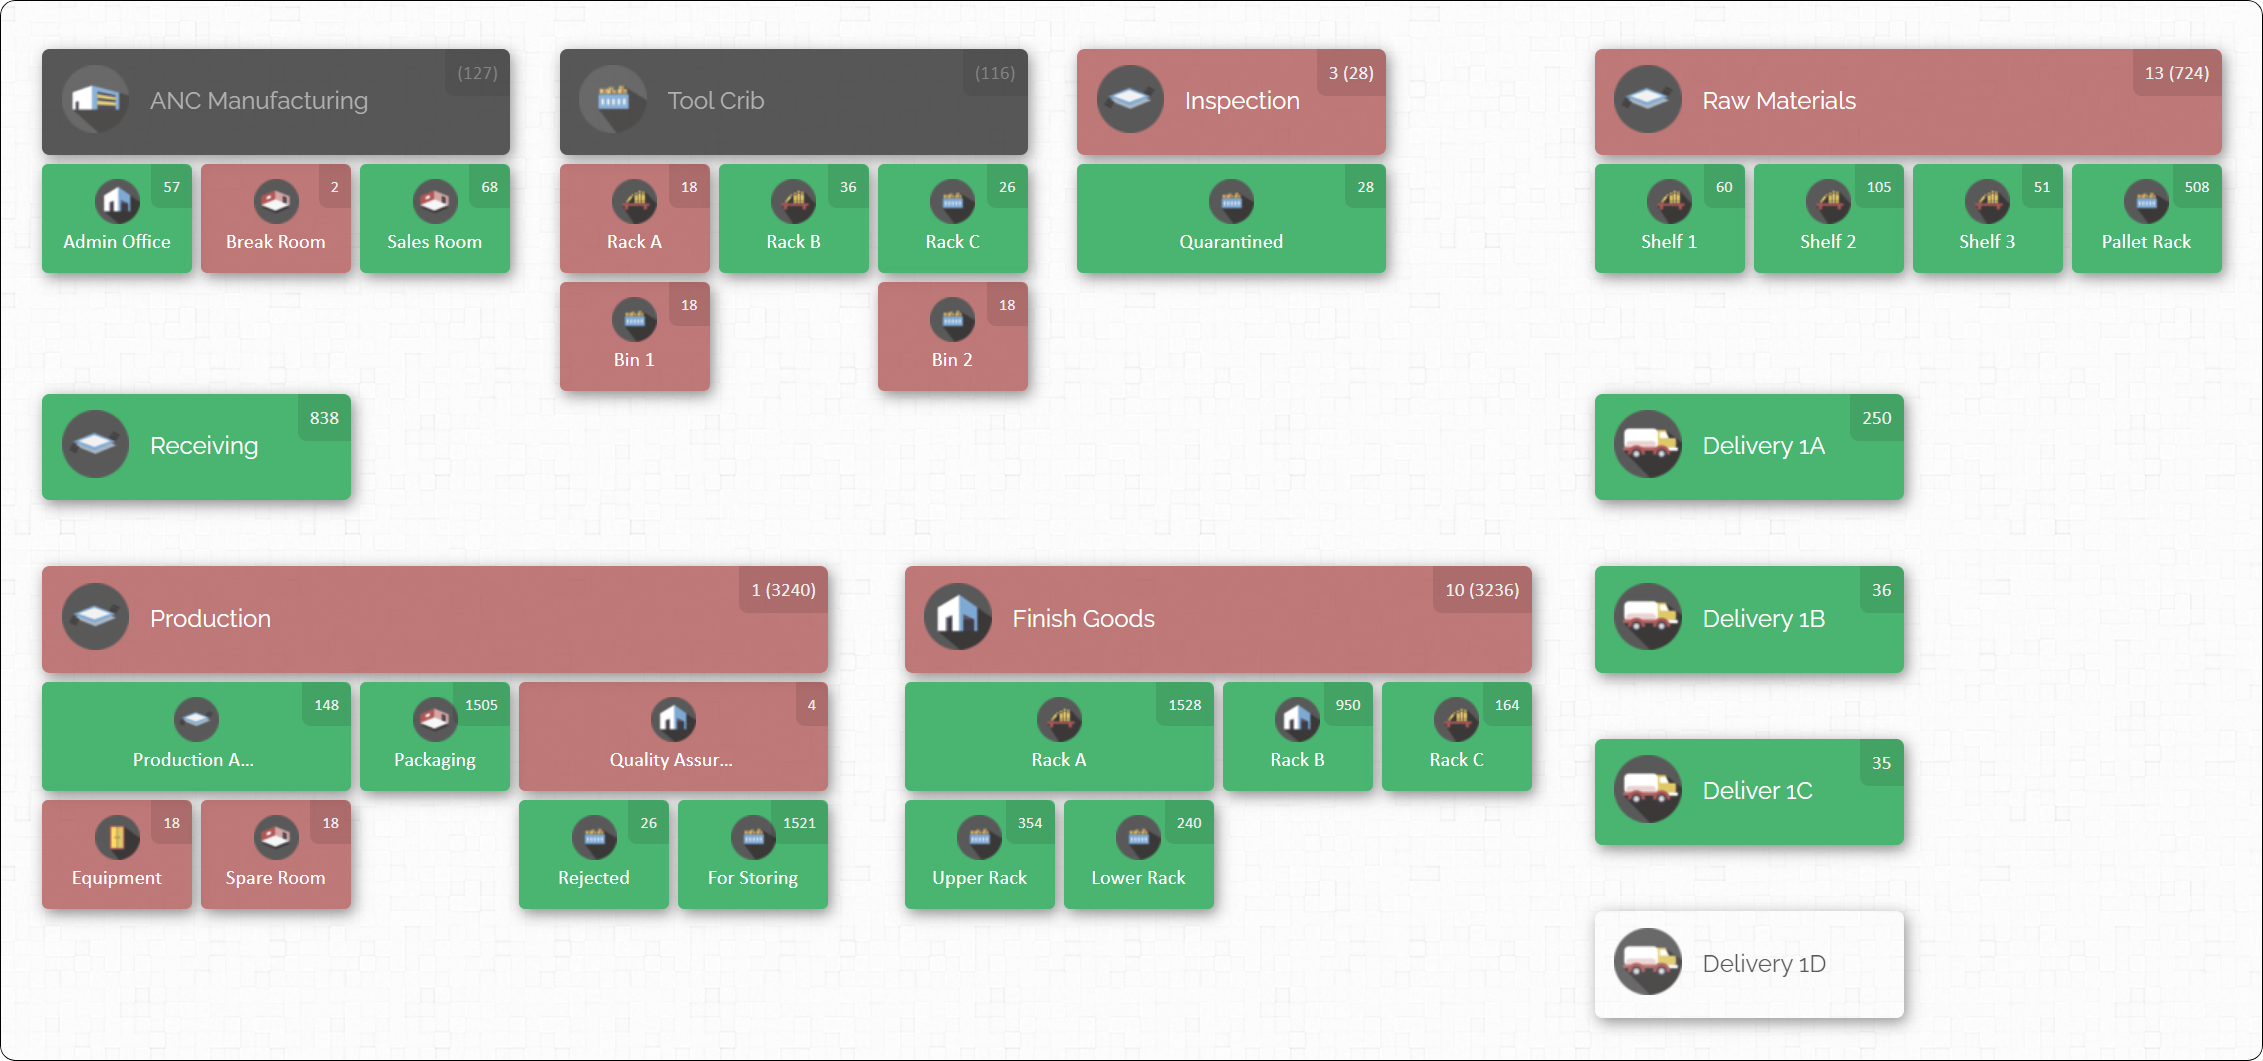
Visual Inventory Mapping
One unique feature of CyberStockroom is its Inventory Map interface. This lets you create a virtual floor plan or map of your business – for example, you can lay out your warehouse zones, production areas, storage rooms, and even multiple facilities on one screen.
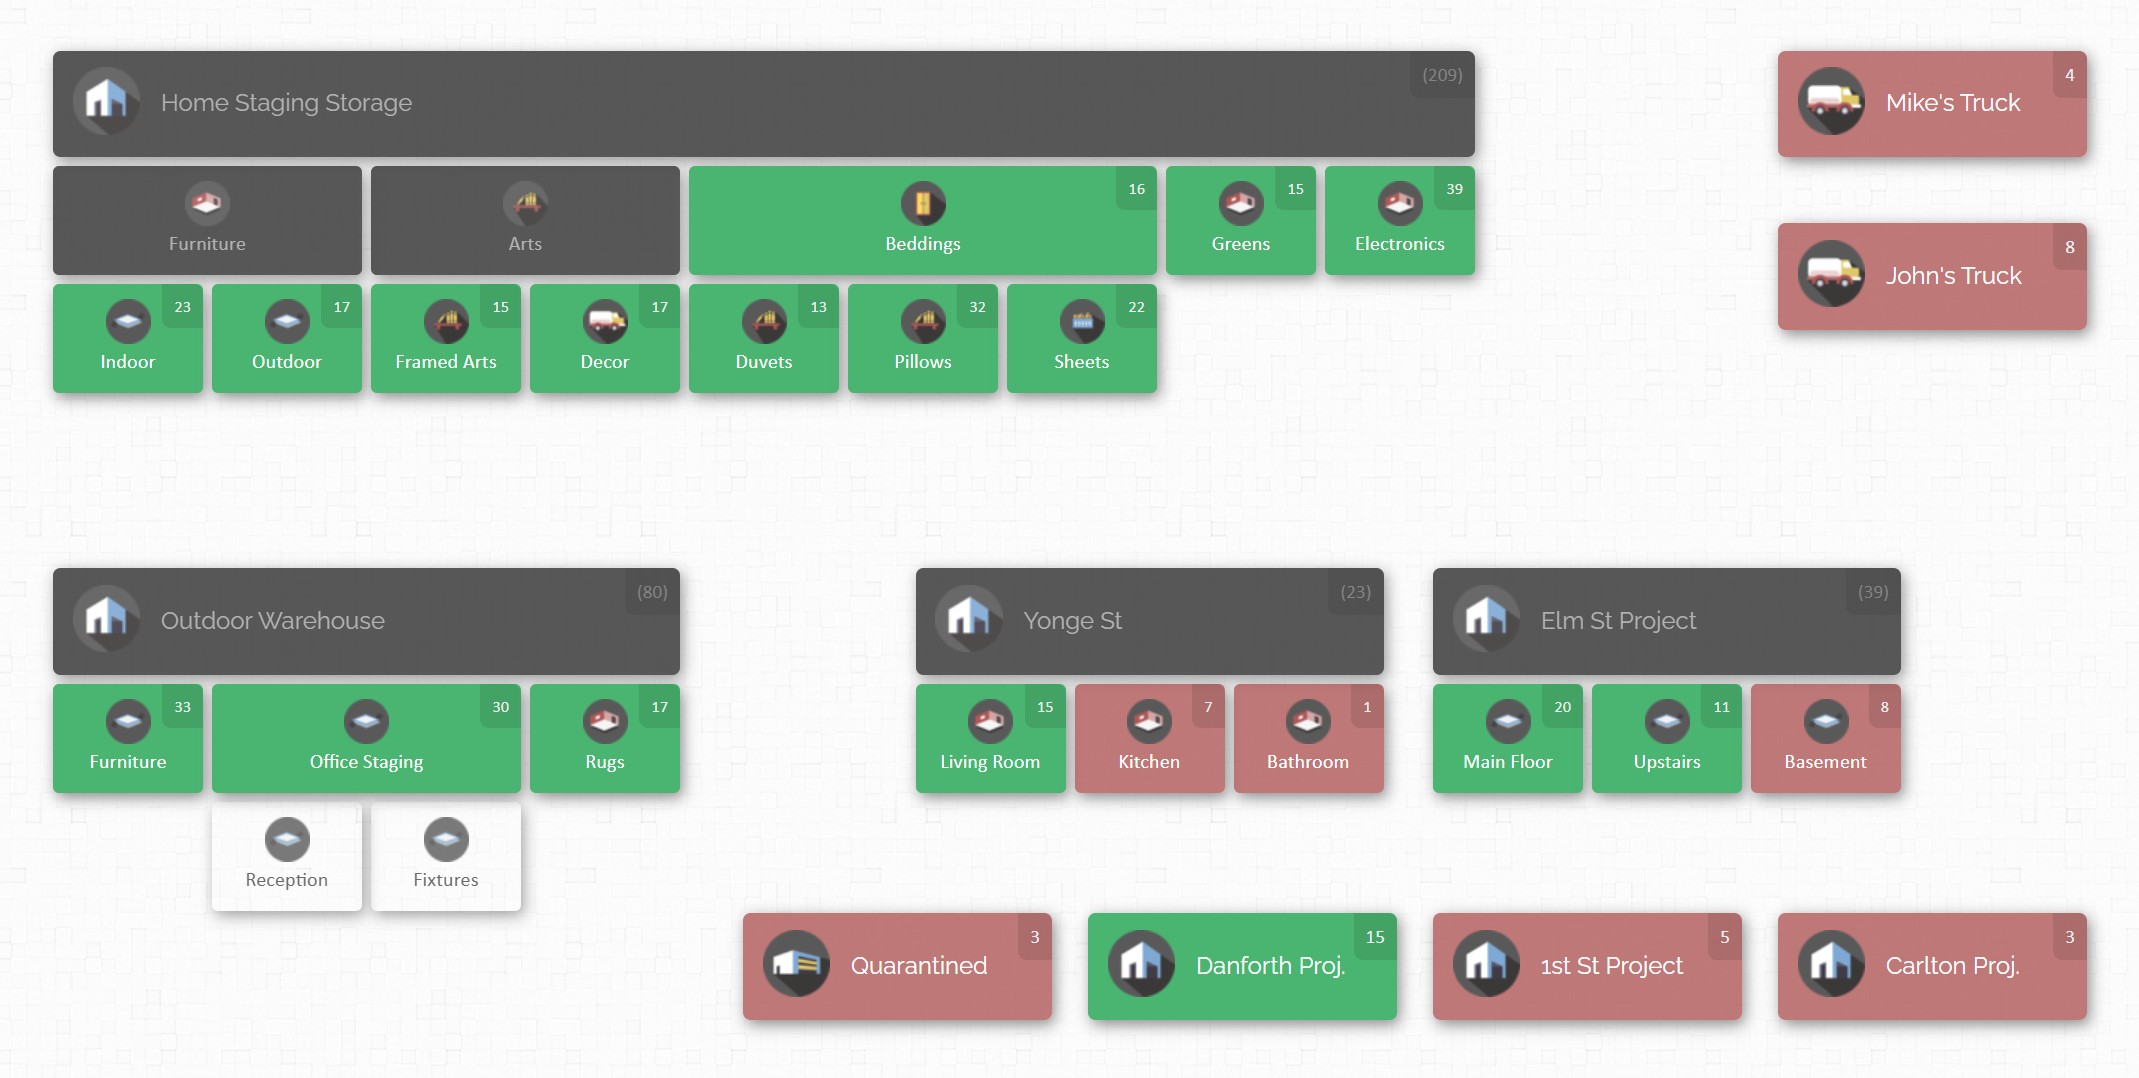
Each location or sub-location on the map corresponds to a real physical area (like “Main Warehouse – Aisle 3 – Bin B”). Now, here’s where barcodes come in: CyberStockroom allows you to use barcodes not only on products but also on those locations. You can print a barcode label for each important location (say a label for “Raw Material Stockroom” or one for “Assembly Line Station 1”). Using the software’s special Quick Scan mode, an employee can scan an item and then scan a location label to instantly record a transfer of that item to the new location. For a manufacturer, this is incredibly handy when moving parts between, say, the stockroom and the assembly line, or finished goods from the production floor to the warehouse. One quick double-scan and the system knows “Part X moved to Station 1” – and the inventory map will update to show that part now at its new location. This visual mapping combined with barcodes means you always have a bird’s-eye view of what’s where, updated in real time by the scanning actions of your team.
Seamless Barcode Integration
CyberStockroom is designed with barcoding in mind, so just about anywhere in the software you could type an item name or number, you can simply scan the item’s barcode instead. A USB or Bluetooth scanner connected to any device running CyberStockroom essentially acts like a keyboard input – except much faster and error-free. This means you can add products to your inventory by scanning them, look up items by scanning their barcode (super useful if you find an unknown part lying around – scan it and instantly see what it is and where it belongs), and perform stock counts by scanning items on the shelf. The system processes these scans in real time, updating counts and records immediately. There’s no complicated syncing – it’s built-in. In practice, this makes day-to-day tasks very efficient. For example, if a technician in the tool crib needs to issue a part, they can scan the part’s barcode and the destination location’s barcode, and CyberStockroom will deduct it from inventory and note it’s now on the shop floor, all in one go.
Built-In Label Printing & Flexibility with Existing Barcodes

For companies starting fresh with barcoding, CyberStockroom includes tools to generate and print barcode labels directly from the app. As you enter new items into the system, you can click to print a label for each item, complete with its barcode. This streamlines the setup process because you don’t need a separate barcode generator – it’s all integrated. On the other hand, if you already use some barcodes (maybe your suppliers provide barcode labels on raw materials, or you have an old system), CyberStockroom can work with those too. You can input or import the existing barcode numbers for items into the system, so that when you scan those codes, CyberStockroom recognizes them. This flexibility is great for transitioning from a legacy system – you don’t have to rip off all your old labels and start over; CyberStockroom can often adopt the codes you’ve been using. In short, it supports you in both printing new labels and leveraging any existing ones.
Accuracy and Audit Trails
By using CyberStockroom’s barcode-driven workflows, every inventory transaction gets logged automatically, creating a reliable audit trail. The software records who did what, when, and where. For example, if 100 units of Part A were moved from warehouse to production, the system might log “10:32 AM – user JohnDoe – moved 100 x Part A from Location ‘Warehouse Shelf 5’ to ‘Assembly Zone 1’.” These logs mean accountability and traceability.

If something goes missing or a count is off, you can quickly check the history to investigate. For quality control or compliance, you can demonstrate exactly how inventory has flowed. CyberStockroom essentially pairs the accuracy of barcode data capture with an intuitive interface that lets you easily review and track those details. Even non-technical staff can navigate the history or pull reports, so everyone can trust the data.
Real-Time Visibility and Alerts Across Locations
Because CyberStockroom is cloud-based, you can access your inventory information from any device (in the office, at home, or on your phone in the field). For a plant manager or owner, this means you can always get a real-time status of stock levels across one or multiple sites. CyberStockroom’s map will show if one site is running low on a certain component, for instance.
Quick Implementation and Ease of Use
CyberStockroom is geared towards quick onboarding – a huge plus if you don’t have a dedicated IT department to help set up complex systems. Because it’s a web-based platform, getting started is often as easy as signing up and logging in through your browser. You can import your existing inventory list via spreadsheet to populate the system rapidly. From there, you generate barcodes and start scanning. The learning curve is minimal, and CyberStockroom offers tutorial videos and customer support to guide new users. This lowers the barrier to entry for adopting barcoding. You won’t need months of setup or consultants configuring things – many small businesses can get up and running in a matter of days. This “quick win” approach is very much in line with the idea of a low-cost, high-impact upgrade. You can start small (maybe track just one category of items at first) and then scale up usage as you see the benefits, all without a massive upfront commitment.
Affordable for Growing Businesses
In keeping with the “low-cost upgrade” theme of this article, CyberStockroom is priced with small and growing businesses in mind. It uses a subscription model (cloud software) which avoids hefty upfront fees. That means you’re not making a huge investment all at once; instead, you’re paying a reasonable monthly or annual fee that includes updates and support. This can be very attractive for manufacturers on a tight budget – you get enterprise-level inventory control features without an enterprise-level price tag. And since it’s scalable, you only pay for what you need. The cost is easily justified by the reduction in inventory losses, improved productivity, and time saved. Essentially, CyberStockroom aims to make modern inventory management accessible and cost-effective, so that even smaller factories can reap the rewards of a sophisticated system.

In essence, CyberStockroom acts as a partner for manufacturers stepping into the world of barcode tracking. It combines the convenience of cloud technology (accessible anywhere, no servers to maintain) with the power of barcodes and a visual map to give even the smallest factory a clear, real-time picture of its inventory. By visualizing your operations on a map and updating everything with quick barcode scans, CyberStockroom simplifies what could otherwise be a complex task.
For a manufacturer considering the jump to barcoding, choosing a solution like CyberStockroom can accelerate your success. You get a proven system with best practices (like barcoding, location tracking, real-time alerts) already built-in, so you can focus on making your products while the software helps keep your inventory organized and under control.
Conclusion
Upgrading to a barcode tracking system is one of the smartest moves a manufacturing business can make to boost efficiency without breaking the bank. We’ve explored how barcode inventory tracking works – from the simple concept of scanning a label to the broad benefits it brings in speed, accuracy, visibility, and cost savings.
We covered the different types of barcodes and scanning hardware, giving you a sense of the flexible options available. Whether you run a tiny workshop or a sprawling factory, there’s a barcode solution that fits your scale. The step-by-step implementation guide shows that getting started is very doable, especially if you plan it out and get your team on board through training and communication. Yes, there are a few challenges to watch out for, but none that can’t be overcome with a bit of foresight and the right approach, as proven by many companies before you.
Crucially, this upgrade is low-cost relative to the alternatives. Barcode technology has matured to be affordable and reliable, which means even smaller manufacturers can implement it and quickly see a return on investment. When we compared it to a purely manual system, it became clear that sticking to the old ways can actually cost more in the long run – through labor inefficiencies, mistakes, and lost opportunities – whereas barcoding is a modest expense that yields ongoing savings.
We also highlighted CyberStockroom as an example of a modern tool that makes barcode inventory management even more accessible. Solutions like that can kickstart your journey by offering an intuitive platform to harness barcodes effectively, with features tailor-made for the needs (and budgets) of growing manufacturing businesses.
In conclusion, if you’re looking for a clear win to improve your manufacturing operations, barcode tracking is it. It’s straightforward to learn, gentle on the budget, and powerful in impact. By tagging your inventory with those simple black-and-white codes and scanning instead of scribbling, you’ll gain a level of control and insight into your production that will help your business run smoother and grow stronger.
Barcode tracking in manufacturing truly is a low-cost upgrade that delivers high-value results – a small change that can transform your inventory management from chaos into clarity. Here’s to scanning your way to success!


Leave a comment