
Construction sites are busy, constantly changing environments where hundreds of tools, parts, and materials must be in the right place at the right time.
One powerful way to manage this complexity is through material kitting and pre-assembly. By grouping every part needed for a task into kits and even pre-building assemblies off-site, contractors can dramatically reduce wasted time, mistakes, and clutter on the site.
In this blog, we’ll explore material kitting and pre-assembly best practices and how they tie into streamlined inventory management on construction sites. You’ll learn what these methods involve, why they matter, and how to implement them effectively.
We’ll also discuss technology solutions – including CyberStockroom’s visual inventory mapping – that make kitting easier. By combining solid planning with digital tools, contractors, site supervisors, and inventory managers can keep projects on schedule, budget, and completely under control.
What Is Material Kitting?
Material kitting is the process of bundling together all the parts and supplies needed for a specific construction task or phase. Instead of delivering raw materials one at a time, a contractor orders and packages them into ready-to-use kits.

For example, if an electrician needs to wire a room, a kit might include all the conduit pieces, cable, connectors, fasteners, and small tools required for that room’s job. The kit is assembled in advance – typically off-site or in a dedicated staging area – and delivered to the site as one package.
Key points of material kitting:
- Pre-planning parts: For each typical task (like installing a bathroom, assembling a wall, or building a roof truss), make a checklist of every item and tool needed. This “bill of materials” is the blueprint for the kit.
- Assemble before shipping: Gather and pack the required components into one kit package. You might use boxes, crates, pallets, or labeled containers. Kits can also be modular: for example, one large kit for all drywall in a room, plus small “roll-up kits” for finishing tasks.
- Labeling and tracking: Each kit should be clearly labeled with its contents, the task it’s for, and any job or drawing references. Barcodes or QR codes on each kit make it easy to scan and log the kit as a single item in inventory systems.
- Deliver to staging areas: Kits are sent to a convenient location on the job (like a trailer, laydown yard, or work area) so that crews can grab the entire kit at once when it’s needed.
By pre-grouping materials this way, crews no longer have to search for individual bolts or run back to the warehouse to pick up the next bag of concrete. Everything they need arrives together, cutting down on search time and project delays.
What Is Pre-assembly (Prefabrication)?
Pre-assembly, often called prefabrication, takes kitting a step further by actually constructing portions of the project off-site under controlled conditions. Instead of delivering loose materials and assembling them on the job, certain components are built in a workshop or factory setting.
Examples include building wall panels, mechanical racks, roof trusses, or even entire bathroom pods before bringing them to the site.

Benefits of pre-assembly:
- Faster onsite installation: A panel or subassembly can often be installed far more quickly than piecing together its parts one by one. The site crew might simply lift a completed panel into place and bolt it up, saving days of on-site labor.
- Higher quality and safety: Prefab assemblies are done in a clean, controlled environment. This reduces mistakes (like mis-cut framing or wiring errors) and avoids risky work in the field (such as doing heavy welding at height). The result is better quality and a safer jobsite.
- Reduced material waste: Off-site builders typically generate less scrap because they can optimize layouts and reuse cut-offs more efficiently. Studies have shown prefabrication can cut waste dramatically – for example, prefab concrete or formwork can reduce material waste by 60–80% compared to fully field-built methods. The same goes for prefab wood or MEP assemblies.
- Weather independence: By assembling components indoors, work can continue on rainy or freezing days without downtime. Weather delays are a major source of cost overruns; prefabrication mitigates that risk.
When used together, kitting and pre-assembly mean that site work is mostly about installation, not sorting parts. Construction becomes more like an assembly line: each crew takes a ready-made kit or prefabricated section, clicks it into place, and moves on to the next task.
Why Kitting and Pre-assembly Matter

In the fast-paced world of construction, time is money and unpredictability is expensive. Kitting and pre-assembly address some of the industry’s toughest pain points:
- Boosted Productivity: Crews spend far less time looking for tools or materials. In fact, industry studies have found that construction workers may waste 10–15% of their workday searching for needed items. By delivering complete kits and assemblies, that downtime essentially disappears. Workers can focus on installation instead of inventory hunts.
- Fewer Delays and Mistakes: Missing parts can stall an entire crew. If a critical fitting or fastener is left behind, a plumber or electrician might sit idle waiting for deliveries. Kitting ensures the full list of parts is on site before work starts. Pre-assembled parts mean fewer surprises (for instance, mis-drilled holes or misaligned studs). Both approaches reduce stoppages and rework.
- Cost and Waste Reduction: Lean inventory is key. When materials are delivered just-in-time and only as needed, the site avoids overstocking. Less stock means less capital tied up and less risk of damage. Also, building kits in a controlled facility cuts on-site packaging waste. Rather than dealing with dozens of material boxes, crews empty one kit packaging. Overall, better inventory planning translates into lower material costs and reduced waste.
- Improved Safety: An organized site is a safer site. Piles of loose materials and tools create trip hazards. If all components for a job are stored neatly in a kit or designated zone, the work area stays tidier. Prefab also keeps work off ladders or scaffolds (since much of the fabrication is done on the ground or in a factory), which lowers accident risk.
- Enhanced Coordination: Kitting forces teams (supervisors, subcontractors, suppliers) to communicate in advance. When everybody agrees on what’s in each kit and when it will be delivered, there’s far less last-minute scrambling. It also makes planning easier: managers know exactly what’s coming and when, so they can align trades and schedules more confidently.
- Better Inventory Visibility: By treating kits and prefabricated modules as inventory items, project managers can track usage and stock levels precisely. This connects directly with technology platforms that give real-time visibility into materials. Knowing exactly how many kits are on site – and what’s in them – eliminates guesswork.
These benefits all reinforce each other. For example, catching a missing piece before it leaves the shop saves a crew an hour of searching on site (productivity gain and delay prevention). Delivering exactly the right amount of material means less waste in dumpster (cost saving and environmental benefit). Overall, teams that embrace kitting and prefabrication tend to see significant boosts in on-time completion rates and profitability.
Best Practices for Material Kitting

Material kitting only works well if it’s done thoughtfully. Here are some best practices to make kitting successful on your construction projects:
- Plan Kits by Task or Phase: Identify repetitive tasks or logical stages in your project. For each, create a detailed kit list (bill of materials) in advance. For example, you might have kits for “bathroom rough-in,” “electrical fixture installation,” or “HVAC duct drop.” Every item needed for that job – down to the last screw – should be on the list.
- Engage the Crew Leads: Before finalizing a kit, get input from the foreman or crew that will use it. They know best which items and quantities are needed. Adjust the kit lists based on feedback to avoid under- or over-supplying. This also secures buy-in from the team, who will be more likely to use the kits properly.
- Standardize and Label Clearly: Use consistent container types (bags, totes, boxes, pallet bins) for kits, and label them clearly with task name, date, and kit contents. Apply large printed labels or color-coding so it’s obvious what each kit is for. If possible, include a checklist of contents inside each kit so crews can verify contents easily.
- Use Barcodes or QR Codes: Attach a barcode or QR code label to each kit container. When kits arrive on site, scan them with a barcode scanner or mobile device as a single item in your inventory system. This lets you track the kit’s location, usage, and even who signed it out. For example, scanning a “Plumbing Fixture Kit” barcode could automatically log that those materials are now in Building A, Floor 2.
- Bundle Sub-kits for Large Assemblies: Sometimes one huge kit is unwieldy. For a big task (like wiring an entire building floor), consider dividing into sub-kits. E.g., “Lighting Kit Level 1,” “Lighting Kit Level 2,” etc. This keeps each kit a manageable size and helps distribute materials closer to where they’ll be used.
- Double-Check Completeness: Before shipping kits to the site, perform a kit pack check. One person selects each kit item and places it in the container while another verifies the list. A final audit catches missing or extra parts that can cause confusion on site.
- Coordinate with Suppliers and Logistics: Communicate with material suppliers about your kitting strategy. They may be able to deliver some kits pre-bundled from the factory (for example, custom mechanical racks or electrical panels with components included). Also, plan the delivery schedule so kits arrive just before they’re needed. Avoid having kits sit unused for weeks; that ties up space and cash.
- Store Kits in Designated Zones: Once on site, keep each kit in a known staging area or trailer rack. For instance, have a labeled shelving unit or pallet in the jobsite laydown yard for “Framing Kits,” “Electrical Kits,” etc. Using mapped zones (like “Staging Area 1: Electrical Kits”) helps site supervisors quickly verify kit inventory.
- Train Crew on Kit Usage: Make sure crews understand the kitting system. Explain how to unpack kits in order, how to check off or scan items as they’re used, and how to handle leftovers. A simple rule like “always return unused materials to the kit box and reseal it” keeps inventory organized. If you use barcodes, train them on scanning correctly. The easier the process, the more likely they will follow it.
- Perform Cycle Counts: Even with kits, do regular spot-checks of kit inventories. Every week or so, confirm that key kits are at the right counts. If a kit is low, investigate why (maybe it was unpacked twice by mistake or a missing part wasn’t caught). These quick audits prevent inventory “mysteries” from cropping up.
- Continuously Improve Kits: After completing a phase, review what worked and what didn’t. Did crews use everything in each kit? Were there items that always got leftover? Use that feedback to adjust future kits. For example, if the “Window Installation Kit” always has 3 screws left, order slightly fewer screws next time.
By following these practices, material kitting can become a well-oiled part of your site workflow. The goal is that every kit is so well-prepared that when the crew arrives, they can immediately start their task without hunting or waiting. Over time, this discipline can cut project timelines and keep budgets in check.
Best Practices for Pre-assembly (Prefabrication)
Pre-assembly requires even more upfront coordination, but its benefits can be huge for certain building elements. Here are tips to make prefabrication smooth:
- Design with Prefab in Mind: Engage your design and engineering teams early to identify components suitable for off-site assembly. Standardize repetitive elements where possible (e.g. uniform bathroom pod sizes, identical electrical racks) so they can be built in a factory. Utilize BIM (Building Information Modeling) if available to coordinate and detect clashes before fabrication.
- Quality-Controlled Environment: Set up a clean, well-equipped shop or partner with a prefab vendor. Ensure accurate shop drawings and tolerances to make sure assembled parts fit perfectly on site. This eliminates surprises in the field. If using an external prefabricator, communicate detailed requirements (connections, finishes, labeling for installation).
- Coordinate Transportation and Lifts: Large assemblies need special handling. Plan how each prefab element will be delivered, unloaded, and craned into place. Give truck drivers and crane crews precise measurements and weights. Scheduling is key – delays in receiving a module can idle other crews.
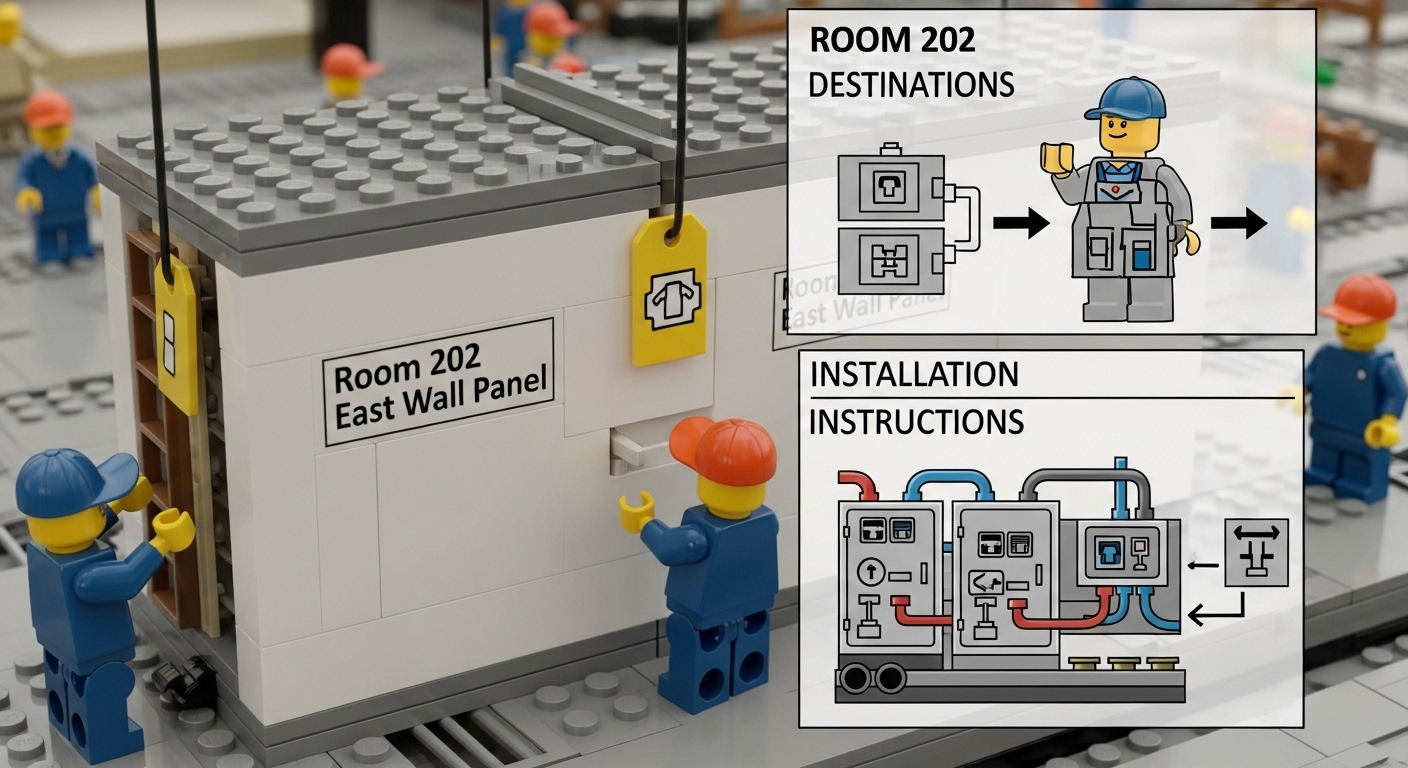
- Label Everything: Just like with kits, each prefab module should be tagged with its destination (e.g. “Room 202 East Wall Panel”) and include installation instructions. If a module has multiple components (like a mechanical skids with plumbing and electrical panels), label each part clearly so the crew knows where to connect pipes or wires on site.
- Prepare the Site in Advance: Before prefab delivery, ensure the site is ready: foundations poured, anchors set, opening spaces cleared. This way, modules can go in seamlessly. Verify with surveyors and foremen that everything is in tolerance.
- Test-Fit if Possible: For complex assemblies, a dry run or mockup can catch issues early. This might mean test-assembling a drywall panel in the shop or checking that a mechanical unit aligns with its floor penetration before sending it out.
- Incorporate Feedback Loops: After each prefab delivery, debrief the process. Note any damage, defects, or fit issues. Update your design or assembly process to fix these for future modules. Continuous improvement will tighten the workflow.
- Store Prefab Modules Safely: Once delivered, protect assemblies from weather or damage. Use designated laydown zones or covered storage. Keep pathways clear for cranes to move modules. Ensure safety protocols are followed during installation.
Effective prefabrication can transform how quickly buildings go up. Instead of 30 men cutting and welding a steel frame on site, you might deliver a complete frame for them to bolt together. By blending careful planning with these tips, your team can harness the speed and quality advantages of off-site work.
Leveraging Technology for Kitting and Inventory Tracking

The methods above work best when combined with robust inventory management technology. Traditional paper logs or spreadsheets quickly become unmanageable on modern sites. Here’s how tech can supercharge kitting and pre-assembly:
- Cloud-Based Inventory Systems: Use a centralized, cloud-hosted platform so everyone sees the same, up-to-date inventory. When a kit is delivered or opened, log it in real time. Foremen and warehouse managers can instantly know what’s available or used, without waiting for end-of-day reports.
- Barcode and QR Tracking: As mentioned, label kits and materials with barcodes. With a simple scanner, crews can check items in and out. For example, when a foreman starts a bathroom install, he scans the “Bath Rough-in Kit” barcode; the system logs the kit as assigned. If something gets used or removed, it’s scanned out, keeping counts accurate.
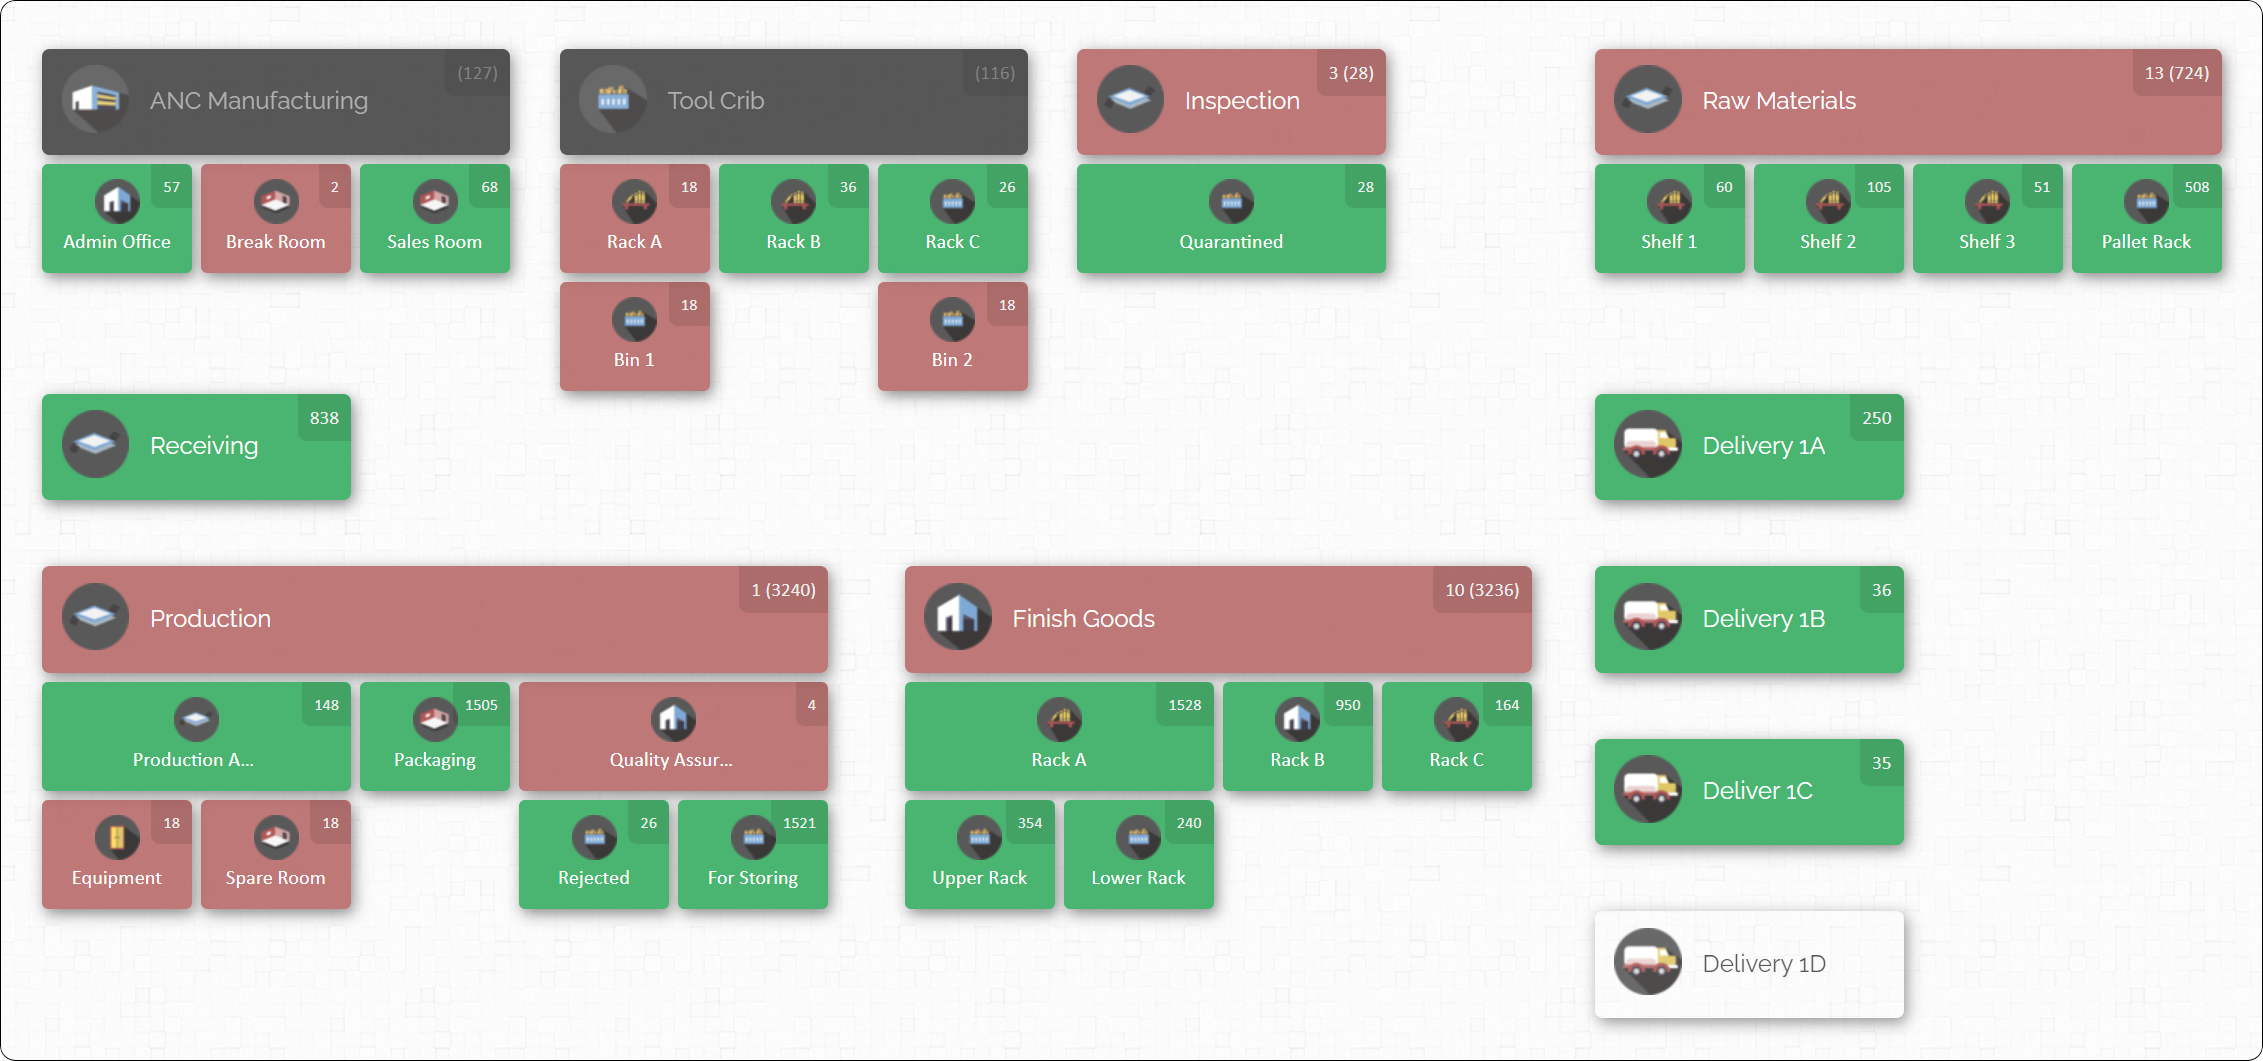
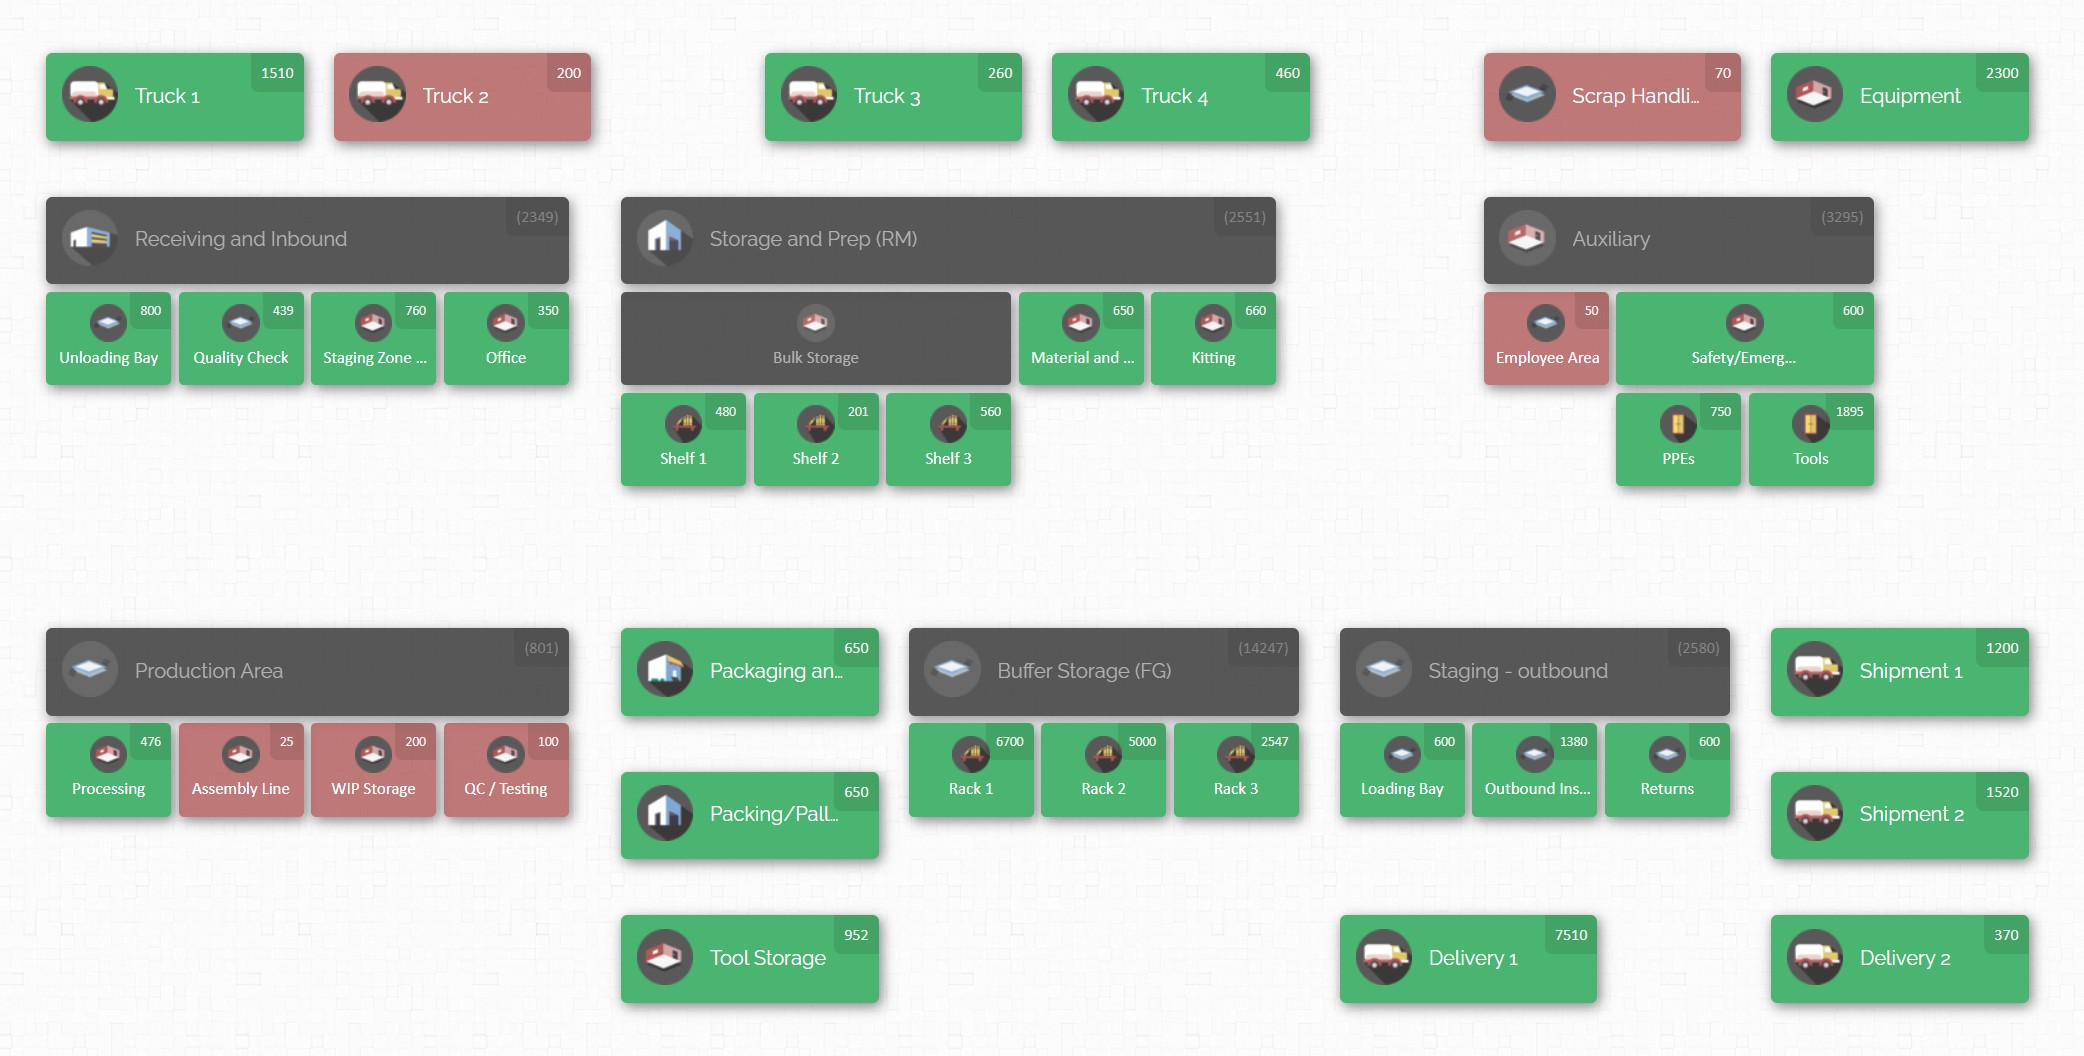
- Visual Inventory Maps: Perhaps the most game-changing tool is an interactive map of the site inventory. Instead of lists or bins in a warehouse, picture your entire project as a map with icons for tool cribs, storage containers, trailers, and even trucks or trailers as separate locations. Each location on the map holds items, and you see real-time counts at a glance. If a kit is moved, you simply drag and drop it to a new location on the map interface. This spatial view helps you quickly verify that every staging zone has what it should.
- Assign Items to Crew or Machine: Advanced systems allow assigning inventory to people or equipment. For example, if a crane lifts a prefab module, the system can log that the module is now “in use” by that crane operator or crew. When items are returned or decommissioned, they can be checked back in. These assignment logs improve accountability and help track who last had the equipment.
- Activity History (Audit Trail): Choose software that keeps a complete history of all inventory transactions. If someone accidentally scans items out of the wrong kit, you can trace the mistake. Audit trails also make theft prevention easier: you can see if items were removed without authorization.
- Integrations and Importing: While not always needed for construction, some inventory tools can import data from spreadsheets or integrate with other systems. For example, if you already have a parts list in Excel, you can bulk import that into the inventory tool instead of retyping.
- Offline and Online Access: Field conditions are not always perfect – signal might be weak. Good inventory systems will allow offline updates (e.g. cached data on your phone) and sync when back online. This ensures crews can still scan kits in a basement or remote area and have data sync later.
By layering on these technologies, your kitting and prefabrication processes become data-driven. Missing kits get flagged immediately, surplus materials are visible to reallocate, and forecasting gets smarter (since you know exactly what was used on past jobs).
CyberStockroom: Visual Inventory Mapping for Construction
Modern inventory software transforms how you see and control materials on site. CyberStockroom is an example of a platform built around interactive inventory maps.
Key features in CyberStockroom that support kitting and pre-assembly:
- Interactive Drag-and-Drop Map: The core idea is that your entire operation is a map. You divide the map into locations (buildings, floors, containers, tool cribs, trucks, etc.) that represent actual sites. Each location can hold inventory items. Moving items between locations is as simple as dragging them on the map. For example, if a kit of framing nails is transferred from the warehouse area to Level 1 – Staging, you can drag it there, instantly updating the counts. This visualization makes it easy to see where every kit or material box is at all times.
- Real-Time Visibility: Because CyberStockroom is cloud-based, all users see live data. If one supervisor checks out a tool kit to a foreman, everyone else’s view updates automatically. Crews can verify the map from any device and know that it reflects actual conditions on the ground. This real-time accuracy is crucial during fast-paced operations, so you avoid calls like “Where is the generator?” – you simply look at the map and see it’s in the supply container.
- Kit and Item Details: Each item or kit on the map can have a custom photo, description, and barcode. For instance, you might upload a photo of the exact connector or tool, so even non-experts can identify it. Assigning a barcode to a kit lets you scan it with a mobile device; the software will automatically select that kit in the map. This is perfect for complex kits: scanning the kit’s label brings up its inventory breakdown.
- Loss/Theft Prevention: Kitting goes hand-in-hand with accountability. CyberStockroom logs every activity – who scanned what and when. If a kit unexpectedly disappears, you can check the history to see who last handled it. Similarly, high-value prefab modules can be locked in location until needed, and any removal will trigger an audit check. These controls help deter theft or unauthorized usage of materials.
- Custom Reporting and Compliance: Each kit and material type can have custom fields (for example, project code, cost center, safety data sheet reference). CyberStockroom allows exporting inventory reports or printing labels, which is useful for compliance (e.g. tracking hazardous materials). You can see at a glance how many kits have been used, what’s left, and even attach photos or documents to specific items for reference.

In summary, CyberStockroom acts like a visual command center for site inventory. For material kitting and pre-assembly, this means:
- Planning and Staging: You can design the site layout in the map before work begins. Place the future staging zone and mark it with the kits that will arrive. When trucks show up, you drop the kits into that zone on the map to signify delivery.
- Execution: As kits are opened and items are used, the map stays updated. If an electrician walks away with an electrical kit for a wing of the building, dragging that kit from “Staging” to “Level 3 – Block A” reflects the transfer instantly.
- Coordination: All trades see the same map. If the framing crew has a full kit of lumber for tomorrow, that kit is shown in “Staging” green. The general contractor knows it’s ready to go.
- Accountability: Every tool and kit is tracked. Toolcrib managers can run inventory in real-time by just glancing at the map. They can answer “How many saws are checked out?” or “Do we have spare bolts for that deck kit?” in seconds.
- Adaptation: As project plans change, the map adjusts. If a scheduled floor pour is delayed, the concrete forms kit might sit in “Staging” a day longer. Once the pour is done, the kit can be reassigned to the next task area with a drag-and-drop.
Modern cloud inventory tools like CyberStockroom enable kitting and pre-assembly strategies to reach their full potential. By combining physical kit preparation with a clear digital picture of what’s on site, contractors can eliminate guesswork. Instead of calling around to find who has the last forklift or last box of fasteners, project managers see it visually and in real time.

Integrating CyberStockroom into Your Workflow
If you decide to use CyberStockroom or a similar system, here are a few tips to get started:
- Build Your Map Early: When a project kicks off, sketch out the main locations in CyberStockroom. This might mean creating a map of your yard, site office, scaffold, trailers, and each building level. Don’t wait – even a rough map helps anchor everything.
- Digitize Your Kit Lists: Take your kitting spreadsheets and import them. You can create a “Kit” item for each task and then attach sub-items (the kit components). Then upload these items in bulk. This saves manual entry and ensures your kits in the system match the planned lists.
- Train the Team: Spend a little time training supervisors and tool crib attendants. Show them how to “quick scan” kits in and out, how to adjust counts, and how to move items on the map. A short demo can save weeks of confusion later.
- Regular Updates: Encourage crews to update the system whenever they use a kit. For example, after a daily check, a crew lead might scan all items used that day. This habit keeps data accurate.
- Use Reports for Forecasting: At the end of each week, pull an inventory report from the system. Check which kits were depleted and which still have surplus. This helps in ordering the next phase’s materials more accurately (so you don’t overbuy next time).
- Emphasize the “One Truth” Principle: Everyone should trust the map. Decide that from this point on, the map is the master record. No more scribbled notes that someone might lose – if something is missing, update the map. This discipline makes the tool extremely powerful.
By following these steps, CyberStockroom becomes more than just software – it becomes the nerve center for your inventory. It ties the hands-on world of construction materials to a high-level digital overview, allowing instant decisions and clarity in a chaotic environment.
Challenges and Considerations

No system is perfect, and kitting/pre-assembly can face hurdles. Keep these in mind:
- Change Orders and Scope Creep: Construction plans change. If a kit was built for a task that gets canceled or altered, you must have a plan. You may need to repack kits for a different use or send them back to inventory. A flexible inventory map helps here: if a kit is no longer needed on Level 3, you can move it back to staging or adjust its contents easily.
- Kit Overhead: Prepping kits costs time and sometimes money upfront. Account for this in your planning. Usually the labor is repaid by the efficiency gained on site, but be sure to track that cost-benefit so you can justify continued use.
- Space Requirements: Staging multiple kits on site requires space. Ensure your site layout includes designated areas for kit storage and prefab components. If space is tight, consider leasing a larger laydown yard or using modular trailers to hold kits.
- Inventory Errors: Humans make mistakes. Even with scanning, items can be entered wrong or counts missed. Mitigate this by building redundancy (like double-checks on kit loads) and by doing periodic training refreshers. Over time, the system’s audit trail will help you spot chronic issues.
- Team Buy-in: New processes can meet resistance. Emphasize that kitting and mapping are meant to help crews, not add bureaucracy. Show quick wins (e.g., “Look how that tool was found immediately with this system!”). Celebrate time saved by the team thanks to kits and inventory visibility.
- Data Management: As project size grows, the inventory data can become large. Organize it with clear naming conventions (like including building and floor codes in kit names) so searches and reports stay manageable.
- Technology Learning Curve: Moving to a digital mapping system may take a bit of learning, especially for crews not used to it. Encourage a culture where everyone checks the map first if they need something. Use the mobile friendly interface – if all workers have a familiar smartphone/tablet, adoption will be smoother.
Anticipating these challenges ensures your kitting and pre-assembly efforts pay off. Most high-performing contractors find that after an initial learning period, the improved efficiency outweighs any early bumps.
Conclusion
Material kitting and pre-assembly are powerful strategies for any construction team looking to optimize inventory and workflow. By assembling parts in advance and delivering them as organized kits or modules, you can eliminate much of the chaos that slows projects down. Crews spend less time searching or waiting for supplies and more time building. Waste is cut, costs are contained, and schedules become more predictable.
However, successful kitting and pre-assembly rely on solid processes and the right tools. Planning each kit carefully, labeling everything clearly, and training crews are key on the human side. On the technology side, adopting a visual inventory management system like CyberStockroom turns inventory from static lists into a living map. With real-time visibility across every kit, toolbox, and staging area, project leaders gain unmatched control over materials.
For general contractors, site supervisors, and inventory managers today, the combination of lean logistics and digital tools is no longer optional – it’s a best practice. If you’re looking to streamline your sites, start by identifying the repetitive tasks on your next project and create kits for them. Draw out your site’s layout (even on paper) and imagine how kits move through the workflow. From there, explore software that can map this process for you.
In short: Keep everything you need – tools, parts, pre-built sections – grouped, labeled, and visible. The result will be fewer headaches, smoother daily operations, and projects that stay on track. Modern construction demands such efficiency. By mastering material kitting and pre-assembly – backed by intuitive inventory mapping – your teams will be building smarter, faster, and safer on every site.


Leave a comment